How to Take a Wrist Shot in Hockey: Mechanics Breakdown

Learning how to take a wrist shot in hockey comes down to one continuous sequence: puck position, weight transfer, and a wrist snap timed to the puck rolling along the blade. Here’s that sequence broken into mechanics you can actually practice and check yourself against.
A wrist shot generates power from weight transfer and a whipping wrist snap, not from winding up. Set the puck between the heel and middle of the blade, sweep it forward while rolling your weight onto your front foot, then snap your wrists through as the puck rolls toward the toe of the blade. The stick flexes and releases through that motion, which is what gives a good wrist shot both speed and accuracy without a big backswing to telegraph it.
The wrist shot is the shot you’ll use more than any other in a real game, because it’s fast to release and hard for a goalie to read. A slap shot needs room and time you rarely get in traffic. A wrist shot needs about a stick-length of space and can go from catching a pass to beating a goalie in under a second. Most players who say their wrist shot “has no pop” aren’t missing strength, they’re missing one or two specific pieces of the sequence below.
- →Power comes from weight transfer and wrist snap, not arm strength or a big windup
- →Puck starts between the heel and middle of the blade, not out near the toe
- →The puck should roll along the blade through the shot, ending near the toe at release
- →Your bottom hand slides down the shaft to add leverage; a hand that stays too high flattens the shot
- →Follow-through direction is your aim: the blade should finish pointing at the target, not off to the side
Table of Contents
Stance and grip before the puck even moves
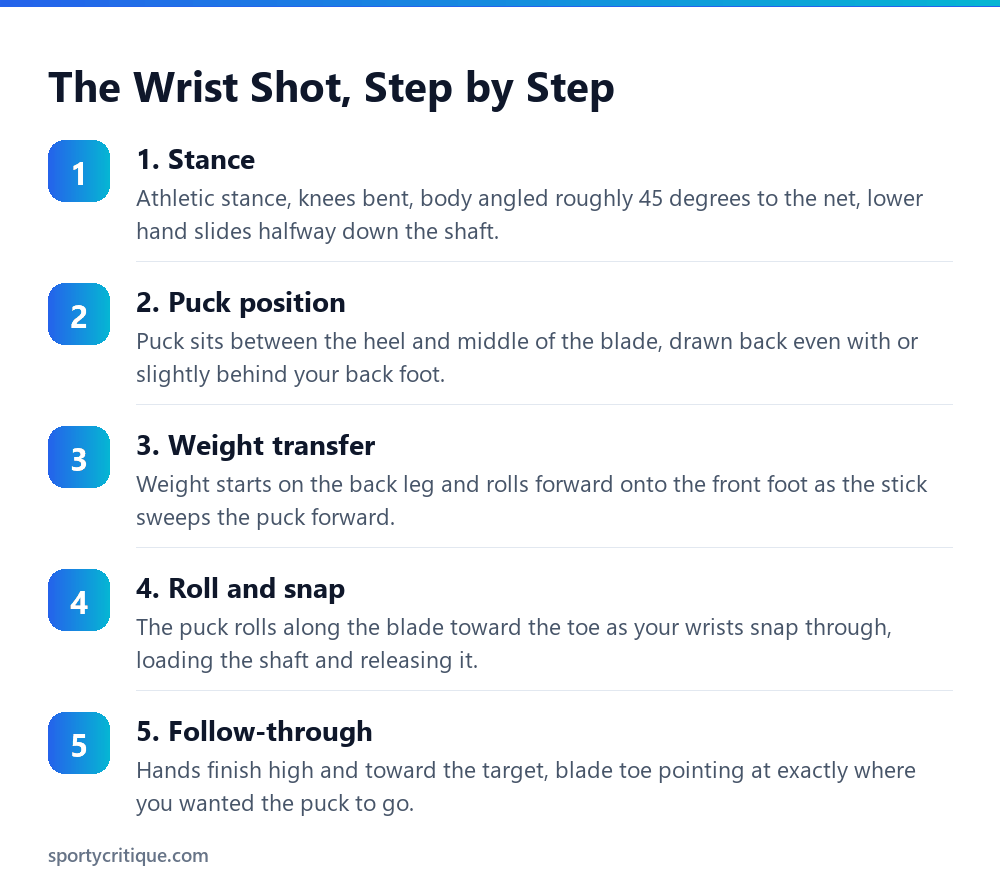
Start in an athletic stance, knees bent, weight balanced, body angled at roughly 45 degrees to the net rather than squared up to it. Squaring your shoulders directly at the goalie telegraphs the shot and gives you less rotation to generate power from. Your top hand stays near the top of the shaft as it normally would; your bottom hand slides down toward the middle, roughly halfway down the shaft, which gives you more leverage to flex the stick than you’d get gripping near the top.
This grip change is easy to skip when you’re rushing a shot in a game, and it’s one of the first things that disappears under pressure. Practice it deliberately in warmups until sliding your bottom hand down becomes automatic, because a wrist shot taken with your hands bunched together near the top of the stick loses most of its whip.
Puck position: the detail everyone gets wrong first
The puck should sit between the heel and the middle of the blade before you start the shot, not out near the toe. Bring it back roughly even with, or just behind, your back foot, lowering your back shoulder slightly as you reach down and back with the stick. This starting position is what lets the puck roll forward along the blade through the shot instead of just getting slapped off a fixed spot.
⚠️ Watch out: If you start with the puck near the toe of the blade, you’ve got nowhere for it to roll and you’ll end up pushing rather than shooting. This is the single most common reason a wrist shot feels weak even when the player is generating plenty of leg drive; the puck never gets the chance to load the blade.
Weight transfer and the sweep
Your weight starts on your back leg. As you sweep the puck forward, that weight rolls onto your front foot while your hips and shoulders rotate toward the target. This is the same kinetic-chain sequence that generates power in a golf swing or a baseball throw: legs and hips first, torso following, arms and wrists last. Players who try to generate a wrist shot from the arms alone are skipping the biggest power source in the whole motion.
The sweep itself should feel continuous, not choppy. You’re not stopping the puck partway through to reset your grip or your stance; the puck rolls from the heel toward the toe of the blade in one motion as your weight and rotation carry it forward.
The wrist snap and blade flex
As the puck reaches the middle-to-toe area of the blade, snap your wrists through the shot. This is what actually flexes the shaft, loading it briefly like a spring and releasing that stored energy into the puck as the blade straightens back out. It’s a fast, compact motion, not a big roundhouse wind of the wrists, and it happens in the same continuous sweep as the weight transfer rather than as a separate step you consciously pause for.
Composite sticks with a lower flex rating bend more easily and suit players who haven’t built the strength or technique to load a stiffer shaft yet; a stick with too high a flex number for your strength will feel like you’re shooting a broomstick, all snap and no load. This is worth knowing when you’re shopping for a stick, not just when you’re working on technique.
💡 Pro tip: A weighted training aid that clips onto your stick, like the Franklin Sports Ice Hockey Stick Weight Trainer, adds resistance to off-ice shooting reps so your wrists and forearms build the specific snap-through strength a wrist shot uses, rather than generic grip strength that doesn’t translate the same way.
Follow-through: your aim, not an afterthought
Where your hands and the blade toe finish is where the puck goes. A follow-through that ends low or off to the side, rather than up and toward the target, is telling you something about where the puck actually released, even if it doesn’t feel that way in the moment. Finish with your hands up near shoulder height and the toe of the blade pointed at your target, whether that’s a specific corner of the net or a passing lane.
Elevation comes from the angle of your blade at release and from rolling your wrists slightly open through the follow-through, not from scooping upward with your arms. Trying to muscle the puck up into the air usually costs you accuracy without adding real height.
Common mistakes that flatten a wrist shot
- ✓Slide the bottom hand down the shaft before starting the sweep
- ✓Start the puck between the heel and middle of the blade
- ✓Drive the shot with leg and hip rotation, then let the wrists snap last
- ✓Finish the follow-through pointed at your actual target
- ✕Keep both hands bunched near the top of the stick through the whole shot
- ✕Start with the puck out near the toe with nowhere to roll
- ✕Try to generate power from the arms and shoulders alone
- ✕Stop the motion abruptly at contact instead of following through
A simple drill to groove the sequence
Stand still with a puck and, without a full skating approach, walk through the five-step sequence above in slow motion: stance, puck position, sweep with weight transfer, wrist snap, follow-through. Do this at half speed for a set of ten, focusing only on the sequence, before adding any real pace. Once the order feels automatic, add a few strides into a small approach before the shot, then progress to shooting off a pass rather than a stationary puck, which is closer to how the shot actually happens in a game.
📊 Note: Shooting off a pass is a different skill from shooting off a stationary puck, since you’re receiving the puck and starting the sequence in the same motion. If your wrist shot feels solid in a stationary drill but falls apart off a pass, that’s specifically a puck-reception issue, not a shooting-mechanics issue, and it’s worth isolating in practice separately.
Aiming: glove side, blocker side, and the five-hole
Once the mechanics are solid, where you aim matters as much as how hard you shoot. Low glove side is a common target because most goalies drop into a butterfly and their glove hand is occupied covering the top of the net rather than reacting to a low shot on that side. High blocker side works when a goalie is cheating toward the glove side or dropping early, since the blocker hand tends to be slower reacting to a quick, high release. The five-hole, between the pads, is the most obvious target and the one goalies train hardest to close, so it works best off a quick release before the goalie fully sets rather than as a first option from a set position.
Picking a target before you shoot, rather than deciding mid-motion, keeps your follow-through consistent. Players who scan the net during the shot itself tend to pull their release off-target because the follow-through direction changes with where their eyes go. Decide, then execute the sequence you’ve already grooved.
Off-ice practice and what actually transfers
Shooting pucks or balls in a driveway or basement builds the mechanical sequence, puck position, weight transfer, wrist snap, follow-through, and that part genuinely transfers to the ice. What doesn’t transfer as directly is the balance and edge work involved in shooting while skating at game speed, since a synthetic surface or a flat floor doesn’t test the same stability your skates need to hold through the weight transfer. Treat off-ice reps as mechanics practice, not a full substitute for shooting while moving on the ice.
A shooting pad or synthetic ice tile reduces friction closer to real ice and is worth the investment if you’re doing serious volume at home, since shooting off bare concrete or wood changes how the puck releases off your blade compared to a lower-friction surface.
Bottom line
A good wrist shot is a sequence, not a single motion: puck position, weight transfer, wrist snap, and follow-through, in that order, happening as one continuous action rather than four separate steps. Most players who feel stuck are missing one specific link in that chain, usually puck position or the bottom-hand slide, rather than lacking raw strength. Fix the sequence first and the power tends to show up on its own.
Why does my wrist shot feel weak even though I’m strong?
Power in a wrist shot comes from weight transfer and wrist snap timed with the puck rolling along the blade, not from arm strength. Check your puck starting position first, out near the toe with nowhere to roll is the most common cause of a flat, weak-feeling shot regardless of how strong you are.
Where should the puck start for a wrist shot?
Between the heel and middle of the blade, drawn back roughly even with or just behind your back foot. Starting further out near the toe removes the room the puck needs to roll forward through the shot.
Does a stiffer hockey stick make a harder wrist shot?
Only if your strength and technique can actually flex it. A flex rating too high for the player won’t load properly and can make the shot weaker and less accurate, not stronger. Match the flex to your own strength rather than picking the stiffest option available.
How is a wrist shot different from a snap shot?
A wrist shot uses a longer sweeping motion with the puck rolling along the blade from heel to toe. A snap shot is a shorter, quicker motion that starts with the puck already further forward and uses a quick stick-tap-and-release action, trading some power for an even faster release.
As an Amazon Associate, we earn from qualifying purchases through links on this page.