To keep a JAR file running on an AWS server, use a few simple steps. First, ensure your server is set up correctly and then manage the JAR file efficiently.
Running JAR files on AWS servers is common for developers who need their applications to be always available. By using AWS, you can maintain the performance and reliability of your Java applications. This guide will help you understand the necessary steps to keep your JAR file running smoothly on an AWS server.
From setting up the environment to managing the process, we’ll cover everything you need to know. Let’s get started and ensure your application runs seamlessly on AWS.
Credit: www.theserverside.com
Setting Up Aws Environment
Setting up an AWS environment is crucial for running your jar file. AWS provides scalable and reliable cloud services. This guide will help you create an AWS account and configure IAM roles. Following these steps ensures a smooth setup.
Creating An Aws Account
First, visit the AWS website. Click on ‘Create an AWS Account’. Fill in your email address and choose a password. AWS will ask for payment information. Don’t worry, you only pay for what you use. Verify your phone number for security. Your AWS account is now ready.
Configuring Iam Roles
Sign in to the AWS Management Console. Go to the IAM (Identity and Access Management) service. Click on ‘Roles’ in the sidebar. Choose ‘Create Role’. Select ‘AWS service’ and then ‘EC2’. Click ‘Next: Permissions’. Attach the necessary policies. For example, ‘AmazonS3FullAccess’ if your jar file uses S3. Click ‘Next: Tags’. Add any tags if needed. Click ‘Next: Review’. Name your role and click ‘Create Role’. Your IAM role is now configured.
Uploading Jar File
Uploading a Jar file to an AWS server is essential for running Java applications. This process involves preparing the Jar file and using AWS S3 for storage. Follow these steps to ensure your Jar file is uploaded correctly.
Preparing Your Jar File
First, ensure your Jar file is ready for deployment. Compile your Java code and package it into a Jar file using your favorite build tool. Common tools include Maven or Gradle. Make sure the Jar file includes all necessary dependencies.
Next, double-check your Jar file. Confirm it runs correctly on your local machine. This step helps avoid potential issues during deployment.
Using Aws S3 For Storage
Storing your Jar file in AWS S3 provides a reliable and scalable solution. Start by logging into your AWS Management Console. Navigate to the S3 service.
Create a new bucket or select an existing one. Upload your Jar file to this bucket. Use the “Upload” button and follow the prompts.
After uploading, set appropriate permissions. Ensure your application can access the Jar file. You can manage permissions through the S3 console.
Finally, note the S3 URL of your Jar file. You will need this URL for further steps in your deployment process.
Launching An Ec2 Instance
Launching an EC2 instance in AWS is a crucial step for running your Jar file. This guide will help you set up the instance correctly. We will cover two essential aspects: choosing the right instance type and configuring security groups.
Choosing The Right Instance Type
Choosing the right instance type is vital for performance and cost. AWS offers various instance types, each with different CPU, memory, and storage options.
| Instance Type | vCPUs | Memory (GiB) | Storage |
|---|---|---|---|
| t2.micro | 1 | 1 | EBS Only |
| t2.small | 1 | 2 | EBS Only |
| t3.medium | 2 | 4 | EBS Only |
For running a Jar file, a t2.micro or t2.small instance is usually enough. Consider the memory and CPU needs of your application.
Configuring Security Groups
Security groups control the traffic to your instance. Proper configuration ensures your server is secure.
- Go to the EC2 dashboard.
- Select Security Groups from the left menu.
- Click Create Security Group.
- Enter a name and description.
- Under Inbound Rules, click Add Rule.
- Choose Custom TCP Rule.
- Set Port Range to 8080 (or your desired port).
- Set Source to
0.0.0.0/0for public access. - Click Create.
Configuring these rules allows your instance to receive traffic on the specified ports. Ensure to monitor and update security groups as needed.
Running The Jar File
Keeping your jar file running on an AWS server is essential for your application. This step-by-step guide will help you in connecting to your EC2 instance and executing the jar file with ease.
Connecting To Your Ec2 Instance
First, you need to connect to your EC2 instance. This can be done using SSH.
- Open your terminal or command prompt.
- Use the following command:
ssh -i "your-key.pem" ec2-user@your-ec2-public-dnsReplace “your-key.pem” with your key file and your-ec2-public-dns with your EC2 instance’s public DNS address. This command will log you into your EC2 instance.
Executing The Jar File
Once connected, navigate to the directory where your jar file is located.
- Change the directory using:
cd /path-to-your-jar-file/Ensure you are in the correct directory. Now, execute the jar file using the following command:
java -jar your-application.jarReplace your-application.jar with the name of your jar file. Your application should now be running. Monitor the output in the terminal to check if it is working correctly.
| Step | Command | Description |
|---|---|---|
| 1 | ssh -i "your-key.pem" ec2-user@your-ec2-public-dns |
Connect to your EC2 instance |
| 2 | cd /path-to-your-jar-file/ |
Navigate to the jar file directory |
| 3 | java -jar your-application.jar |
Execute the jar file |
Make sure to keep the terminal open to keep the application running. If you close the terminal, the application will stop.
Automating Jar File Execution
Keeping a Jar file running on an AWS server can seem challenging. Automating the execution of your Jar file simplifies this task. Automation ensures your application runs without manual intervention. This guide will cover two methods: Using Systemd and creating a Cron Job.
Using Systemd For Automation
Systemd is a system and service manager for Linux. It is efficient for automating tasks. To automate your Jar file with Systemd, follow these steps:
First, create a service file in the /etc/systemd/system directory. Use the .service extension. For example, myapp.service.
[Unit]
Description=My Java Application

[Service]
ExecStart=/usr/bin/java -jar /path/to/yourfile.jar
SuccessExitStatus=143
User=yourusername
Restart=on-failure
RestartSec=10

[Install]
WantedBy=multi-user.target
Save and close the file. Then, reload the Systemd manager configuration with sudo systemctl daemon-reload. Enable your service with sudo systemctl enable myapp.service. Start your service with sudo systemctl start myapp.service. Your Jar file will now run automatically.
Creating A Cron Job
Cron jobs are scheduled tasks in Unix-based systems. They are simple to set up and use. To create a cron job for your Jar file, open the crontab with crontab -e.
Add a new line to the crontab file:
/usr/bin/java -jar /path/to/yourfile.jar >/dev/null 2>&1This example runs the Jar file every minute. Adjust the schedule as needed. Save and close the crontab file. Your Jar file will now run based on your schedule.
Both methods ensure your Jar file runs smoothly on an AWS server. Choose the one that best fits your needs.
Monitoring And Maintenance
Monitoring and maintenance are crucial to keep your Jar file running smoothly on an AWS server. Effective monitoring ensures that you catch problems early. Regular maintenance helps prevent unexpected downtime. This section will guide you through the essentials of monitoring and maintaining your AWS server.
Setting Up Cloudwatch Alarms
CloudWatch Alarms help you stay informed about your server’s health. They alert you to potential issues before they become critical. To set up an alarm, navigate to the CloudWatch console. Choose the metrics you want to monitor, like CPU usage or memory. Set thresholds for these metrics. If a threshold is crossed, CloudWatch will send an alert. You can receive alerts via email or SMS. This immediate notification lets you take quick action.
Regular Instance Health Checks
Regular health checks ensure your instances are running optimally. Go to the EC2 dashboard to perform a health check. Check the status of your instances. Look for any warning signs like high CPU utilization. Restart instances if necessary. Schedule these checks weekly or bi-weekly. Regular checks can prevent minor issues from becoming major problems.
Best Practices
Keeping your JAR file running smoothly on an AWS server requires following some best practices. These practices ensure optimal performance, security, and compliance. Below, we discuss how to achieve this.
Optimizing Resource Usage
Efficient resource usage is crucial for maintaining performance and cost-effectiveness. Here are some tips:
- Choose the right instance type: Match your instance type to your workload needs. For lightweight applications, a t2.micro instance might suffice. For heavier loads, consider a c5.large instance.
- Auto-scaling: Use AWS Auto Scaling to adjust your instance count based on demand. This helps manage costs and ensures high availability.
- Monitor performance: Regularly monitor CPU, memory, and I/O usage with CloudWatch. Set alarms to detect and respond to performance issues quickly.
Ensuring Security And Compliance
Security and compliance are non-negotiable. Follow these practices to keep your JAR file secure:
- IAM roles and policies: Use Identity and Access Management (IAM) roles to control access to your AWS resources. Ensure least privilege access.
- Encrypt data: Encrypt data at rest and in transit using AWS Key Management Service (KMS). This protects your data from unauthorized access.
- Regular updates: Keep your software and dependencies up to date. Apply security patches as soon as they are available.
By adhering to these best practices, you can ensure your JAR file runs efficiently and securely on AWS. Regular monitoring and updates are key to maintaining optimal performance and compliance.
Credit: www.coretechnologies.com
Troubleshooting Common Issues
Keeping your Jar file running on an AWS server can sometimes be challenging. There are a few common issues that you might encounter. This section will guide you through troubleshooting some of these issues.
Handling Connection Problems
Connection problems can often stop your Jar file from running smoothly. These issues usually stem from incorrect network configurations.
- Check your security groups and ensure they allow traffic on the necessary ports.
- Make sure your EC2 instance has the right permissions and access settings.
If you are using a database, verify your database connection strings. Ensure they match your AWS RDS settings. Incorrect strings can cause connection failures. Additionally, check for any IP restrictions that might block your instance.
Debugging Jar File Errors
Jar file errors can sometimes be tricky. Here are steps to identify and solve them:
- Check the Logs: AWS CloudWatch can help you monitor and log your application’s activity. Look for error messages or stack traces.
- Verify Dependencies: Ensure all required libraries and dependencies are included. Missing dependencies often cause runtime errors.
- Memory Allocation: Allocate enough memory to your Java application. Use the
-Xmsand-Xmxflags to set the initial and maximum heap sizes.
Another common issue is the Java version mismatch. Ensure the Java version on your local machine matches the version on the AWS server. This can prevent compatibility issues.
| Issue | Solution |
|---|---|
| Connection Timeout | Check security groups and network configurations. |
| Missing Dependencies | Verify and include all required libraries. |
| Memory Errors | Adjust memory settings using -Xms and -Xmx flags. |
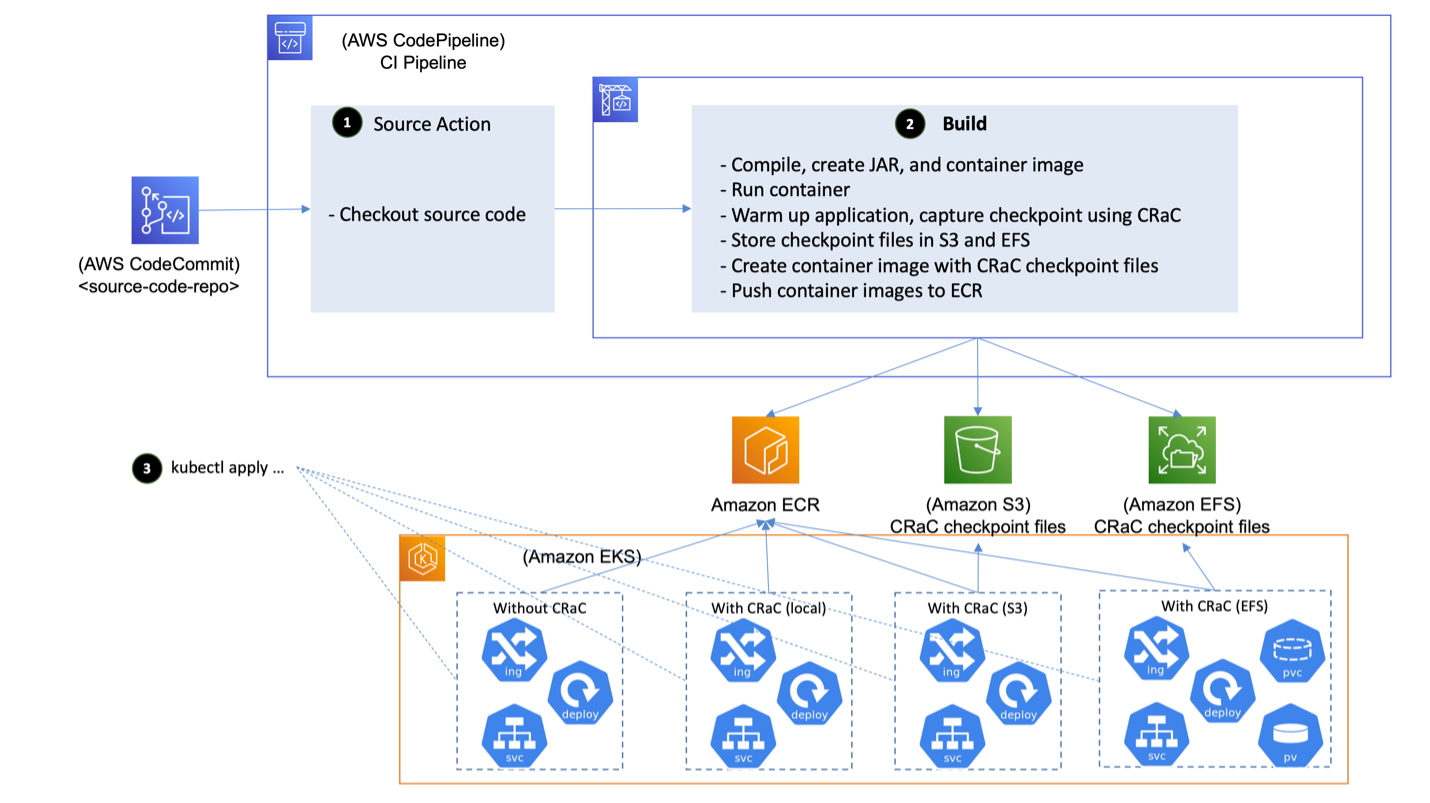
Credit: aws.amazon.com
Frequently Asked Questions
How To Run A Jar File On Aws?
To run a JAR file on AWS, first, upload it to an EC2 instance. Then, use the command `java -jar yourfile. jar` to execute it.
Can I Keep A Jar File Running Continuously?
Yes, use a service like `systemd` or `nohup` to keep the JAR file running continuously on your AWS server.
What Aws Services Support Jar Files?
AWS EC2 and AWS Elastic Beanstalk support running JAR files. EC2 offers more control, while Elastic Beanstalk manages the infrastructure.
How To Troubleshoot Jar File Issues On Aws?
Check the logs for error messages. Ensure Java is installed and the correct version is being used. Verify all dependencies are included.
Conclusion
Keeping a jar file running on an AWS server is easy. Follow the steps carefully. Use proper configurations and commands. Regularly monitor your server’s performance. This ensures smooth operation. Troubleshoot any issues promptly. Stay updated with AWS best practices. Secure your server for safety.
Consistent maintenance is key. With these tips, your jar file will run efficiently. Happy hosting!

