How to Check Apache Running on Linux Ubuntu: Quick & Easy Guide
Checking if Apache is running on Linux Ubuntu is straightforward. Use simple commands to verify its status.
Apache is a popular web server for hosting websites. Ensuring it runs correctly on your Linux Ubuntu system is crucial. In this guide, you’ll learn how to check if Apache is running and troubleshoot any issues. This process involves using command-line tools that help you manage your server effectively.
Whether you’re a beginner or an experienced user, this step-by-step guide will make it easy. Keep reading to ensure your Apache server is running smoothly on your Ubuntu machine.
Credit: www.tecmint.com
Prerequisites
Before checking if Apache is running on your Linux Ubuntu system, ensure you meet certain prerequisites. These prerequisites help in avoiding any potential issues during the process.
System Requirements
Make sure your system meets the minimum requirements to run Apache smoothly. Here is a quick checklist:
- Ubuntu 16.04 or later
- At least 512 MB of RAM
- 500 MB of free disk space
These requirements ensure that your system can handle Apache’s workload without issues.
Basic Knowledge
A basic understanding of Linux commands is essential. You should know how to open and use the terminal. Familiarity with commands like cd, ls, and sudo is helpful.
Here are a few commands you might need:
| Command | Description |
|---|---|
sudo |
Runs commands with superuser privileges |
systemctl |
Manages system services |
Knowing these basics will make the process smoother and less confusing.
Check Apache Status
To ensure your Apache server is running smoothly on Linux Ubuntu, you need to check its status regularly. This can help you troubleshoot issues and maintain a healthy server environment. In this section, we will discuss how to check the status of Apache using the systemctl command and how to interpret the output.
systemctl Command
The systemctl command is a powerful tool for managing services on Linux systems. To check the status of the Apache service, open your terminal and type the following command:
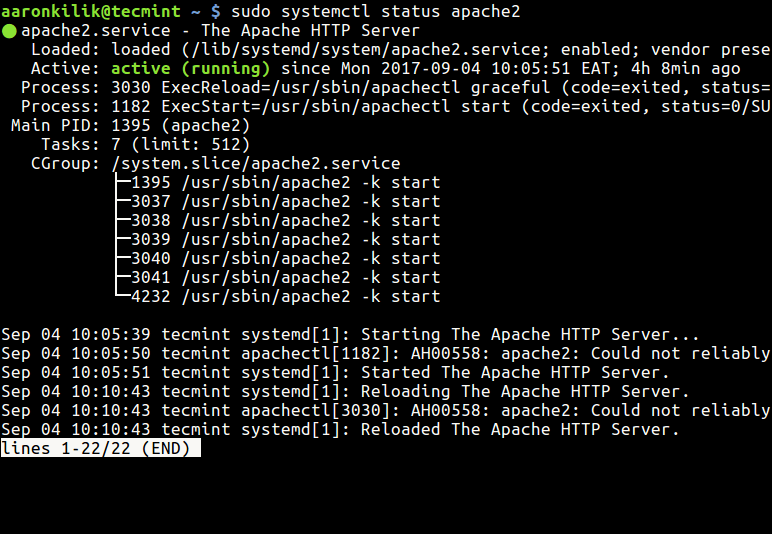
sudo systemctl status apache2This command will provide you with detailed information about the current state of the Apache server.
Interpreting The Output
Once you run the command, you will see an output that looks like this:
● apache2.service - The Apache HTTP Server
   Loaded: loaded (/lib/systemd/system/apache2.service; enabled; vendor preset: enabled)
   Active: active (running) since Tue 2023-10-17 10:20:30 UTC; 2h 15min ago
 Main PID: 1234 (apache2)
    Tasks: 55 (limit: 4915)
   CGroup: /system.slice/apache2.service
           ├─1234 /usr/sbin/apache2 -k start
           ├─1235 /usr/sbin/apache2 -k start
           └─1236 /usr/sbin/apache2 -k start
Here are the key elements you need to understand:
- Loaded: This line shows if the service is properly loaded.
- Active: Indicates whether the service is running or not. Look for
active (running). - Main PID: Displays the process ID of the main Apache process.
- Tasks: The number of tasks currently being handled by Apache.
- CGroup: Shows the control group and the processes within it.
If you see active (running), your Apache server is running correctly. If not, you may need to restart the service or check the logs for errors.
Verify Apache Processes
To ensure your Apache server is running smoothly on your Linux Ubuntu system, it’s crucial to verify the Apache processes. This step helps confirm that the server is active and functioning correctly. Below, we explore two effective methods to check Apache processes: using the ps command and the top command.
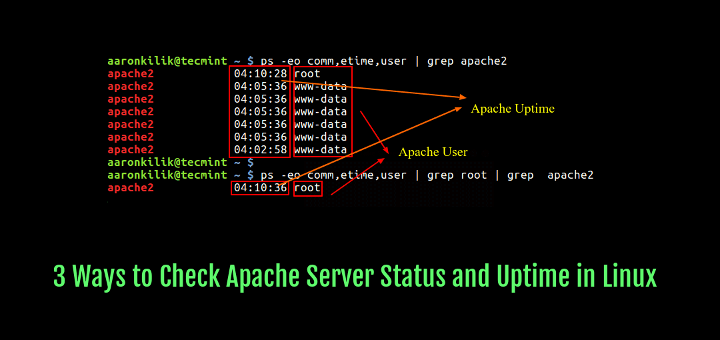
Using Ps Command
The ps command is a simple yet powerful tool. It displays information about active processes on your system.
ps -aux | grep apache2This command shows a list of all processes with the name ‘apache2’. Look for lines that indicate Apache is running. This method is quick and easy, giving you a snapshot of Apache’s status.
Using Top Command
The top command provides a dynamic, real-time view of all running processes. It is an excellent tool for monitoring system activity.
topIn the list of processes, search for entries labeled ‘apache2’. This command continuously updates, offering a live view of Apache’s performance. Use this to monitor resource usage and ensure your server runs efficiently.
Both methods are essential for maintaining your Apache server. Regularly verifying Apache processes helps prevent downtime and ensures a smooth operation.
Checking Apache Ports
Ensuring Apache runs smoothly involves checking the ports it uses. This helps confirm if Apache is active and which ports it listens to. Two effective ways to check Apache ports on Linux Ubuntu are using the netstat and ss commands. Both commands offer insights into network connections and listening ports.
Using Netstat Command
The netstat command is a powerful network tool. It shows network connections and listening ports. To check Apache ports, open your terminal. Type the following command:
sudo netstat -tuln | grep ':80\|:443'This command lists services listening on ports 80 and 443. Apache usually uses these ports. If Apache is running, you will see its process details.
Using Ss Command
The ss command is another useful tool. It displays socket statistics. It is faster and more informative than netstat. To check Apache ports with ss, open your terminal. Type the following command:
sudo ss -tuln | grep ':80\|:443'This command filters the output to show only ports 80 and 443. You will see details about processes listening on these ports. If Apache is running, it will be listed here.
Apache Configuration Files
The Apache web server is a powerful tool for hosting websites. It is essential to understand its configuration files to ensure it runs smoothly. These files control the behavior of the Apache server. Proper knowledge of these files helps in troubleshooting and optimizing performance.
Locating Configuration Files
Apache’s main configuration file is /etc/apache2/apache2.conf. This file contains the primary settings for your server. Other important files include:
/etc/apache2/ports.conf– Defines the ports Apache listens on./etc/apache2/sites-available/– Contains configuration files for individual sites./etc/apache2/sites-enabled/– Links to the active site configurations.
Use the following command to open the main configuration file:
sudo nano /etc/apache2/apache2.confChecking Syntax And Errors
It is crucial to check the syntax of your Apache configuration files. This ensures there are no errors that could prevent Apache from running. Use the following command to check the syntax:
sudo apache2ctl configtestIf there are no syntax errors, you will see:
Syntax OKIf errors are found, the command will output details. This helps you identify and fix the issues.
Log files are another important resource for troubleshooting. The main log files are:
/var/log/apache2/error.log– Contains error messages./var/log/apache2/access.log– Tracks access requests.
Check these files regularly to monitor your server’s health.

Credit: webhostinggeeks.com
Restarting Apache
Restarting Apache on Linux Ubuntu is crucial for applying new configurations. It ensures the web server runs smoothly without disruptions. This step is simple but essential.
Using Systemctl Command
To restart Apache, use the systemctl command. Open your terminal. Type the following command:
sudo systemctl restart apache2Press Enter. This command stops and then starts the Apache service. It helps apply changes without rebooting the entire system.
Confirming The Restart
After restarting, confirm the Apache server is running. Use the following command:
sudo systemctl status apache2Check the output. Look for the status “active (running)”. This confirms Apache restarted successfully. If there are issues, the output will show error messages. Address these errors to ensure Apache runs smoothly.
Troubleshooting
Troubleshooting Apache on your Linux Ubuntu system can seem daunting. Sometimes, things don’t work as expected. Knowing how to identify and fix issues is crucial. Here, we’ll look at common issues and useful logs to help you troubleshoot effectively.
Common Issues
Apache might not start due to configuration errors. Check for syntax errors in the configuration files. Missing modules can also cause problems. Ensure all required modules are enabled.
Sometimes, port conflicts arise. Apache uses port 80 by default. Verify no other service is using this port. If needed, change the port number in the configuration file.
Permissions can cause Apache to fail. Ensure the Apache user has the correct permissions. Check file and directory permissions to confirm they are set correctly.
Useful Logs
Logs are your best friend in troubleshooting. Apache logs provide detailed error messages. They help pinpoint the exact issue. Access logs show incoming requests. Error logs show problems Apache encounters.
Check the error log file at /var/log/apache2/error.log. Look for recent entries. They often contain clues about what went wrong. The access log file is at /var/log/apache2/access.log. It shows all requests made to your server.
Use the tail command to view the latest log entries. Run tail -f /var/log/apache2/error.log to monitor the error log in real-time. This helps you see issues as they occur.
Credit: www.tecmint.com
Frequently Asked Questions
How To Check Apache Status On Ubuntu?
You can check Apache status by running `sudo systemctl status apache2` in the terminal. It shows whether Apache is active or not.
What Command To Restart Apache?
To restart Apache, use `sudo systemctl restart apache2`. This command stops and then starts the Apache service.
How To Start Apache On Boot?
Ensure Apache starts on boot by using `sudo systemctl enable apache2`. This command enables the Apache service to start automatically on boot.
How To View Apache Error Logs?
View Apache error logs by accessing `/var/log/apache2/error. log`. Use the `cat` or `less` command to read the log file.
Conclusion
Checking if Apache is running on Linux Ubuntu is straightforward. Use simple commands. Verify the status with `systemctl status apache2`. Ensure it’s active and running. Restart the service if needed. Regular monitoring keeps your server healthy. Stay informed of any issues.
This helps maintain smooth operations. Follow these steps for a hassle-free check. Keep your Apache server running efficiently on Linux Ubuntu.