Drawing an ice hockey player might seem challenging. But with some guidance, you can do it!
Ice hockey players are dynamic, full of energy, and fun to draw. This guide will show you, step by step, how to sketch one. Whether you’re a beginner or have some drawing experience, you’ll find this process simple and enjoyable.
From the helmet to the skates, capturing an ice hockey player’s essence is all about breaking it down into parts. Ready to bring your ice hockey player to life on paper? Let’s get started!
Materials Needed
Drawing an ice hockey player can be a fun and rewarding experience. Before you start, gather all the necessary materials. Having the right tools will make the process smoother and more enjoyable. Below, you will find a list of essential materials needed to get started.
Drawing Tools
To create a detailed and realistic drawing, you need the right drawing tools. Here is a list of essential items:
- Pencils: Use different grades, such as HB, 2B, and 4B, for various shades and details.
- Erasers: A kneaded eraser is perfect for lightening areas without leaving residue.
- Paper: Choose smooth, high-quality drawing paper for clean lines.
- Ruler: Helps in drawing straight lines and maintaining proportions.
- Sharpener: Keep your pencils sharp for fine details.
Reference Images
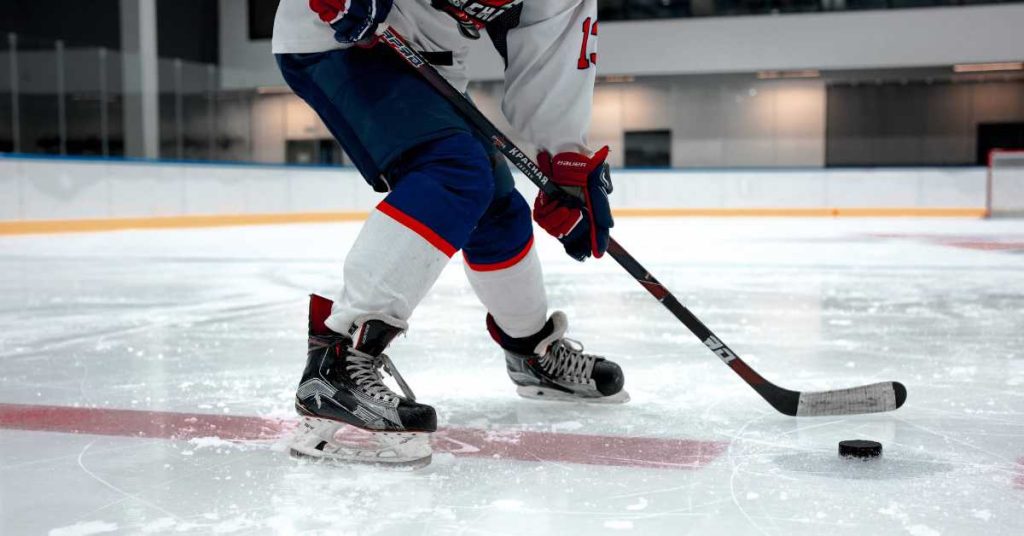
Having good reference images is crucial for accuracy. Here are some tips for selecting the best images:
- High Resolution: Choose images with high clarity to see details.
- Different Angles: Look for pictures from various angles to understand the player’s posture.
- Action Shots: Images capturing the player in motion add dynamism to your drawing.
- Uniform Details: Ensure the images show the uniform details like logos and numbers.
With these materials, you are well-equipped to start drawing your ice hockey player. Good luck, and enjoy the process!
Basic Shapes
Drawing an ice hockey player starts with understanding the basic shapes. These shapes help create a strong foundation. This makes the drawing process easier and more accurate. Let’s break down the basic shapes used for the head, body, limbs, and stick.
Head And Body
Begin with the head. Draw a circle for the head. This will help you get the proportions right. Below the head, draw an oval shape for the body. This oval will represent the player’s torso. The head and body are the two main parts of your drawing.
Ensure the head is smaller than the body to keep it realistic. Draw a line through the center of the head and body. This line will help align the features and limbs correctly.
Limbs And Stick
Next, draw the limbs. Use simple lines for the arms and legs. Draw two lines extending from the top of the body for the arms. The legs should extend from the bottom of the body. These lines will be your guide for the final shapes of the limbs.
Now, add the stick. Draw a long, straight line extending from one of the hands. This line represents the hockey stick. Make sure the stick is proportional to the player’s body. The stick should appear to be held firmly.
With these basic shapes, you have the foundation of your ice hockey player. Next steps involve adding details and refining the shapes to bring your drawing to life.
Outline The Body
To draw an ice hockey player, first outline the body. This step gives a strong foundation for your drawing. Start with basic shapes to capture the posture and movement. Focus on proportions to ensure the player looks realistic.
Torso And Arms
Begin with the torso. Draw an oval shape for the chest. This part should be wide, reflecting the player’s protective gear. Below it, sketch a smaller oval for the abdomen. Connect these shapes with smooth lines.
Next, draw the arms. Start with the shoulders, using small circles at the top of the chest. From each shoulder, draw two lines for the upper arms. Then, sketch the elbows as small circles. Extend lines down for the lower arms. Remember, the arms should look muscular and strong.
Draw the hands gripping the hockey stick. Use simple shapes for the fingers and the stick. Make sure the hands are in proportion to the arms.
Legs And Feet
Now, outline the legs. Start with the upper legs. Draw two lines extending from the bottom of the torso. Add circles for the knees.
From the knees, sketch the lower legs. These should taper down to the ankles. Remember to show the padding and gear. Use small details to indicate the knee pads and shin guards.
Finally, draw the feet. Use simple shapes to represent the skates. Make sure they are proportional to the rest of the body. The feet should point slightly outward, giving a realistic stance.
By outlining the body, you set a solid base for your drawing. This step ensures the proportions are correct and the player looks dynamic. Keep your lines light and simple. You’ll refine them in the next steps.

Credit: russianmachineneverbreaks.com
Add Details To The Face
Adding details to the face of your ice hockey player brings your drawing to life. This step involves fine-tuning the helmet, visor, and facial features. Each element adds character and realism to your artwork. Let’s break down the process into simpler steps.
Helmet And Visor
Start by sketching the outline of the helmet. The helmet should fit snugly around the head. Add the ear protectors on both sides. Next, draw the visor in the front. The visor covers the eyes and part of the nose. It should look slightly curved to show its shape. Add small details like screws and padding lines. These details make the helmet look realistic.
Facial Features
Now, focus on the facial features visible under the helmet. Draw the eyes beneath the visor. Make them expressive. Add the eyebrows above the eyes. The nose should be simple, just a few lines. Sketch the mouth, showing a determined expression. Don’t forget the chin strap of the helmet. These features add personality to your ice hockey player. Keep your lines clean and simple for a more polished look.
Draw The Uniform
Creating an ice hockey player’s uniform is an exciting step in your drawing. The uniform brings character and realism to your sketch. Pay close attention to the details of the jersey, pads, gloves, and pants. Each piece is essential to the player’s look and functionality.
Jersey And Pads
Start by drawing the jersey. Hockey jerseys are loose and baggy. This helps with movement. Draw the sleeves wide and flowing. Add the team’s logo on the front. Jerseys also have numbers on the back and shoulders. Draw these large and clear. Don’t forget the player’s name above the number on the back.
Next, draw the pads. Hockey players wear pads under their jerseys. Shoulder pads give the player a bulky look. Draw these under the jersey, making the shoulders appear rounded. Elbow pads are less visible but essential. Show a slight bulge at the elbows to represent these pads.
Gloves And Pants
Hockey players wear thick, protective gloves. Draw the gloves with extra padding. This padding is visible on the back of the hand and fingers. Add lines to show the different sections of the gloves. The palms are usually a different color or material. Show this in your drawing.
Next, draw the player’s pants. Hockey pants are short but bulky. They cover the thighs and hips. Draw the pants wider at the top and tapering down. Add pads on the sides and front. These pads protect the player’s thighs and hips. The pants also have a belt at the top. Draw this belt with a buckle in the front.
With these details, your ice hockey player will look ready to hit the ice. Take your time to ensure accuracy and detail in the uniform. Happy drawing!
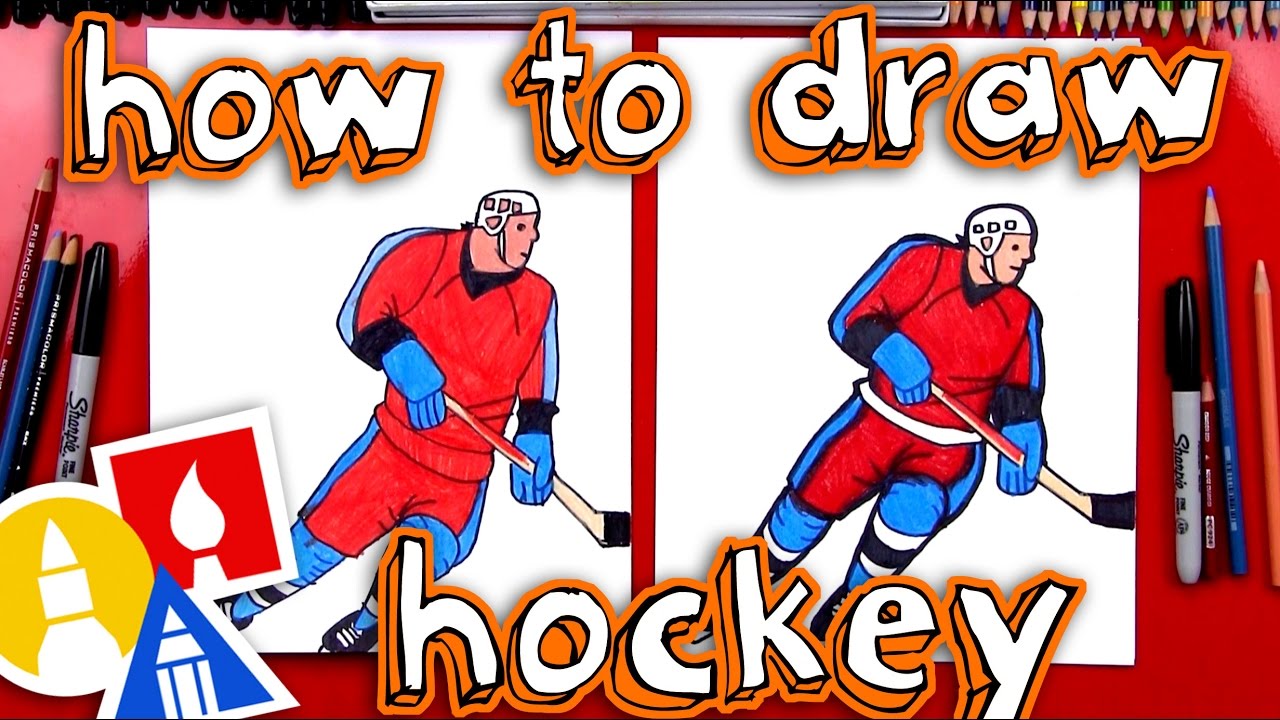
Credit: www.youtube.com
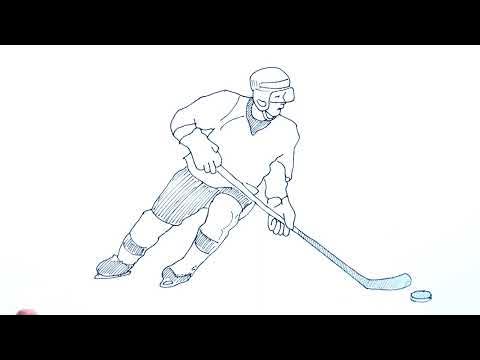
Sketch The Equipment
Sketching the equipment of an ice hockey player is essential. It gives your drawing authenticity and depth. Focus on the details of the hockey stick and skates. These are the key pieces of equipment that every player uses. Let’s dive into how to draw them.
Hockey Stick
The hockey stick is a vital part of the player’s gear. Begin with a long, slightly curved line to represent the shaft. The curve should be gentle. This mimics the real shape of a hockey stick.
Next, draw the blade at the end of the shaft. The blade should be flat and slightly angled. Ensure it is wider than the shaft. Add a few lines to show the tape on the handle. This adds realism and detail to your sketch.
Skates
Ice hockey skates are unique and crucial for the player. Start with an oval shape for the boot of the skate. The boot should be snug and high to protect the ankle.
Draw the blade underneath the boot. It should be thin and slightly curved. Add small details like laces and eyelets on the boot. These features make your drawing more realistic.
Remember to show the thickness of the boot. This gives the skate a three-dimensional look. The blade should be sharp and distinct. This emphasizes its importance in the sport.
Add Final Touches
Adding final touches to your ice hockey player drawing can make a big difference. These small details bring your art to life. They give it depth, texture, and realism. In this section, we will focus on shading and texture, and fine lines.
Shading And Texture
Shading adds depth. It makes your drawing look more three-dimensional. Start by identifying the light source. This will help you decide where the shadows fall. Use a softer pencil for the shadows. Press lightly at first. You can always make it darker later. Create texture on the jersey and equipment. Short, quick strokes work best for this. Pay attention to the direction of the fabric. This adds realism to the drawing.
Fine Lines
Fine lines are essential for detailing. They define the edges and small features. Use a sharp pencil for this. Outline the helmet, skates, and stick. Make sure the lines are clean and precise. Add details to the face and gloves. Thin lines can show wrinkles and seams. They make the drawing look more realistic. Don’t forget the ice surface. Light lines can suggest movement and speed. These small touches add a lot to the overall effect.

Credit: www.drawingtutorials101.com
Coloring Tips
Coloring your ice hockey player drawing can bring it to life. Let’s explore some tips to make your colors pop and look realistic.
Choosing Colors
Choosing the right colors is crucial. Start with basic colors like blue, red, and white for the uniform. These are common colors for ice hockey jerseys.
- Blue: Often used for jerseys and pants.
- Red: Great for accents and logos.
- White: Perfect for highlights and details.
Don’t forget the skin tone for the player’s face and hands. Use brown or black for the hockey stick and skates. These colors are typically seen in real-life hockey gear.
Blending Techniques
Blending colors can add depth to your drawing. Here are some techniques:
- Layering: Apply light layers of color and gradually build up. This creates a smooth transition.
- Smudging: Use a blending tool or your finger to soften edges. This works well for shadows and highlights.
- Cross-hatching: Draw parallel lines in different directions. This technique can create texture and depth.
Practice these techniques on a separate sheet. Once confident, apply them to your drawing.
Frequently Asked Questions
What Materials Do I Need To Draw An Ice Hockey Player?
To draw an ice hockey player, you need paper, pencils, erasers, and coloring tools. Reference images also help.
How Do I Start Drawing An Ice Hockey Player?
Start by sketching basic shapes for the body. Add details like the helmet, stick, and skates.
What Are Key Details To Include?
Include the player’s uniform, helmet, stick, and skates. Don’t forget facial features and action poses.
How Can I Improve My Ice Hockey Player Drawing?
Practice regularly and study real-life hockey players. Use reference images and tutorials for guidance.
Conclusion
Drawing an ice hockey player can be fun and easy. Follow each step carefully. Start with basic shapes, then add details. Use reference photos to help with accuracy. Practice regularly to improve your skills. Don’t worry about mistakes; they are part of learning.
Keep your lines light until you feel confident. Add shading for depth. Soon, you will see progress. Enjoy the process of creating your ice hockey player. Happy drawing!