A running Fluidmaster can waste water and increase your bills. Fixing it is easier than you think.
A Fluidmaster that keeps running can be frustrating. It can also lead to higher water costs. Many people think they need a plumber for this issue. But, with a few simple steps, you can fix it yourself. This guide will show you how.
We will explain why your Fluidmaster runs continuously. Then, we’ll give clear steps to solve it. No special tools needed. Just a bit of time and patience. Read on to learn how to stop your Fluidmaster from running. Save water and money with these easy tips.
Credit: www.youtube.com
Introduction To Fluidmaster Issues
Fluidmasters are popular in many toilets. They help control water flow. But they can have problems. These issues can lead to wasted water and high bills. Fixing a Fluidmaster can seem tough. But with a little guidance, you can handle it.
Common Problems
Fluidmasters face several common issues. Here are a few:
- Constant running: The tank never stops refilling.
- Slow fill: The tank takes too long to fill.
- Noise: The fill valve makes loud sounds.
Why Fluidmasters Run
Understanding why Fluidmasters run is key. Here are some reasons:
- Worn out flapper: The rubber flapper may be old and not sealing properly.
- High float level: The float may be set too high, causing water to overflow.
- Debris: Small particles can block the valve, preventing it from closing.
These are common causes. Addressing them can stop your Fluidmaster from running.

Credit: www.facebook.com
Tools And Materials Needed
Fixing a Fluidmaster from running might seem daunting at first. With the right tools and materials, the process becomes much easier. This guide will help you gather all the essentials to get your Fluidmaster working perfectly again.
Essential Tools
- Adjustable Wrench: A must-have for loosening and tightening nuts.
- Screwdriver: Both flathead and Phillips for removing screws.
- Bucket: To catch any excess water and prevent spills.
- Plumber’s Tape: Ensures a tight seal on threaded connections.
Recommended Materials
- Replacement Fluidmaster Parts: Depending on what’s broken, you might need a new fill valve or flapper.
- Cleaning Cloth: To wipe down and clean any parts.
- Vinegar or CLR: For cleaning mineral deposits.
- Latex Gloves: To keep your hands clean and protected.
Having these tools and materials on hand will ensure a smooth repair process. Make sure to gather everything before you start. This way, you won’t have to pause midway through the repair.
Turning Off The Water Supply
Dealing with a running Fluidmaster can be frustrating. The first step to fix it is turning off the water supply. This helps to avoid any further water waste. It also makes the repair process easier. Let’s dive into the details.
Locate The Shut-off Valve
The shut-off valve is usually located near the base of the toilet. It is a small handle or knob. This valve controls the water flow to the toilet. You need to find this valve first.
Sometimes, the valve is hidden behind the toilet. In rare cases, it might be in the basement or another room. So, take a few moments to locate it.
Properly Turning Off The Valve
Once you find the shut-off valve, turn it clockwise. This will stop the water flow to the toilet. Turn it until it stops moving. This ensures the water is completely shut off.
After turning off the valve, flush the toilet. This will empty the tank. Now, you can work on the Fluidmaster without any water in the way.
Removing The Toilet Tank Lid
Removing the toilet tank lid is the first step in fixing a Fluidmaster from running. This task may seem simple, but it requires caution. The lid is fragile and can break easily. Follow these steps to safely remove and inspect the inside of your toilet tank.
Safe Removal Tips
Before you start, make sure to turn off the water supply to the toilet. This prevents any accidental overflow. Next, carefully lift the lid using both hands. Avoid using excessive force. Hold the lid close to your body to prevent dropping it.
- Turn off the water supply valve.
- Lift the lid with both hands.
- Hold the lid close to your body.
Place the lid on a flat, stable surface. Avoid placing it on the edge of the sink or bathtub where it can fall. A towel or soft cloth can provide a cushion to prevent chips or cracks.
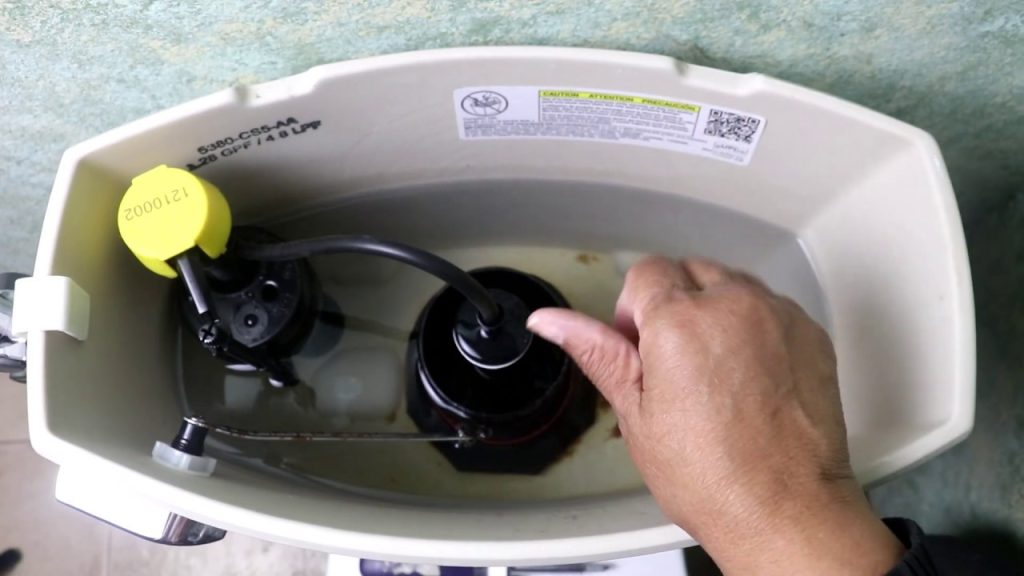
Inspecting The Inside
With the lid removed, take a moment to inspect the inside of the tank. Look for any obvious signs of damage or wear. Pay special attention to the fill valve and flush valve. These are common sources of running issues.
- Check the fill valve for any leaks or cracks.
- Inspect the flush valve for wear or misalignment.
- Ensure the float is not stuck or damaged.
Use a flashlight to get a better view if needed. If you notice any damaged parts, you might need to replace them. This can often fix the issue of a running Fluidmaster.
| Component | Issue | Action |
|---|---|---|
| Fill Valve | Leaks or cracks | Replace the valve |
| Flush Valve | Wear or misalignment | Realign or replace |
| Float | Stuck or damaged | Free or replace |
Once you’ve inspected the inside of the tank, you can proceed with any necessary repairs. This simple inspection can save you from more costly repairs in the future.
Adjusting The Float
A Fluidmaster running continuously can be a nuisance. Often, the culprit is a misadjusted float. Adjusting the float can stop the water from running. Follow these simple steps.
Identifying The Float
First, identify the float in your toilet tank. It is a plastic device connected to the fill valve. The float rises with the water level. There are two types: ball floats and cup floats.
A ball float is a large, round ball at the end of a rod. A cup float is a cylinder-shaped device that moves up and down the fill valve. Both types serve the same purpose.
Correcting Float Position
Once you identify the float, check its position. The float should be set to the right height. If it is too high, the water level will rise above the overflow tube. This causes the toilet to run.
To adjust a ball float, bend the rod gently downward. This lowers the water level. For a cup float, find the adjustment screw on top of the fill valve. Turn the screw clockwise to lower the float.
Flush the toilet and check the water level. Repeat adjustments until the water stops running. A correctly positioned float will solve the running water problem.
Cleaning The Fill Valve
Is your Fluidmaster running continuously? Cleaning the fill valve can help. Debris often clogs the valve, causing it to malfunction. Follow these simple steps to fix the issue.
Removing Debris
First, turn off the water supply. Locate the fill valve inside the tank. Remove the cap covering the valve. Check for any visible debris. Use a cloth to wipe away dirt. Inspect the valve for any blockages. Use a small brush to clean hard-to-reach areas. Rinse the parts with water.
Reassembling The Valve
After cleaning, reassemble the fill valve. Place the cap back on the valve. Ensure it fits snugly. Turn the water supply back on. Test the toilet by flushing. Check if the Fluidmaster stops running. If it does, your cleaning was successful. If not, consider replacing the fill valve. Proper maintenance can prevent future issues.
Replacing The Fill Valve
Replacing the fill valve is crucial when fixing a Fluidmaster from running. This part controls the water flow into the toilet tank. A faulty fill valve can lead to constant running water. Follow these simple steps to replace the fill valve and save water.
Selecting The Right Valve
Choosing the correct fill valve is essential. Look for a valve compatible with your toilet model. Most hardware stores carry universal fill valves that fit various toilet types. Read the product labels carefully. Ensure the valve has good customer reviews for reliability.
If unsure, bring the old fill valve to the store. This helps in finding a suitable replacement. A staff member can assist you in selecting the right one. Having the correct valve makes installation easier and ensures proper functioning.
Installation Steps
Begin by turning off the water supply to the toilet. This prevents any water from flowing into the tank during the process. Next, flush the toilet to empty the tank. Use a sponge or towel to soak up any remaining water.
Remove the old fill valve by unscrewing the lock nut at the bottom of the tank. Take out the valve and clean the area. Insert the new fill valve into the hole. Secure it with the lock nut and tighten it by hand.
Attach the refill tube to the overflow pipe. Adjust the fill valve height if needed. Ensure the valve is not too high or low. Turn the water supply back on and let the tank fill. Check for any leaks around the new fill valve. Adjust as necessary to ensure a proper seal.
Finally, test the toilet by flushing it a few times. Make sure the fill valve stops running once the tank is full. This confirms a successful installation.
Testing The Fix
Once you have finished making the necessary adjustments to your Fluidmaster, it’s time to test the fix. This step ensures that your toilet is functioning correctly and that the Fluidmaster is no longer running. Follow these steps to make sure everything is in working order.
Turning On The Water Supply
First, you need to turn the water supply back on. Locate the water supply valve, usually found near the base of the toilet. Turn the valve counterclockwise to allow water to flow back into the tank. Listen for the sound of water filling the tank. This should take a few minutes.
Checking For Leaks
After the tank is full, check for leaks. Inspect the area around the Fluidmaster and the base of the tank. Make sure there are no drips or puddles. If you find any leaks, turn off the water supply and tighten the connections. Repeat the process until there are no leaks.
Preventative Maintenance Tips
Fix a Fluidmaster from running with these simple steps. Check the fill valve and adjust the float arm. Replace worn-out parts to ensure smooth operation.
Preventative maintenance can save you time and money. It keeps your Fluidmaster from running. Regular checks and cleaning will ensure it works smoothly. Here are some easy tips to follow.Regular Inspections
Inspect your Fluidmaster every few months. Look for any signs of wear. Check the float and valve. Make sure they are not stuck or damaged. Listen for unusual noises. These can indicate a problem. Catching issues early can prevent bigger problems.Proper Cleaning Techniques
Clean the Fluidmaster parts regularly. Use a soft cloth and mild soap. Avoid harsh chemicals. They can damage the parts. Rinse thoroughly with water. Ensure all parts are dry before reassembling. A clean Fluidmaster works better and lasts longer. “`When To Call A Professional
Call a professional if your Fluidmaster keeps running after basic troubleshooting. Persistent leaks or unfamiliar components need expert attention.
Sometimes fixing a Fluidmaster from running can be tricky. You might try all the DIY fixes, yet the issue persists. This is when you need to call a professional. A plumber has the tools and knowledge to handle tough problems. They can ensure your toilet works correctly and prevent future issues.Signs Of Severe Issues
If you notice water pooling around the base of the toilet, it’s a serious issue. This could mean a leak, which requires immediate attention. Another sign is if the toilet makes loud noises or if the water runs constantly. These problems can lead to higher water bills and damage to your home. If the tank doesn’t refill properly, it could be a valve issue. These problems often need a professional’s touch.Choosing A Reliable Plumber
When picking a plumber, look for one with good reviews. Check their experience and ask for references. A reliable plumber should have proper licenses and insurance. This ensures they are qualified to work on your plumbing. Get quotes from a few plumbers to compare prices. Choose one who offers a fair price and has a good reputation. Remember, a good plumber will fix your problem quickly and efficiently. “`:max_bytes(150000):strip_icc()/fluidmaster-fill-valve-repair-2719029-hero-513e35ed3fe248ccbf91b126e5a4910e.jpg)
Credit: www.thespruce.com
Frequently Asked Questions
How To Stop Fluidmaster From Running?
To stop a Fluidmaster from running, check the fill valve and float. Adjust the float height and clean the valve. This should resolve the issue.
Why Is My Fluidmaster Toilet Running?
A running Fluidmaster usually indicates a faulty fill valve or improper float height. Inspect both components and make necessary adjustments.
How To Adjust Fluidmaster Float?
Adjust the Fluidmaster float by turning the adjustment screw or sliding the float up and down. This controls the water level.
Can A Faulty Fill Valve Cause Running Toilet?
Yes, a faulty fill valve is a common cause of a running toilet. Replacing or repairing the fill valve can fix the issue.
Conclusion
Fixing a Fluidmaster from running is simple with the right steps. Follow the guide, and your toilet will work efficiently again. Regular maintenance prevents future issues. Check the parts occasionally to ensure they function well. This saves water and reduces bills.
A little effort now avoids bigger problems later. Enjoy a smoothly operating toilet with these easy tips.