Building a billiards table can seem challenging, but it’s quite manageable. With the right tools and steps, you can create a beautiful table.
Creating your own billiards table can be a rewarding project. Imagine the satisfaction of playing on a table you built. This guide will walk you through the process, providing clear instructions and tips. We’ll cover everything from selecting materials to assembling the table.
Whether you’re a seasoned woodworker or a beginner, this project is within your reach. By following our steps, you’ll have a sturdy, great-looking billiards table in no time. Let’s get started on this exciting DIY journey!
Designing The Table
Designing the table is a crucial step in building your own billiards table. This phase involves making decisions about the size, shape, and overall look of the table. You will need to create a detailed plan. This will guide you through the entire building process.
Choosing The Right Dimensions
The dimensions of a billiards table are very important. They influence how the game is played. Standard tables come in several sizes. Common sizes include 7-foot, 8-foot, and 9-foot tables. Choose the size that fits your space and needs. Measure your room to ensure there is enough space around the table for players to move.
A 7-foot table is suitable for smaller rooms. An 8-foot table is a popular choice for home use. A 9-foot table is often used in professional settings. Consider the space you have available. Also, think about who will be using the table. This will help you choose the right dimensions.
Creating A Blueprint
Once you have chosen the dimensions, create a detailed blueprint. This will serve as your guide during construction. Start by drawing the table’s frame. Include the legs, rails, and pockets. Make sure to include precise measurements.
Use graph paper or design software to make your blueprint. Label each part of the table clearly. This will help you stay organized. The blueprint should also show the placement of the slate bed. The slate bed is the playing surface of the table. It must be level for a fair game.
A well-designed blueprint will make the building process easier. It will help you avoid mistakes. Take your time with this step. A detailed plan will save you time and frustration later.
Credit: quedos.com.au
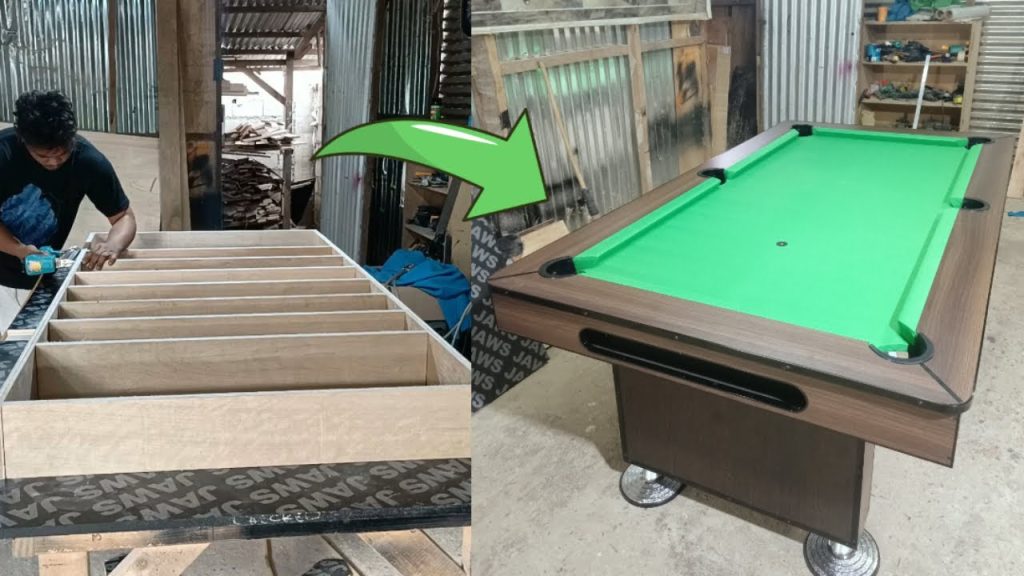
Building The Frame
Building the frame is a crucial step in making a billiards table. A strong frame ensures stability and longevity. Here’s how to build a solid frame.
Cutting The Wood
Begin by selecting high-quality hardwood. Measure the dimensions of your table. Mark the wood for accurate cuts. Use a saw to cut the pieces. Ensure all pieces are even and smooth.
Assembling The Frame
Lay out the cut pieces on a flat surface. Start by connecting the longer side beams. Use wood glue and clamps for a strong bond. Secure the joints with screws. Attach the shorter beams to complete the rectangle. Double-check the alignment and tightness.
Add supporting beams across the width. These will provide extra support. Ensure they are evenly spaced. Secure them with screws. Your frame is now ready for the next steps.
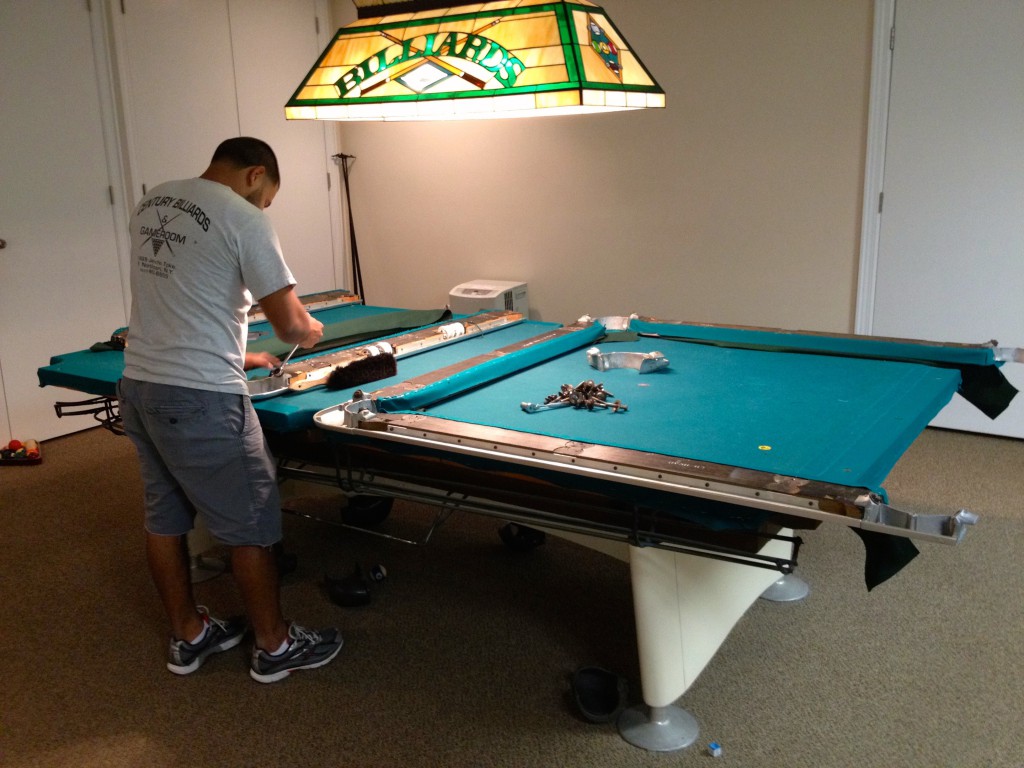
Preparing The Playing Surface
Preparing the playing surface is one of the most crucial steps in making a billiards table. A smooth, level surface ensures fair play and enhances the overall experience. This section will guide you through selecting and securing the slate, which forms the core of the playing surface.
Selecting The Slate
Choosing the right slate is essential. Slate is a fine-grained rock that provides a flat, durable surface. Look for slate that is three pieces. This allows for easier transport and precise leveling. The thickness should be at least three-quarters of an inch. Thicker slate offers more stability.
Examine the slate for cracks or imperfections. Even small flaws can affect gameplay. Ensure the slate is honed to a smooth finish. This reduces friction and allows balls to roll true. Always source slate from reputable suppliers to guarantee quality.
Leveling And Securing The Slate
Once you have the slate, it’s time to level and secure it. Place the slate pieces on the table frame. Use a carpenter’s level to check the alignment. Adjust the legs of the table until the surface is perfectly level. This step is critical for fair play.
After leveling, secure the slate to the frame. Use screws and washers to attach the slate. Make sure the screws are evenly spaced. This prevents the slate from shifting during play. Fill the seams between the slate pieces with wax or putty. This creates a seamless playing surface.
Finally, sand the seams to ensure a smooth finish. A well-prepared surface enhances the billiards experience. It allows for precise shots and consistent play. Take your time to get this step right.
Credit: centurybilliards.com
Adding The Cushions
Adding the cushions to your billiards table is a critical step. Cushions ensure the ball bounces correctly off the sides. This enhances the game’s quality and enjoyment. Let’s dive into the steps of cutting, shaping, and attaching the cushions.
Cutting And Shaping The Cushions
First, measure the length of the table’s rails. Use these measurements to cut the cushion material. A sharp utility knife or a specialized cutter works best. Accuracy is key, so take your time.
Next, shape the cushions to fit the rails. Use sandpaper to smooth out any rough edges. The cushions should have a consistent thickness. This ensures a uniform bounce during play.
Attaching The Cushions To The Table
Start by applying adhesive to the rails. A strong, durable glue is essential. Press the cushions firmly onto the rails. Make sure they align perfectly with the edge.
Once attached, use clamps to hold the cushions in place. Leave them to dry for at least 24 hours. This ensures a secure bond. After drying, remove the clamps and inspect the cushions. They should be firmly attached and aligned.
Your billiards table is now one step closer to being complete. The cushions are crucial for a smooth and enjoyable game. Properly installed cushions make a significant difference in play quality.
Covering With Felt
Covering your billiards table with felt is a crucial step in creating a smooth playing surface. The felt provides the necessary friction for the balls to roll accurately and ensures consistent play. This section will guide you through the process of choosing the right felt and the techniques for stretching and stapling it to your billiards table.
Choosing The Right Felt
Picking the right felt is essential for a great playing experience. Here are some tips:
- Material: Choose wool and nylon blends for durability.
- Weight: Heavier felt lasts longer and plays better.
- Color: Traditional green is popular, but any color will work.
Make sure the felt size matches your table dimensions. A slightly larger size is better than one that is too small.
Stretching And Stapling The Felt
Proper stretching and stapling ensure a smooth surface. Follow these steps:
- Position the felt: Lay the felt flat over the table.
- Centering: Make sure it is centered and covers all edges.
- Stretching: Start from the middle of one side, pull the felt tight.
- Stapling: Use a staple gun to secure the felt underneath the table.
- Continue: Move to the opposite side and repeat the stretching and stapling process.
- Corners: Pay special attention to corners. Fold and staple neatly.
Check for wrinkles and adjust as needed. A smooth surface ensures the best play.

Credit: www.youtube.com
Installing The Pockets
Installing the pockets on your billiards table is a crucial step. It ensures the table functions correctly and looks professional. Properly installed pockets improve the gameplay experience. Let’s dive into the details of installing these essential components.
Types Of Pockets
Billiards tables come with different types of pockets. The two main types are drop pockets and ball return pockets. Drop pockets are simpler and collect balls in nets or pouches. Ball return pockets have a system that returns balls to a central location. Each type has its pros and cons. Choose the one that best fits your needs and preferences.
Attaching The Pockets
To attach the pockets, you need basic tools. Start by positioning the pockets at each corner and side pocket opening. Ensure they align perfectly with the table’s edges. Use screws to secure the pockets in place. Make sure to tighten the screws evenly to avoid any misalignment.
Check each pocket after securing it. Confirm they are firm and stable. If using drop pockets, ensure the nets or pouches are properly attached. For ball return pockets, connect the return system according to the manufacturer’s instructions. Test the pockets by rolling a few balls into them. They should hold or return the balls smoothly.
Finishing Touches
After building a sturdy frame and attaching the felt, it’s time for the finishing touches. This is where your billiards table transforms from a project into a centerpiece. The final steps include sanding and painting, and adding decorative elements. These steps ensure your table looks polished and professional.
Sanding And Painting
Begin with sanding the entire surface. Use fine-grit sandpaper for a smooth finish. Sanding removes rough spots and prepares the wood for painting. After sanding, wipe the surface with a damp cloth to remove dust.
Next, apply a coat of primer. This helps the paint adhere better. Once the primer dries, apply your chosen paint color. Use a high-quality paint designed for wood. Apply two or more thin coats, allowing each coat to dry completely. This ensures a durable and even finish.
Finally, consider adding a clear coat for extra protection. This step is optional but recommended for a long-lasting finish.
Adding Decorative Elements
Personalize your table with decorative elements. These details make your table unique. Consider adding corner pockets with intricate designs. You can find these at specialty stores or online.
Another idea is to add custom decals or inlays. These can feature your name, favorite team, or any design you like. Decals are easy to apply and can be changed later. Inlays require more skill but provide a permanent, high-end look.
For a classic look, add wood trim or molding around the edges. This adds a touch of elegance. Choose a wood that matches or complements the rest of your table.
Remember, the goal is to make your table both functional and beautiful. Spend time on these details for a table you’ll be proud to show off.
Maintenance Tips
Keeping your billiards table in top condition is essential for an enjoyable game. Regular maintenance can extend the lifespan of your table and ensure consistent performance. Below are some practical tips to help you maintain your billiards table.
Cleaning The Table
Dust and dirt can affect the playability of your billiards table. Regular cleaning is crucial. Use a soft-bristled brush to remove chalk dust and debris from the cloth. Brush gently in a straight line from one end to the other.
- Vacuum the Cloth: Use a vacuum with a soft brush attachment.
- Spot Clean: Use a cloth dampened with water for stains.
- Wipe the Rails: Use a damp cloth to clean the wooden rails.
Repairing Damage
Even with the best care, your billiards table may get damaged. Knowing how to fix common issues can save you time and money.
- Loose Cushions: Re-glue the cushions if they become loose.
- Cloth Tears: Small tears can be fixed with a patch kit.
- Warped Wood: Place weights on the wood to flatten it.
Keeping your table in good condition involves regular inspections. Look out for any signs of wear and tear. Addressing these issues promptly can prevent bigger problems down the line.
Frequently Asked Questions
What Materials Are Needed To Make A Billiards Table?
To make a billiards table, you need wood, slate, felt, and rubber cushions. Additional materials include screws, nails, and glue for assembly.
How Long Does It Take To Build A Billiards Table?
Building a billiards table can take anywhere from 20 to 40 hours. The time varies depending on your skill level and tools available.
Can A Beginner Build A Billiards Table?
Yes, a beginner can build a billiards table with proper instructions. Following a detailed guide and having the right tools is essential.
What Is The Cost To Build A Billiards Table?
The cost to build a billiards table ranges from $500 to $2000. Costs depend on materials and tools you choose to use.
Conclusion
Creating a billiards table can be a rewarding project. With patience and the right materials, you can build a table that lasts. Remember to measure accurately. Follow each step carefully. This ensures your table is sturdy and level. Enjoy the process and take your time.
Soon, you’ll have a custom billiards table to enjoy. Share your new creation with friends and family. The game of billiards will be even more fun. Happy building and playing!