How to Change a Swimming Pool Light: Step-by-Step Guide
Changing a swimming pool light might seem tough. It’s actually simple with the right steps.
Swimming pool lights can brighten up your pool area. Over time, they may need replacement. Knowing how to change a pool light can save you time and money. This guide will help you through the process. You’ll learn the tools needed and the steps to follow.
Proper lighting in your pool enhances safety and beauty. Ready to dive in? Let’s get started with changing that pool light!

Credit: www.swimmingpoolsteve.com
Gather Necessary Tools
Changing a swimming pool light might seem tricky. But with the right tools, the task becomes manageable. Before starting, gather all the necessary equipment. This ensures the process goes smoothly and safely.
Required Equipment
To change a swimming pool light, you need specific tools. First, get a flathead screwdriver. This helps remove the light fixture’s screws. Next, you’ll need a Phillips head screwdriver for other screws. A voltage tester is essential. It ensures the power is off before you begin. Safety goggles protect your eyes from debris. A new light bulb or LED replacement is needed. Finally, have a waterproof sealant handy. This ensures no water leaks into the fixture.
Where To Purchase Tools
Most tools are easy to find. Visit your local hardware store for screwdrivers and voltage testers. Big-box stores like Home Depot or Lowe’s offer a wide selection. For the new light bulb, check pool supply stores. They often carry specific pool light models. Online retailers like Amazon are also great options. They offer a variety of tools and replacements. Always read reviews before buying. This ensures you get quality products.

Credit: www.youtube.com
Turn Off Power
Changing a swimming pool light may seem daunting. But, the first step is crucial. You must turn off the power. This ensures safety throughout the process. Follow these steps for a smooth experience.
Locate Circuit Breaker
Find your home’s main electrical panel. It is usually in the garage or basement. Look for the circuit breaker labeled “pool” or “pool light”. This breaker controls the power to your pool light. Switch it to the “off” position.
Ensure Power Is Off
Before proceeding, confirm the power is off. Test the pool light switch. Try turning the light on. If the light does not turn on, you are good to go. Safety is priority number one.
Remove Old Light Fixture
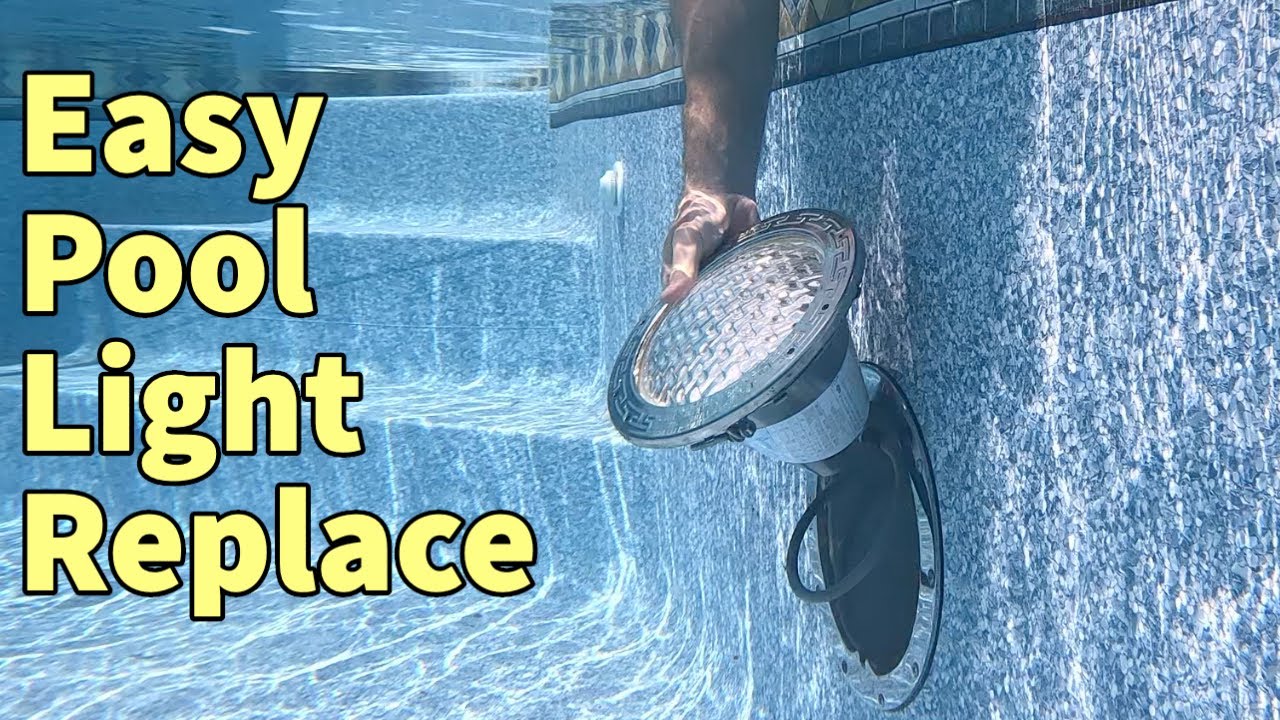
Changing a swimming pool light can seem daunting. The first step is to remove the old light fixture. This process involves a few key steps, which we will break down for you. By following these steps, you can safely and effectively remove the old light fixture from your pool.
Unscrew Light Fixture
Begin by turning off the power to the pool light at the circuit breaker. This is crucial for your safety. Next, locate the screw at the top of the light fixture. Use a Phillips head screwdriver to unscrew it. Once the screw is loose, carefully remove it and set it aside. The light fixture should now be free from the niche.
Disconnect Wiring
After removing the fixture, gently pull it out of the niche to access the wiring. You will see a cord leading from the fixture to the power source. Disconnect the wiring by loosening the wire nuts that connect the fixture wires to the power wires. Carefully separate the wires and ensure they do not touch each other or the water. With the wires disconnected, you can now remove the old light fixture completely from the pool.
Follow these steps carefully to safely remove the old light fixture. This will prepare the pool for the new light installation.

Credit: clarkcountypoolandlawn.com
Install New Light Fixture
Changing a swimming pool light can seem daunting. But, installing a new light fixture is straightforward. By following these steps, you will have a bright pool in no time. Let’s dive into the process!
Connect Wiring
The first step is to connect the wiring. Make sure the power is off. Safety comes first. Then, remove the old light fixture. You will see the wires behind it. Take note of how they are connected. This will help with the new fixture.
Next, strip the ends of the new wires. Use a wire stripper for this. Twist the wires together. Match the colors: black to black, white to white. Secure them with wire nuts. This keeps them in place and safe. Double-check your connections. They should be tight and secure.
Secure New Fixture
After wiring, secure the new fixture. Place the light into the niche. It should fit snugly. Use the screws provided with the fixture. Tighten them with a screwdriver. Make sure the fixture is flush with the pool wall. This prevents water from leaking behind it.
Finally, test the new light. Turn the power back on. Switch on the light. It should glow brightly. If not, check your connections. Make sure everything is secure.
By following these steps, you can install a new pool light easily. Enjoy a well-lit pool for night swimming!
Test The New Light
After installing your new swimming pool light, it’s time to test it. This step ensures the light works correctly and safely. Testing the new light involves a few simple checks.
Turn On Power
First, restore power to the pool lighting system. Locate your pool’s circuit breaker. Flip the switch to turn the power back on. Ensure all safety precautions are in place. Avoid touching the water during this process.
Check For Proper Functioning
Observe the new light carefully. It should illuminate the pool evenly. Look for any flickering or dim areas. These could indicate installation issues. Make sure the light color matches your expectations. If the light is color-changing, cycle through the colors to ensure they all work.
If the light operates as expected, your installation is successful. If not, consult the light’s manual or contact a professional. Always prioritize safety when dealing with electrical components.
Reassemble And Seal
After replacing the swimming pool light, it’s crucial to reassemble and seal the fixture properly. This ensures the light remains waterproof and functions correctly. Follow these steps to finish the job successfully.
Reattach Light Fixture
Begin by carefully placing the light fixture back into its niche. Ensure the wiring is neatly tucked away and does not get pinched. Use the screws provided to secure the fixture firmly. Tighten each screw evenly to avoid damage.
| Step | Action |
|---|---|
| 1 | Place the light fixture into the niche |
| 2 | Ensure wiring is properly tucked |
| 3 | Secure the fixture with screws |
| 4 | Tighten screws evenly |
Ensure Waterproof Seal
To ensure a watertight seal, check the gasket for any wear or damage. Replace it if necessary. Apply a thin layer of pool-safe silicone around the gasket. This adds an extra layer of protection. Carefully press the light fixture into place, making sure the seal is tight. Wipe away any excess silicone for a clean finish.
- Check the gasket for wear
- Apply pool-safe silicone around the gasket
- Press fixture into place
- Wipe away excess silicone
These steps are essential for a successful reassembly. Your pool light will be safe and secure, ready to light up your swimming pool once again.
Maintenance Tips
Maintaining your swimming pool light ensures it functions properly and lasts longer. Proper care can also enhance the safety and beauty of your pool. Here are some essential maintenance tips to help you keep your pool light in top condition.
Regular Inspection
Inspect your pool light regularly for any visible damage. Check the light fixture and the surrounding area for cracks or leaks. Look for signs of corrosion or rust on the light casing. Ensure the light is securely attached to the wall of the pool. A loose fixture can cause electrical hazards.
Cleaning Recommendations
Clean your pool light to maintain its brightness and efficiency. Turn off the power supply before cleaning. Use a soft cloth and mild detergent to wipe the light surface. Avoid abrasive cleaners that can scratch the light cover. For underwater lights, use a pool brush to remove algae or debris. Ensure the light is dry before turning the power back on.
Frequently Asked Questions
What Tools Do I Need To Change A Pool Light?
To change a pool light, you’ll need a screwdriver, replacement light, gasket, and possibly a new lens.
How Long Does It Take To Change A Pool Light?
It usually takes about 30 minutes to an hour to change a pool light.
Can I Change A Pool Light Without Draining The Water?
Yes, you can change most pool lights without draining the water. The light fixture is designed for this.
Is It Safe To Change A Pool Light Myself?
Yes, it’s safe if you follow the manufacturer’s instructions and turn off the power first.
Conclusion
Changing a swimming pool light can seem challenging at first. With the right steps, it becomes manageable. Ensure you follow safety measures. Always turn off the power before you start. Use the correct tools and replacement parts. Consult your pool’s manual for specific instructions.
Take your time and be careful. Enjoy your well-lit pool once the job is done. Your pool will shine brighter, making your swim more enjoyable. Happy swimming!