How to Build Equestrian Jumps: Step-by-Step Guide for Beginners
Building equestrian jumps can seem complicated, but it’s simpler than you think. You can create sturdy, attractive jumps with the right materials and steps.
Equestrian jumps are essential for training and competition. They help horses develop strength, agility, and coordination. Constructing your own jumps allows customization and can be cost-effective. You need to understand the basics, gather materials, and follow clear instructions. This guide will walk you through each step, ensuring your jumps are safe and functional.
Whether you’re a beginner or experienced, learning to build equestrian jumps can enhance your riding experience. Ready to get started? Let’s dive in and explore the process together.
Introduction To Equestrian Jumps
Welcome to the world of equestrian jumps! Building these jumps can be a rewarding experience. Understanding their purpose and the different types will help you create effective and safe obstacles for your horse.
Purpose And Benefits
Equestrian jumps serve multiple purposes. They improve a horse’s agility and strength. Jumps also test the rider’s skill and coordination. Regular practice helps build trust between horse and rider. This leads to better performance in competitions.
There are several benefits to building your own jumps. Custom jumps allow for personalized training. You can adjust the height and difficulty. This can make training more versatile and engaging.
Different Types Of Jumps
There are many types of equestrian jumps. Each type serves a different training purpose. Here are some common types:
- Verticals: These are simple, straight jumps. They consist of poles placed one above the other. Verticals are great for improving precision.
- Oxer: This jump has two verticals placed close together. It helps build a horse’s strength and scope.
- Combination: A series of jumps placed in quick succession. It tests agility and quick thinking.
- Water Jump: This involves jumping over a water-filled ditch. It is used to test bravery and technique.
Knowing these types will help you plan your training sessions. You can mix and match different jumps. This keeps the training varied and interesting for both horse and rider.
Credit: www.youtube.com
Essential Tools And Materials
Building your own equestrian jumps can be both fun and rewarding. But to ensure your jumps are sturdy and safe, you need the right tools and materials. This section will guide you through the essential tools and materials required for this task.
Basic Tools Needed
Having the proper tools is crucial. Here’s a list of the basic tools you will need:
- Hammer – For driving nails into the wood.
- Saw – To cut wood to the required size.
- Measuring Tape – Ensures accurate measurements.
- Drill – For making holes and driving screws.
- Screwdriver – To tighten screws securely.
- Level – Ensures your jumps are even and straight.
- Paintbrushes – For painting and finishing touches.
Materials Required
The materials you choose will affect the durability and appearance of your jumps. Here are the key materials you will need:
| Material | Description |
|---|---|
| Wood | Use treated lumber for long-lasting jumps. |
| Nails and Screws | For assembling the wooden parts. |
| Paint | Weather-resistant paint to protect the wood. |
| Sandpaper | To smooth the wooden surfaces. |
| Poles | Use PVC or wooden poles for the jumps. |
Gathering these basic tools and materials will set you on the right path. Ensuring you have high-quality tools and materials is essential for creating sturdy and safe equestrian jumps.
Safety Precautions
Ensuring safety while building equestrian jumps is crucial. Proper safety precautions can prevent accidents and injuries. This section will guide you through essential safety measures. Let’s dive into protective gear and safe working practices.
Protective Gear
Always wear a helmet. A helmet protects your head from injuries. Use gloves to protect your hands. Gloves provide a better grip and prevent blisters. Wear safety goggles to protect your eyes from debris.
Sturdy boots are essential. They protect your feet from heavy objects. Wear long sleeves and pants. These protect your skin from scratches and cuts.
Safe Working Practices
Keep your work area clean and organized. A clutter-free area reduces the risk of tripping. Use tools properly. Follow the instructions for each tool.
Work in a well-lit area. Good lighting helps you see clearly. Take breaks to avoid fatigue. Tiredness can lead to mistakes. Always have a first aid kit nearby. Be prepared for any minor injuries.

Credit: www.saddlebox.net
Designing Your Jump
Designing your jump is a crucial step in building equestrian jumps. A well-designed jump not only looks good but also ensures safety and functionality. It’s important to plan carefully, ensuring each element fits together perfectly.
Choosing A Style
First, decide on the style of your jump. There are various types like verticals, oxers, and walls. Each style offers a different challenge for the rider and horse. Consider what you want to achieve with your jump. For beginners, simple verticals are ideal. More advanced riders might prefer oxers or combinations. Research different styles to find the one that fits your needs.
Measuring And Planning
Accurate measurements are key to building a safe jump. Start by determining the height and width of your jump. Use a measuring tape for precision. Make sure to keep all measurements consistent. This will help in creating a balanced and stable jump. Draw a plan on paper, including all dimensions. This will serve as your blueprint during construction. Double-check your measurements to avoid any mistakes. Planning ahead saves time and reduces errors.
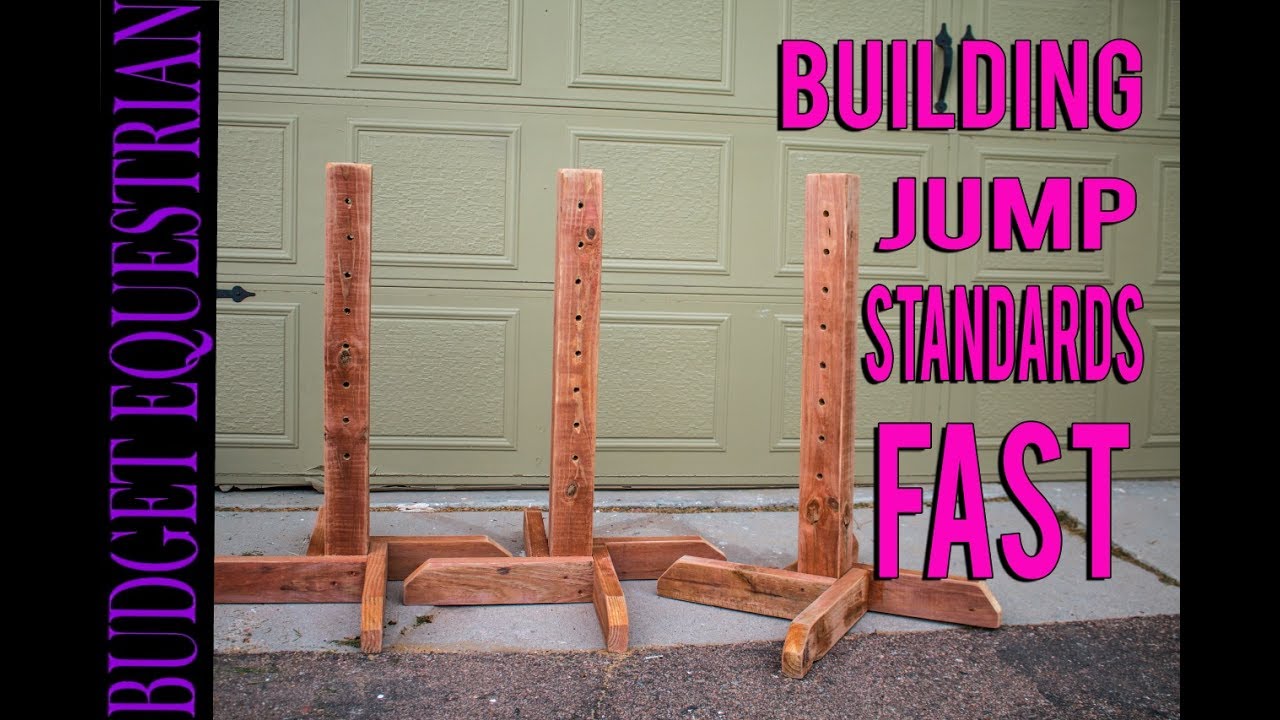
Constructing The Jump Standards
Constructing the jump standards is a crucial step in building equestrian jumps. The standards support the poles and set the height. This section will guide you through the process with easy steps.
Cutting The Wood
First, gather your materials. You need sturdy wood for the standards. Measure and mark the wood. Use a saw to cut the wood to the desired lengths. Usually, you need four pieces for each standard. Ensure the cuts are straight and even. This will provide stability.
Assembling The Pieces
Next, start assembling the pieces. Lay out the wood pieces on a flat surface. Attach the base pieces together using wood screws. Make sure they form a stable base. Then, attach the vertical pieces to the base. Use a level to ensure they are straight. Secure them with screws for extra stability.
Finally, add the cup holders. These will hold the jump poles. Measure and mark the desired heights on the vertical pieces. Attach the cup holders using screws. Ensure they are secure and level. Your jump standards are now ready for use.
Building The Jump Rails
Jump rails are crucial for any equestrian jump. They need to be strong and durable. Building them yourself can be cost-effective and satisfying. Let’s dive into the details.
Selecting The Right Wood
Choosing the right wood is essential. Pine and spruce are popular choices. They are lightweight but strong. Cedar can also be a good option. It’s durable and weather-resistant.
Make sure the wood is straight and free from knots. Knots can weaken the wood. Avoid wood with cracks. This can lead to breakage. The wood should be smooth to prevent injuries.
Painting And Finishing
Painting the rails adds a professional touch. Use outdoor paint for durability. Bright colors can make the rails stand out. This helps in visibility during jumps.
Start with a primer. This helps the paint to stick better. Apply two coats of paint. Make sure each coat dries completely before adding the next. For a smooth finish, use a brush or roller.
Seal the paint with a clear coat. This adds extra protection. It also gives the rails a glossy look. Let the rails dry completely before using them.
Setting Up The Jump Course
Building an equestrian jump course requires careful planning and attention to detail. A well-set course helps horses and riders train effectively. It also ensures safety and enjoyment for everyone involved.
Placing The Standards
Start by positioning the standards, which are the vertical posts. Place them at equal distances apart. The spacing depends on the type of jump you plan to set. Ensure the ground is level and firm to avoid any wobbling. Use a measuring tape for accuracy.
Arrange the standards in a straight line or a specific pattern. Common patterns include grids, lines, and circles. Always leave enough space for horses to approach and land safely. Double-check the stability of each standard before moving on.
Adjusting The Rails
Once the standards are in place, it’s time to adjust the rails. Rails are horizontal poles that horses jump over. Begin by setting the rails at a low height. This helps both new riders and young horses gain confidence. Gradually increase the height as skills improve.
Make sure the rails are secure but easy to knock down. This ensures the safety of the horse if they hit a rail. Adjust the rails to create various types of jumps, such as verticals, oxers, and combinations. Regularly check that all rails are correctly positioned and stable.

Credit: www.budgetequestrian.com
Maintenance And Storage
Building equestrian jumps is just the beginning. Proper maintenance and storage ensure their longevity. Regular upkeep keeps the jumps safe and looking good. Correct storage protects them from weather and wear. Let’s dive into the essentials of maintaining and storing equestrian jumps.
Regular Inspections
Regular inspections are crucial. They help identify potential issues early. Check for loose parts, cracks, and signs of wear. Here’s a simple checklist for your inspections:
- Inspect wood for splits or cracks.
- Check for rust on metal parts.
- Ensure all joints and screws are tight.
- Look for signs of rot or mold.
Inspections should be done monthly. This helps keep the jumps in top condition.
Proper Storage Techniques
Storing equestrian jumps properly is essential. It protects them from damage and extends their life. Follow these storage tips:
- Store jumps in a dry and covered area.
- Keep them off the ground using pallets or blocks.
- Stack them neatly to avoid warping.
- Use tarps or covers for extra protection.
Proper storage techniques prevent damage from moisture and pests.
Regular maintenance and proper storage are key to the longevity of your equestrian jumps. By following these simple steps, you ensure your jumps remain safe and attractive for years to come.
Tips For Beginners
Building equestrian jumps can be an exciting and rewarding experience. For beginners, it is crucial to start with the basics and gradually improve your skills. This guide will provide useful tips to help you avoid common mistakes and enhance your abilities in building equestrian jumps.
Common Mistakes To Avoid
Beginners often make a few common mistakes when building equestrian jumps. Being aware of these can help you create safer and more effective jumps.
- Incorrect Measurements: Ensure all measurements are accurate. Use a measuring tape and double-check your work.
- Poor Material Choice: Use sturdy and durable materials. Avoid materials that can easily break or wear down.
- Ignoring Safety: Safety should be your top priority. Make sure there are no sharp edges or loose parts.
- Overcomplicating Designs: Start simple. Complex designs can be overwhelming and unsafe for beginners.
Improving Your Skills
As you gain experience, you will want to improve your skills. Here are some tips to help you build better equestrian jumps.
- Practice Consistently: The more you build, the better you will become. Set aside regular time for practice.
- Study Professional Designs: Look at jumps built by professionals. Note the design and materials used.
- Seek Feedback: Ask experienced builders or riders for feedback. Use their advice to improve your jumps.
- Experiment with Materials: Try different materials to see what works best. Some materials may be more suitable for certain types of jumps.
| Material | Pros | Cons |
|---|---|---|
| Wood | Sturdy, easy to work with | Can rot if not treated |
| Plastic | Lightweight, durable | May be more expensive |
Remember, building equestrian jumps is a skill that improves with practice and patience. Use these tips to help guide your journey and create safe, effective jumps for your equestrian activities.
Frequently Asked Questions
What Materials Are Needed To Build Equestrian Jumps?
To build equestrian jumps, you’ll need wood, screws, paint, and PVC pipes. Ensure the materials are durable and safe.
How High Should Equestrian Jumps Be?
Equestrian jumps should be set according to the horse’s skill level. Typically, they range from 2 to 5 feet.
Can I Build Equestrian Jumps At Home?
Yes, you can build equestrian jumps at home with basic tools. Follow safety guidelines and construction plans.
How Do I Maintain Equestrian Jumps?
Regularly inspect for damage, repaint as needed, and store properly. This ensures longevity and safety for your horse.
Conclusion
Building equestrian jumps can be fun and rewarding. Follow the steps, use the right materials, and ensure safety. Your horse will enjoy the new jumps, and you’ll feel accomplished. Keep practicing, and soon you’ll create even more complex designs. Happy jumping and good luck with your equestrian projects!