How to Draw a Basketball: Step-by-Step Guide for Beginners

Drawing a basketball may seem tricky. But with some tips, it’s easy.
Basketball is a popular sport around the world. Its simple, round shape makes it a great starting point for beginners. This guide will help you draw a basketball step by step. You don’t need to be an artist to create a realistic basketball.
Whether you’re a student or just looking for a fun activity, this guide is for you. Drawing helps improve focus and creativity. Plus, it’s a fun way to spend your free time. Grab a pencil and some paper, and let’s get started on drawing a perfect basketball. Soon, you’ll see how simple shapes come together to create a detailed drawing.
Materials Needed
Drawing a basketball can be fun and rewarding. To get started, you will need some basic materials. In this section, we will cover the essential tools and some optional supplies that can enhance your drawing experience.
Essential Tools
- Pencil: A good quality pencil is crucial. It helps in making precise lines and adjustments.
- Eraser: Mistakes happen. Use a soft eraser to correct them without damaging your paper.
- Paper: Choose a smooth, sturdy paper. It should handle erasing and shading well.
- Ruler: A ruler helps in drawing straight lines and maintaining proportions.
- Compass: A compass is useful for drawing perfect circles, which are essential for the basketball shape.
Optional Supplies
- Colored Pencils: Use colored pencils to add color and depth to your drawing.
- Markers: Markers can help in highlighting certain areas and adding bold lines.
- Blending Stump: This tool helps in blending shades and creating smooth transitions.
- Sharpener: Keep your pencils sharp for precise lines and details.
- Reference Image: A picture of a basketball can guide you through the drawing process.
Preparing Your Workspace
Before you start drawing a basketball, it is crucial to set up your workspace. A well-organized space can boost your creativity and focus. It also ensures you have all the necessary tools within reach.
Choosing A Location
Select a quiet spot with good lighting. Natural light is ideal, but a bright lamp can also work. Make sure you have enough room to spread out your supplies. A clear, clutter-free desk or table is best.
Organizing Supplies
Gather your drawing tools before you begin. You will need:
- Paper
- Pencils (preferably HB, 2B, and 4B)
- Eraser
- Sharpener
- Ruler
- Compass or a round object for tracing
Place your supplies in an easily accessible layout. You might use a small container or organizer to keep everything tidy. Arrange your pencils by type for quick selection. Ensure your eraser and sharpener are within reach.
| Item | Purpose |
|---|---|
| Paper | Canvas for your drawing |
| Pencils | Different shades for depth |
| Eraser | Correcting mistakes |
| Sharpener | Keeping pencils sharp |
| Ruler | Ensuring straight lines |
| Compass | Drawing perfect circles |
Having a dedicated and organized workspace sets you up for success. Now, you are ready to start drawing your basketball.
Drawing The Basic Shape
To draw a basketball, start with the basic shape. This part lays the foundation. Once you get this right, the rest becomes easier. Let’s break it down.
Sketching A Circle
Begin by drawing a circle. You can use a compass or draw freehand. The circle does not have to be perfect. It’s just a guide.
Here are some tips:
- Use light strokes. This makes it easier to erase mistakes.
- Keep your hand steady. Rest your arm on the table.
- If drawing freehand, draw slowly.
Refining The Outline
Now, refine your circle. Make the lines smoother. Use a darker pencil or pen to go over the circle.
Check these points:
- Ensure the circle is even.
- Check for any wobbly lines. Smooth them out.
- Erase any extra light lines.
Now, you have a clear and smooth circle. This is the base of your basketball. Ready for the next steps!
Credit: www.youtube.com
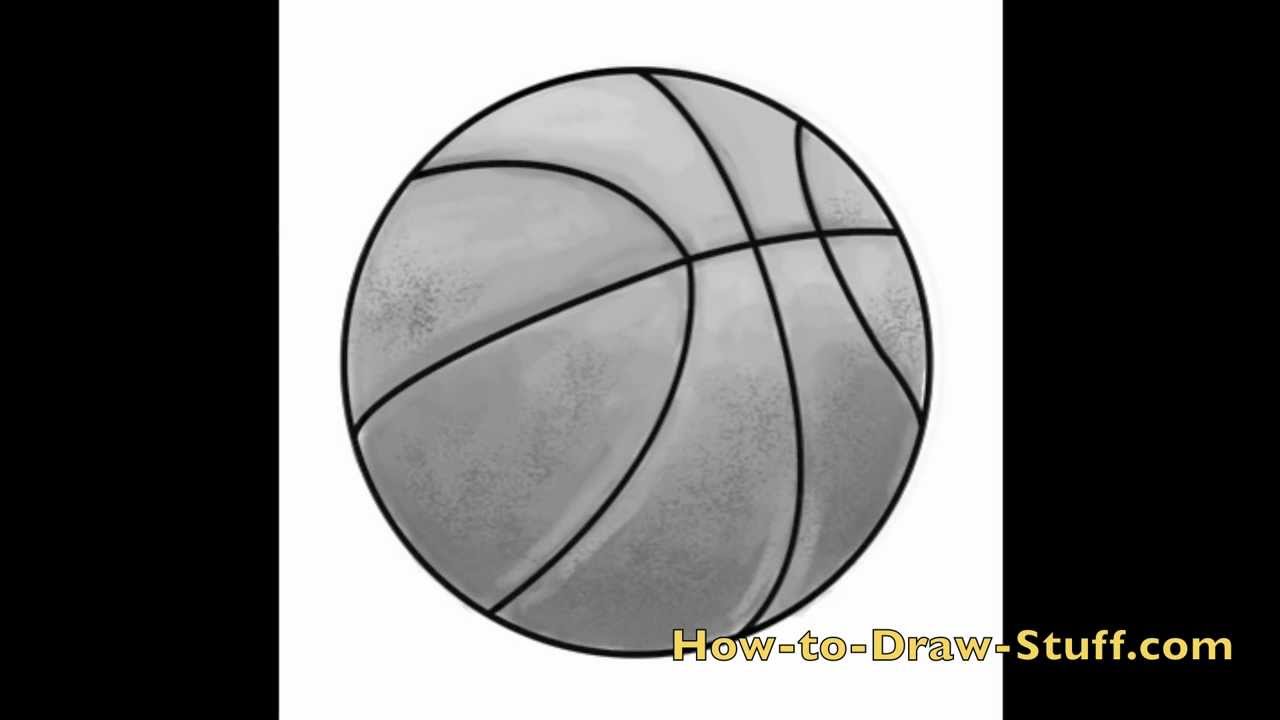
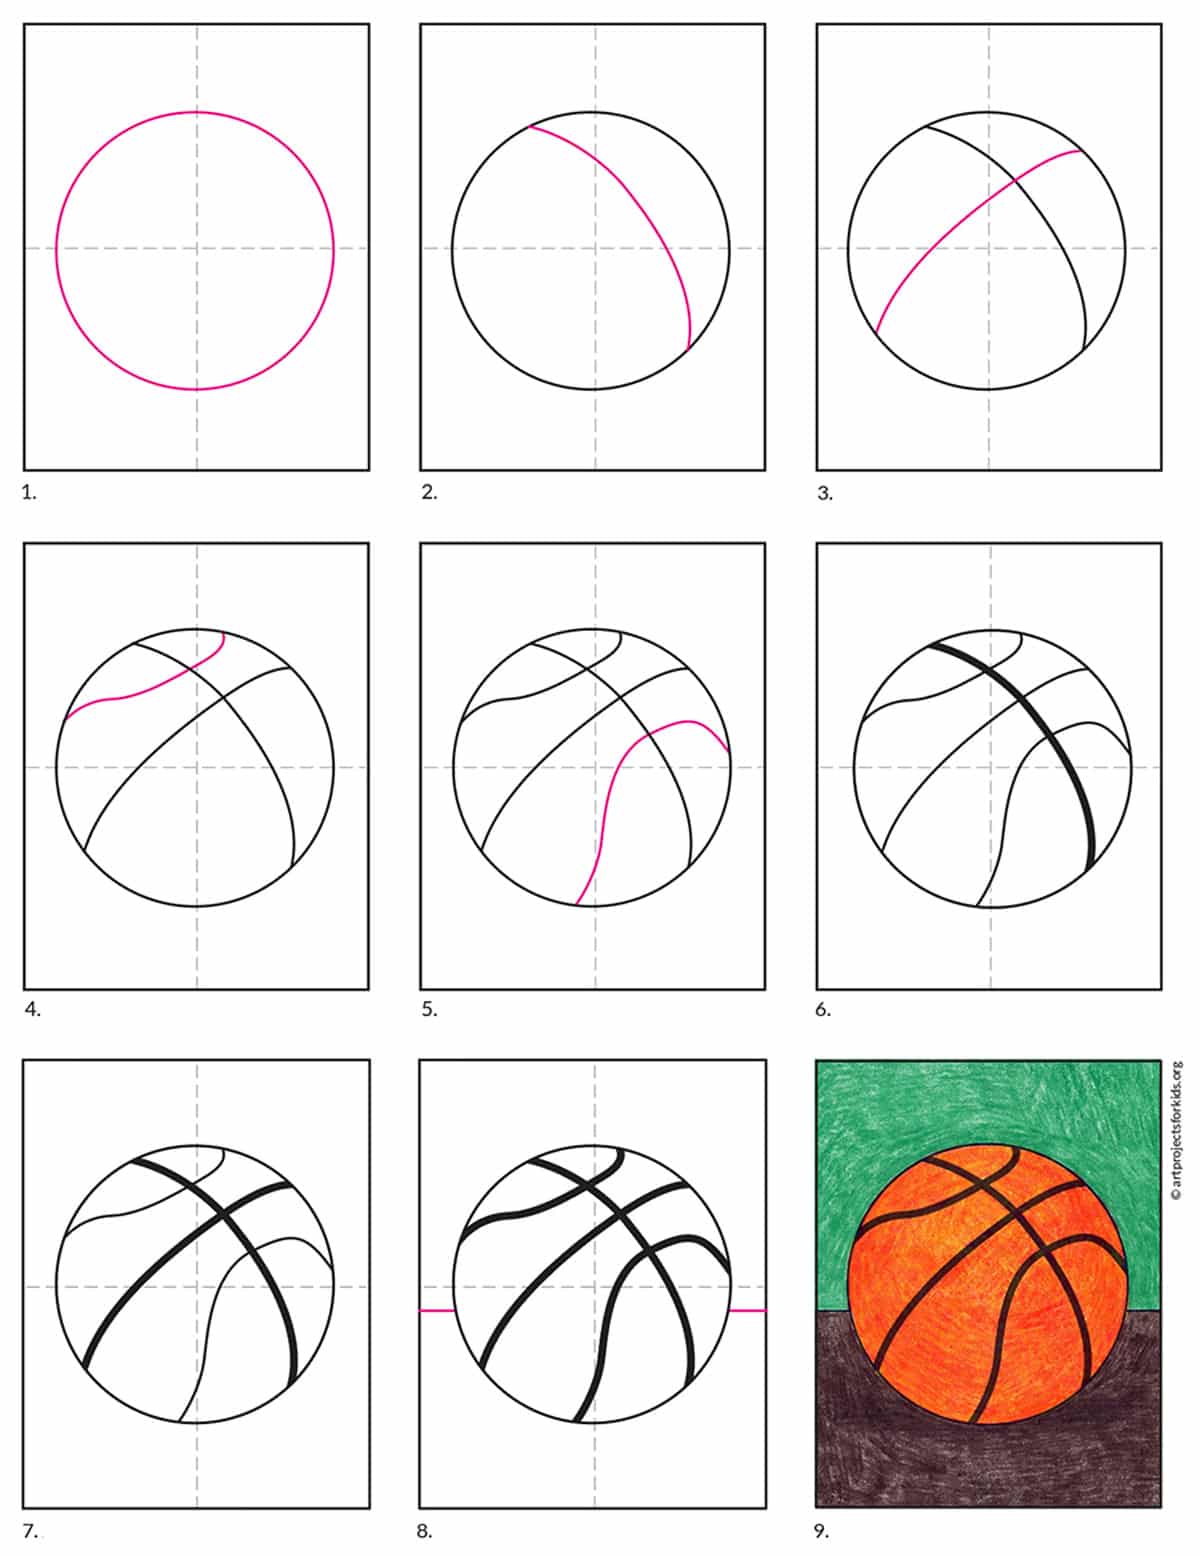
Adding Basketball Lines
Adding basketball lines is crucial to making your drawing look realistic. The lines give the basketball its signature look. They help to define the ball’s texture and shape. In this section, we will explore how to draw these lines effectively.
Vertical And Horizontal Lines
Start by drawing a vertical line through the middle of the ball. This line divides the basketball into two equal halves. Next, draw a horizontal line across the center of the ball. Ensure the horizontal line crosses the vertical line at the ball’s center. These lines form a cross and help in aligning the other lines.
Curved Lines
Now, add the curved lines. Draw a curved line from the top left to the bottom right. It should follow the ball’s contour. Repeat this step for the other side, from the top right to the bottom left. These curved lines should meet the vertical and horizontal lines at four points. This creates the iconic basketball pattern. Ensure the curves are smooth and symmetrical for a realistic look.
Creating Depth And Texture
Creating depth and texture in your basketball drawing brings it to life. It’s not just about drawing a perfect circle. Adding shading and highlighting can make your basketball look real. Let’s explore some simple techniques to enhance your drawing.
Shading Techniques
Shading gives your basketball a three-dimensional look. Start by identifying the light source. This will determine where the shadows fall. Use a soft pencil to draw light, curved lines on one side. Gradually darken these lines toward the edge of the ball.
Blend the shading with a tissue or blending stump. This softens the lines and creates a smooth transition. Remember, the area opposite the light source will be the darkest. This gives the impression of a rounded shape.
Highlighting
Highlights add a realistic touch. They show where the light directly hits the ball. Use an eraser to gently lift some graphite off the paper. This creates a lighter area. Place the highlight on the side of the ball facing the light source.
Keep the highlight small and rounded. This mimics the reflection of light on a real basketball. You can also use a white pencil or gel pen for a brighter highlight. These simple steps can make your basketball drawing more dynamic and engaging.
Credit: artprojectsforkids.org
Detailing The Basketball
Drawing a basketball involves more than just a circle. You need to add details to make it look real. This section will guide you through adding texture and enhancing lines. These steps will help your drawing look more lifelike.
Adding Texture
Textures make your basketball look rough and real. Start by drawing small dots and short lines on the surface. These should be unevenly spread out. This will mimic the leather texture of a real basketball.
Use light and dark shading to add depth. Focus on areas where the light hits and where shadows fall. This gives your basketball a three-dimensional look.
Enhancing Lines
Basketballs have curved lines that form panels. These lines need to be clear and smooth. Use a ruler or freehand if you feel confident. Make sure the lines curve gently to match the ball’s shape.
Go over these lines to make them stand out. Use a darker pencil or pen. This will add contrast and make your drawing pop. Your basketball will look more defined and realistic.
Final Touches
Adding the final touches to your basketball drawing can make a big difference. These steps help your artwork look more refined and professional. Follow these simple steps to bring your basketball drawing to life.
Cleaning Up
Start by cleaning up any stray lines or marks. Use an eraser to remove any pencil guidelines. Make sure the lines are neat and clean. This step will help your drawing look polished.
If you used a lot of pencil, go over the main lines with a pen. This makes the drawing bold and clear. Ensure the ink is dry before erasing any remaining pencil marks.
Reviewing Your Work
Take a moment to review your work. Check for any areas that may need extra attention. Look at the lines and shapes. Are they smooth and even?
Consider adding some shading to give depth. Use light and dark tones to show where the light hits the basketball. This can make your drawing look more realistic.
Use a soft pencil or blending tool to create smooth transitions. This can make the ball look round and three-dimensional.
Finally, add any final details. These could be the texture of the basketball or small highlights. Little touches can make a big difference.
| Steps | Actions |
|---|---|
| Cleaning Up | Erase stray lines, ink over main lines, ensure neatness |
| Reviewing Your Work | Check lines, add shading, smooth transitions, add details |

Credit: www.pinterest.com
Practice Tips
Drawing a basketball can be a fun and rewarding activity. With the right practice tips, anyone can improve their skills. This section will cover some essential practice tips to help you draw a basketball more effectively.
Daily Practice
Consistency is key to improving your drawing skills. Daily practice ensures steady progress. Here are some tips to get the most out of your daily practice:
- Set aside a specific time each day for drawing.
- Start with basic shapes and gradually move to more complex details.
- Use reference images of basketballs to understand their structure.
- Practice drawing different angles of a basketball.
By dedicating time each day, you will see improvement over time.
Learning From Mistakes
Mistakes are a part of learning. Learning from mistakes can help you improve faster. Here’s how to make the most of your mistakes:
- Identify the specific areas where you struggle.
- Analyze why the mistake occurred.
- Look for resources or tutorials to address these areas.
- Practice the corrected technique repeatedly.
Remember, every mistake is an opportunity to learn and grow.
| Tip | Description |
|---|---|
| Use references | Always have a basketball image for reference. |
| Break it down | Start with simple shapes and add details slowly. |
| Stay consistent | Practice every day to build muscle memory. |
By following these tips, you’ll improve your drawing skills and create more realistic basketballs.
Frequently Asked Questions
What Materials Do I Need To Draw A Basketball?
You need paper, a pencil, an eraser, and colored pencils or markers. These basic materials help you get started.
How Do I Start Drawing A Basketball?
Begin by drawing a large circle. This will be the outline of the basketball.
How Do I Draw The Basketball Lines?
Draw two curved lines intersecting the circle. Then, add two more lines to form the classic basketball pattern.
How Can I Add Texture To My Basketball Drawing?
Add small, evenly spaced dots inside the circle. This will give your basketball a realistic texture.
Conclusion
Drawing a basketball can be fun and easy. Practice makes you better. Follow the steps and keep trying. Soon, your basketball will look great. Share your drawing with friends. Get feedback and improve. Enjoy the process and have fun drawing.
Happy sketching!