How to Hit a Badminton Forehand Clear (Full Extension Technique)

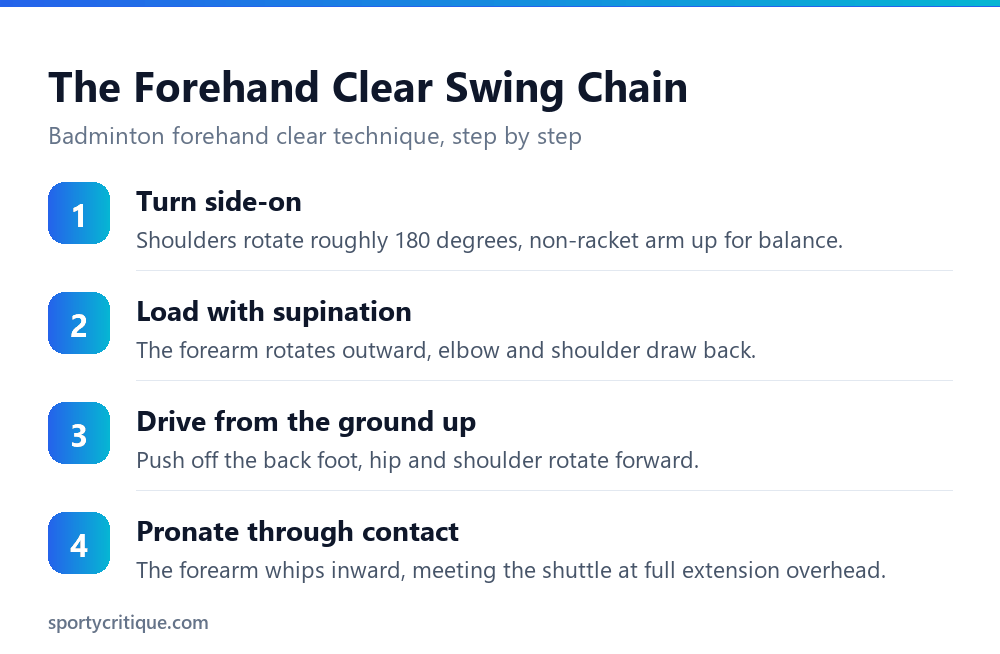
To hit a badminton forehand clear with full extension, turn side-on to the net with shoulders rotated roughly 180 degrees, load the stroke by rotating the forearm outward (supination) while drawing the elbow and shoulder back, then drive forward from the back foot through the hips and shoulder, whipping the forearm inward (pronation) to meet the shuttle at full extension directly above or slightly in front of the hitting shoulder. Power comes from that whole kinetic chain working in sequence, not from arm strength alone.
This breaks down the swing mechanics specifically: the shoulder turn, the supination-to-pronation whip, and the full-extension contact point that separates a real overhead clear from an arm-only push. If the question is when to use a clear versus other shot options and tactical timing, that’s covered separately.
- →The shoulder turn (roughly 180 degrees, side-on to the net) sets up the entire stroke
- →Supination (forearm rotating outward) loads the stroke before pronation (rotating inward) releases it
- →Power comes from the ground up: back foot push, hip rotation, shoulder rotation, then the arm
- →Contact happens at full extension, directly above or slightly in front of the hitting shoulder
- →A tight grip from the start of the stroke blocks pronation and kills both power and control
Table of Contents
The Shoulder Turn: Setting Up the Whole Stroke
Before the swing itself begins, the body should turn roughly 180 degrees to a side-on position relative to the net, with the non-racket arm raised for balance and timing. This isn’t a minor setup detail; it’s what allows the hips and shoulders to rotate through the shot afterward. A player who stays square to the net and reaches across their own body loses most of that rotational power before the swing even starts, since the shoulder physically can’t rotate through a stroke it’s already facing forward for.
In the ready position before the turn, the racket arm typically holds roughly two 90-degree angles, at the shoulder and elbow, neither fully extended nor overly compact. An arm that’s too straight or too bent at this stage restricts the range of motion available for the supination-pronation whip that generates most of the stroke’s actual power.
Supination and Pronation: Where the Power Actually Comes From
As the racket arm draws back to load the stroke, the forearm rotates outward, a motion called supination, while the elbow and shoulder pull back to build the stretch that powers the forward whip. This loading phase is largely invisible to a casual observer but is doing most of the actual power-generation work, the same way loading a spring stores energy before it’s released.
The release reverses that rotation: the forearm snaps inward, called pronation, right as the body’s rotation and the arm reach the contact point together. This inward whip is what gives an experienced player’s clear its distinctive fast “whip” or “swoosh” sound off the racket, a sound that’s largely absent from a slower, arm-only swing that skips the supination-pronation sequence entirely.
⚠️ Watch out: Gripping the racket tightly from the very start of the stroke makes proper pronation physically difficult, since a locked wrist and forearm can’t rotate freely through the whip motion. The grip should stay relatively relaxed through the backswing and only firm up briefly at the moment of contact.
The Full Kinetic Chain: Ground Up, Not Arm Alone
Power for the clear starts at the back foot, which pushes off and drives the hip forward, which in turn drives the shoulder forward, which finally arrives at the arm and the supination-pronation whip described above. Each link in that chain adds to the total energy reaching the shuttle at contact, which is why an overhead clear thrown with the legs and hips engaged travels meaningfully farther than the identical arm motion performed flat-footed.
This sequencing matters more than raw arm strength for generating a deep, full-court clear. A physically strong player who skips the ground-up sequence and swings purely with the arm produces less power than a lighter player who correctly chains the whole body through the stroke, which is part of why clear technique translates across a wide range of body types and strength levels.
Contact Point: Full Extension, Not a Late Reach
The shuttle should be met at the highest comfortable point reachable, directly above or slightly in front of the hitting shoulder, roughly analogous to the 12 to 1 o’clock position if the body were a clock face. Contacting the shuttle too low or too late, letting it drop closer to the body before swinging, reduces both power and the steep trajectory a good clear needs to clear an opponent at the net and land deep.
💡 Pro tip: A useful self-check: if a clear consistently lands short or the opponent gets under it easily, contact point is worth checking before assuming the problem is pure power. Meeting the shuttle earlier and higher, rather than swinging harder from a late contact point, often fixes a short clear more reliably than adding effort to the same flawed timing.
Follow-Through and Grip Considerations
The follow-through should carry the racket and the dominant side of the body slightly toward the net as the stroke finishes, a natural continuation of the rotational chain rather than an abrupt stop right at contact. Stopping the swing dead at the moment of contact, rather than letting the whole chain continue through, tends to also shorten the power generated before contact, since players who plan to stop abruptly often unconsciously decelerate slightly before the hit.
📊 Note: A grip that stays secure without needing a hard, constant squeeze makes it easier to keep the wrist and forearm loose through the backswing and loading phase. A towel grip like the Yonex AC402EX Towel Grip ($13.95) adds tackiness and sweat absorption specifically so a lighter hold stays secure, which supports the relaxed-grip, sharp-pronation technique described above rather than working against it.
Common Forehand Clear Mistakes
- ✓Turn fully side-on before starting the swing
- ✓Keep the grip relaxed through the backswing, firming only at contact
- ✓Drive the stroke from the ground up through the hips and shoulder
- ✓Meet the shuttle at full extension, above or slightly ahead of the shoulder
- ✕Reaching across the body instead of turning side-on
- ✕Gripping tightly from the start, which blocks pronation
- ✕Swinging with the arm alone, skipping the leg and hip drive
- ✕Letting the shuttle drop too low before making contact
Getting Into Position: Footwork Before the Swing
Good clear technique starts before the racket even moves, with the footwork that gets a player into a balanced, side-on hitting position under the shuttle rather than lunging or reaching at the last second. A chasse or scissor-kick footwork pattern to the rear corners, depending on which is more comfortable for a given player, positions the body so the shoulder turn and kinetic chain described above can actually happen cleanly.
A player who arrives late or off-balance under the shuttle has to compensate with the arm alone, since there’s no time or stability left to execute a proper ground-up sequence. This is exactly why clear technique often breaks down under time pressure in a fast rally even for a player who executes it cleanly in slow, fed practice: the footwork that sets up the stroke hasn’t been drilled to the same automatic level as the swing itself.
Five Specific Ways Contact Point Goes Wrong
Most of these faults trace back to the same root cause described earlier: arriving under the shuttle late or off-balance, which forces a compensation somewhere in the chain. Fixing footwork and court positioning first, before drilling the swing itself further, resolves more of these faults than isolated swing correction does on its own.
Drilling the Motion
Shadow swings without a shuttle, focused purely on the shoulder turn, supination-pronation sequence, and full extension, let a player feel the correct motion without the added pressure of tracking and timing a real shuttle. This isolation work is where the counterintuitive relaxed-grip-until-contact feel actually gets learned, since it’s hard to notice grip tension while also focused on hitting a moving target.
Fed multi-shuttle drills, where a coach or partner feeds shuttles to the back corners in sequence, build the footwork-to-swing connection under repeated, moderate time pressure without the full unpredictability of live rally play. Progressing from shadow swings to fed drills to live points, in that order, builds the skill in layers rather than trying to fix swing mechanics and court movement simultaneously under full game pressure.
Frequently Asked Questions
Why does my forehand clear keep landing short?
Late or low contact point is the most common cause, followed by swinging with the arm alone instead of driving the stroke from the ground up through the hips and shoulder. Check contact timing before assuming more raw power is the fix.
What is pronation and why does it matter for the clear?
Pronation is the inward rotation of the forearm during the swing’s release, and it’s a major source of the stroke’s actual power and racket-head speed. Gripping too tightly from the start of the stroke restricts this rotation and reduces both power and control.
Do I need to jump to hit a good forehand clear?
No, jumping isn’t required for a standard forehand clear, though advanced players sometimes use a small jump for specific tactical situations. The core power comes from the ground-up kinetic chain and rotation, not from getting extra height off the court.
How is the forehand clear different from a smash?
Both share the same overhead setup and general swing mechanics, but a smash drives through the shuttle more steeply downward for pace and a lower trajectory, while a clear aims for maximum height and depth to send the shuttle to the back of the opponent’s court.
Why does my clear break down during fast rallies even though it looks fine in practice?
Footwork is the usual culprit. If a player arrives under the shuttle late or off-balance, there’s no time to execute the full ground-up kinetic chain, forcing an arm-only compensation that looks and feels nothing like the clean technique drilled in slower, fed practice.
Should I practice the clear with shadow swings before hitting real shuttles?
Yes, it’s a useful progression. Shadow swings isolate the shoulder turn and supination-pronation sequence without the added complexity of tracking a moving shuttle, making it easier to feel and correct grip tension and sequencing errors before adding real shuttles back in.
Every piece here connects to the others: footwork sets up the turn, the turn enables the kinetic chain, and the chain feeds the supination-pronation whip that finally meets the shuttle at full extension. Isolating and drilling each piece, then rebuilding them together, is a more reliable path to a genuinely reliable clear than trying to fix the whole stroke at once.
As an Amazon Associate, we earn from qualifying purchases through links on this page.