How to Tack Up a Horse Step by Step


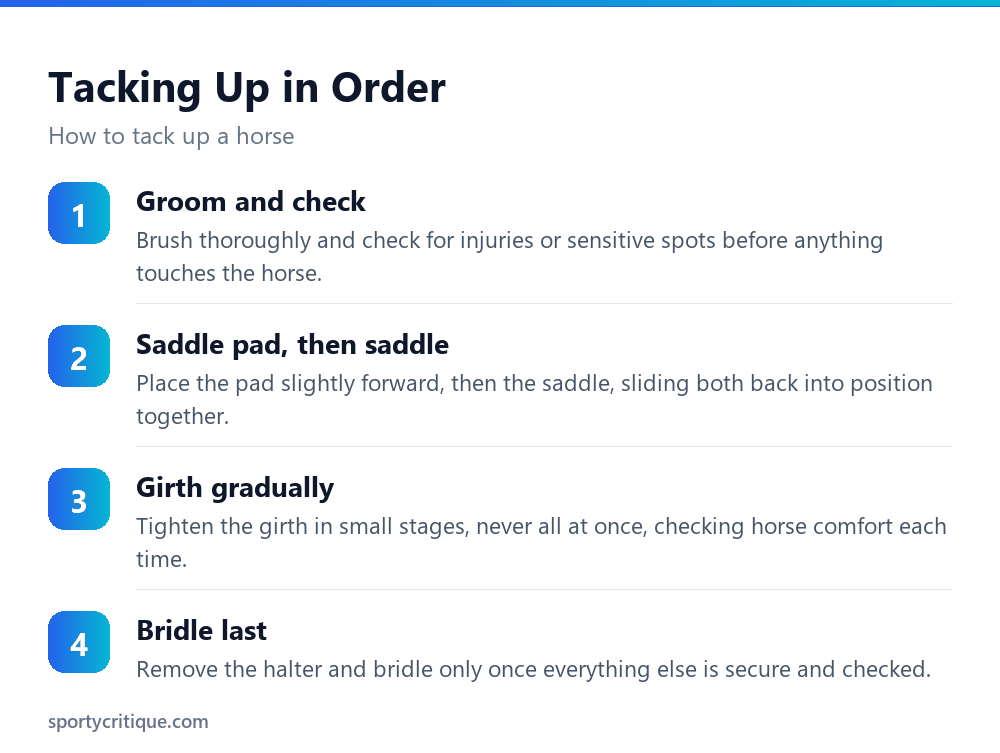
Learning how to tack up a horse in the correct order means grooming and checking the horse first, placing the saddle pad slightly forward before sliding it back into position with the saddle, tightening the girth gradually in small stages rather than all at once, and putting the bridle on last, only after everything else is checked and secure. Rushing this order, especially girthing too quickly, is the most common source of tacking-up mistakes for beginners.
Tacking up looks simple to an experienced rider, a routine repeated so many times it becomes automatic, but for a beginner it’s a sequence with several specific details that matter for both the horse’s comfort and the rider’s safety. Getting the order and technique right from the start builds habits that stay reliable even under the added pressure of an unfamiliar horse or a busy barn environment.
- →Grooming and checking the horse thoroughly always comes before any tack goes on
- →The saddle pad and saddle should be placed slightly forward, then slid back into position
- →Girthing gradually in stages prevents discomfort and reduces the risk of a horse reacting badly
- →The bridle goes on last, after the saddle and girth are already checked and secure
- →Checking girth tightness again after a few minutes of walking is a step beginners often skip
Table of Contents
Grooming and Checking Before Anything Else
Thorough grooming before tacking up removes dirt, dust, and loose hair that would otherwise get trapped under the saddle pad and girth, potentially causing rubbing or discomfort during a ride. This step also gives a rider the chance to run hands over the horse’s back, girth area, and legs to check for any swelling, heat, or sensitivity that would need attention before riding.
⚠️ Watch out: Skipping a proper grooming and check-over to save time is a common shortcut that can mean missing an injury, a girth gall, or a sensitive spot that then gets aggravated once tack and rider weight are added. This quick check takes only a few extra minutes but catches problems before they become bigger issues mid-ride.
Placing the Saddle Pad and Saddle
The saddle pad goes on first, positioned slightly higher and more forward on the horse’s back than its final resting position, since it needs to be slid back into place along with the saddle rather than placed directly in its final spot. Placing it too far back from the start and sliding it forward instead pushes the horse’s coat hair the wrong direction underneath, which can cause irritation during a ride.
The saddle itself follows the same forward-then-back placement principle, set down gently rather than dropped, and slid back along the direction of the coat until it settles into a natural, comfortable resting position just behind the shoulder blades. Placing the saddle too far back from the very start, or too far forward and never adjusted, are two common positioning mistakes that affect both horse comfort and rider balance.
💡 Pro tip: A saddle that naturally wants to slide slightly forward when set down and released is generally positioned correctly; a saddle that stays exactly where it’s initially placed without any natural settling is sometimes positioned slightly too far back.
Girthing Gradually, Not All at Once
Tightening the girth fully in one motion is uncomfortable for most horses and can trigger reactions ranging from mild irritation to a more significant behavioral response, particularly in a horse that’s had a bad experience with girthing before. Tightening in two or three gradual stages, checking the horse’s comfort and body language between each stage, is both kinder to the horse and safer for the handler.
A girth that’s snug enough to keep the saddle securely in place but not immediately at full riding tightness is the right target for the initial tacking-up stage, with a final tightening check happening closer to mounting, and often another check after a few minutes of walking once the horse has settled and its body has adjusted slightly to the tack.
📊 Note: Some horses instinctively hold their breath or tense their belly muscles during initial girthing, which can make the girth feel tighter than it actually will be once the horse relaxes. This is exactly why a follow-up check after a few minutes of movement matters, not just an initial tightening before mounting.
Putting the Bridle On Last
The bridle goes on after the saddle and girth are checked and secure, with the halter typically kept on underneath or nearby until the very last moment for safety and control during the transition. This ordering keeps the horse safely secured by lead rope or crossties for as long as possible during the more involved saddle placement and girthing steps.
Guiding the bit gently into the horse’s mouth, using a thumb pressed into the gap behind the front teeth if needed to encourage the mouth to open, and then carefully bringing the headpiece up and over the ears without bending or folding them uncomfortably, are the specific technical details that take a beginner the most practice to get smooth and confident.
Common Tacking-Up Mistakes
- ✓Groom and check the horse thoroughly before any tack goes on
- ✓Place the saddle pad and saddle slightly forward, then slide back
- ✓Tighten the girth gradually in stages, checking comfort each time
- ✓Put the bridle on last, after the saddle and girth are secure
- ✕Skipping a proper grooming and injury check to save time
- ✕Placing the saddle too far back and never adjusting its position
- ✕Tightening the girth fully in one motion without gradual stages
- ✕Putting the bridle on first, before the horse is safely secured for saddling
Checking Saddle and Bridle Fit
A saddle that doesn’t fit a specific horse well, too narrow, too wide, or poorly balanced front to back, causes discomfort regardless of how carefully the tacking-up process itself is executed. Beginners tacking up a horse that isn’t their own should confirm with the owner or instructor that the saddle being used is actually a correct fit for that particular horse before assuming any saddle will work.
Bridle fit matters similarly; a browband that’s too tight can pinch behind the ears, and a noseband or bit that sits at the wrong height causes ongoing discomfort during riding. Checking that two fingers fit comfortably under the noseband and that the bit sits with a small wrinkle at the corners of the mouth, not high enough to pull those corners up sharply, are simple fit checks worth learning early.
Safety Habits While Tacking Up
Standing to the side rather than directly behind the horse during tacking up, particularly while adjusting the girth or reaching around the hindquarters, reduces injury risk if the horse reacts suddenly. Staying aware of the horse’s ears, tail, and overall body language throughout the process gives an early warning if the horse is becoming uncomfortable or agitated at any point in the routine.
Keeping the horse properly secured, tied with a quick-release knot or held safely by an assistant, throughout the entire tacking-up process, not just during the more involved saddling steps, prevents a horse from wandering off partially tacked or reacting unpredictably in an open space without any control in place.
Untacking in Reverse Order
Untacking generally reverses the tacking-up sequence: the bridle comes off first, with a halter immediately secured in its place before anything else is removed, followed by loosening and removing the girth, and finally lifting the saddle and pad away together. Removing the girth before the saddle rather than trying to lift the saddle off while it’s still fastened is both safer and easier.
Loosening the girth gradually when untacking, similar to the gradual approach used when putting it on, is more comfortable for the horse than releasing it in one abrupt motion, particularly if the horse has just finished a ride and its body is still warm and slightly sensitive from the exertion. This small courtesy at the end of a ride matters as much as the careful approach used at the start.
Differences Between English and Western Tack
The core sequence, grooming, saddle pad, saddle, girth, bridle, applies to both English and Western riding disciplines, but the specific equipment differs meaningfully. Western saddles use a cinch rather than a girth, typically fastened with a latigo strap and a specific knot rather than a simple buckle, which takes separate practice to master smoothly.
Western bridles also commonly skip a noseband entirely and sometimes use a bosal or hackamore instead of a standard bit, depending on the specific training approach and discipline. A beginner learning on one style shouldn’t assume the exact same equipment-specific steps transfer directly to the other, even though the broader tacking-up philosophy, groom first, girth gradually, bridle last, remains consistent across both.
Tacking Up a Fidgety or Anxious Horse
A horse that fidgets, paws, or shows tension during tacking up often benefits from a slower, more deliberate pace rather than rushing through the routine to get it over with quickly. Taking extra time during grooming specifically, since this is the horse’s first physical contact of the session, can help settle a tense horse before saddling even begins.
If a specific step consistently triggers tension, girthing being the most common culprit, breaking that step down even further, pausing between smaller increments of tightening rather than the usual two or three stages, gives an anxious horse more time to process and accept the sensation. Consulting a trainer about a horse with a persistent, significant tacking-up problem is worthwhile rather than assuming the issue will resolve purely through repetition alone.
Keeping Tack Clean for Comfort and Longevity
Dirty or stiff leather, particularly on the girth and saddle panels that sit directly against the horse’s skin, can cause rubbing and discomfort that has nothing to do with fit or tacking-up technique. Regular cleaning and conditioning of leather tack keeps it supple and reduces this specific, easily overlooked source of discomfort.
Checking girth and saddle pad linings for embedded dirt or hardened sweat residue before each use, not just during periodic deep cleaning, catches a build-up that can otherwise rub against sensitive skin during a ride. This quick check fits naturally into the grooming step already built into the tacking-up routine, adding minimal extra time to the overall process.
Frequently Asked Questions
What order should I tack up a horse in?
Groom and check the horse first, then place the saddle pad and saddle, tighten the girth gradually in stages, and put the bridle on last once everything else is secure.
Why does my horse react badly when I tighten the girth?
Tightening too quickly or too tightly in one motion is uncomfortable for most horses. Gradual tightening in stages, with a final check closer to mounting, usually resolves this reaction.
How do I know if my saddle pad is positioned correctly?
Place it slightly forward of its final position, then slide it back along the direction of the coat together with the saddle, rather than placing it directly in its final spot from the start.
Should I check the girth again after tacking up?
Yes. Checking again closer to mounting, and often once more after a few minutes of walking, catches the natural loosening that happens as a horse relaxes and adjusts to the tack.
Why does the bridle go on last?
It keeps the horse safely secured by halter or crossties for as long as possible during the more involved saddling and girthing steps, rather than removing that safety control too early.
How do I check if a bridle fits correctly?
Confirm two fingers fit comfortably under the noseband, and check that the bit creates only a small wrinkle at the corners of the mouth, not enough to pull those corners up sharply.
Tacking up becomes automatic with repetition, but the underlying habits, grooming first, gradual girthing, checking fit, and staying alert to the horse’s comfort throughout, matter just as much for an experienced rider as for a complete beginner learning the routine for the first time.
As an Amazon Associate, we earn from qualifying purchases through links on this page.