How to Build a Foosball Table: A Realistic DIY Guide

Building a foosball table is a woodworking project with bought hardware. Make the cabinet, legs, playfield, and ball return yourself; buy the rods, bearings, men, handles, and bumpers as parts — steel rods and precision bearings aren’t worth improvising. Order the hardware first, because rod length dictates your cabinet width. The critical step is drilling the bearing holes: clamp both cabinet walls together and drill through both at once, so the holes align perfectly and the rods don’t bind.
Unlike a shuffleboard table, where the demanding part is a machining tolerance most people can’t meet at home, a foosball table is genuinely buildable. The cabinet is a plywood box, the playfield is a flat sheet, and the fiddly precision components can all be bought cheaply.
There’s one step that decides whether it plays well, and it isn’t the one people expect. It’s drilling eight pairs of perfectly aligned holes.
- →Buy the hardware first — rod length dictates every cabinet dimension.
- →Drill bearing holes with both walls clamped together, through both at once.
- →The cabinet must be square, or the rods bind for the life of the table.
- →Use 3/4 in plywood or MDF minimum. Thin walls flex and pinch the rods.
- →Standard layout is 1 goalie, 2 defence, 5 midfield, 3 attack per side.
- →Seal and smooth the playfield properly — ball roll depends on it entirely.
What to build and what to buy
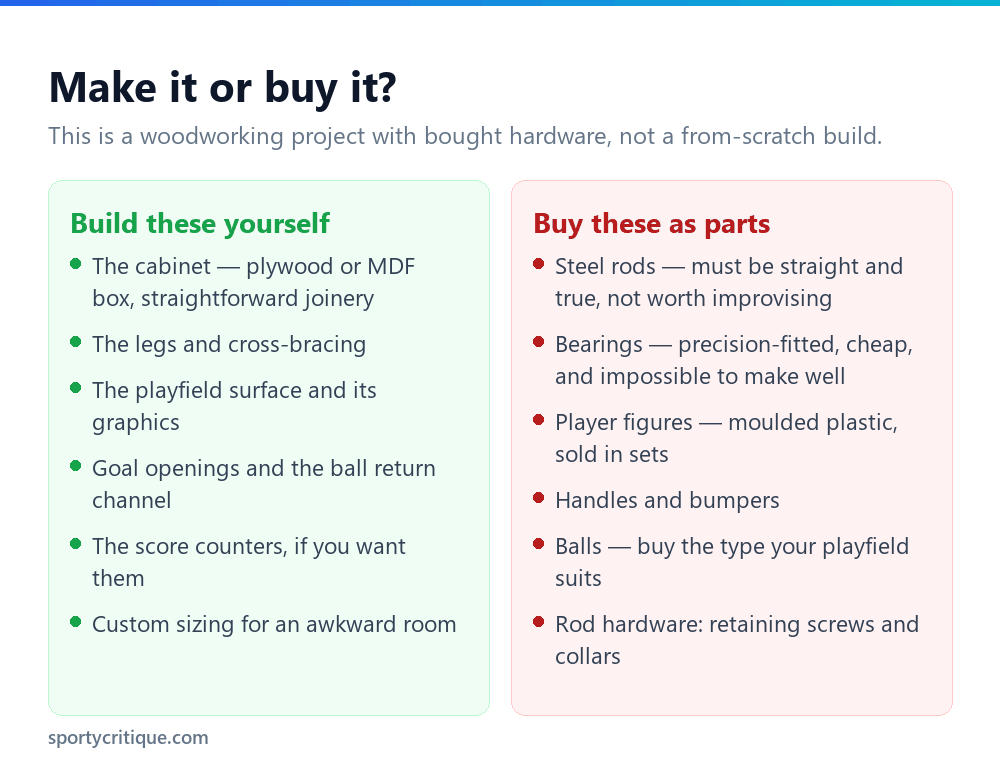
The line here is clear and worth respecting. Steel rods need to be straight and true along their whole length; a rod with any bend binds in the bearing permanently, and getting stock steel genuinely straight at home is not realistic. Bearings are precision plastic collars, they cost very little, and there’s no home method that produces anything comparable. Men are moulded plastic, sold in matched sets.
Buying these isn’t a compromise — it’s what makes the project sensible. Foosball parts suppliers sell everything as components precisely because people repair and rebuild tables, and the same catalogue serves a new build. Our repair guide covers the same parts from the maintenance side.
Everything else is ordinary woodworking. A cabinet, some legs, a flat playfield, and a sloped channel to return balls. Nothing there requires specialist tooling.
The hardware you can’t make is the hardware that’s cheap to buy. That’s what makes a DIY foosball table a realistic project and a DIY shuffleboard table mostly not.
Order the hardware before you cut anything
This is the sequencing mistake that scraps builds. Your cabinet width is determined by your rod length, minus the handle, minus however far you want the rods to protrude on the far side. Rod lengths vary between suppliers, and telescoping rods change the calculation completely.
So buy the rods, bearings, men, handles, and bumpers first. Measure what actually arrives. Then design the cabinet around those measurements. Designing first and hoping to find rods that fit is how people end up with a beautifully made box that no available hardware suits.
Decide the through-rod versus telescoping question at this stage too, since it affects both the cabinet design and the room requirement. Our buying guide covers the trade-off — briefly, telescoping rods stay inside the cabinet, which is safer around small children and in tight rooms, at the cost of a slightly less direct feel.
The cabinet, and the step that matters

Material first: use three-quarter inch plywood or MDF at minimum. This isn’t about durability so much as rigidity — a foosball table takes significant lateral force when players push and pull, and thin walls flex. A flexing wall moves the bearing, which pinches the rod, which is exactly the drag problem our maintenance guide spends its time solving. Build the box heavy.
Square matters more than on ordinary furniture, for the same reason it does when assembling a bought table: the rods pass through bearings mounted on opposite walls. If those walls aren’t parallel, every rod runs at a slight angle through its bearings and binds forever. Check square by measuring diagonals as you glue and clamp, not by eye.
Then the bearing holes — the step that decides everything. Each rod needs a hole in each side wall, and the two holes must align precisely. Even a couple of millimetres of misalignment means a rod that drags no matter how much silicone you apply.
The technique that solves this: clamp both side walls together and drill through both at once, before assembling the cabinet. Identical hole positions are then guaranteed by geometry rather than by careful measuring. Use a drill press if you have access to one, or a drill guide to keep the bit perpendicular — a hole drilled at a slight angle causes the same binding as a misaligned one.
⚠️ Watch out: Do not try to drill the second wall by measuring from the first. Small measurement errors compound across eight rod positions, and by the time you discover it the cabinet is assembled. Drilling both walls together takes ten extra minutes and removes the entire risk.
Playfield, goals, and ball return
The playfield is a flat sheet set into the cabinet, positioned so the top rail sits roughly four inches above it — enough to keep the ball in play without obstructing the figures. Use a stable sheet material and seal it well; ball roll depends entirely on this surface being smooth and consistent, and an unsealed board absorbs moisture and swells.
Finish it with several thin coats of a hard-wearing sealer or paint, sanding lightly between coats. Graphics and pitch markings go on before the final clear coats so they’re protected rather than sitting on the surface where the ball wears them away.
The goals are openings at each end, sized for the ball with clearance. Behind and beneath each goal, build a sloped channel that carries balls to a return opening on the side of the cabinet. The slope needs to be gentle but continuous — balls that stall in a flat section mean reaching into the cabinet mid-game, which is the most irritating possible flaw in a finished table.
Make the return channel accessible. Debris, coins, and occasionally a jammed second ball will end up in there, and a channel you can’t reach into means dismantling the cabinet to clear a blockage.
Legs, levelling, and fitting out
Overbuild the legs. Foosball generates real lateral force, and a table that rocks when players lean into it is unpleasant to play on. Use substantial timber, brace between the legs, and fix the brackets solidly into the cabinet rather than into edge-grain MDF, which strips.
Fit adjustable feet. Levelling isn’t optional — an unlevel table sends every loose ball drifting to one side, and players will blame their own touch for months. Threaded inserts with bolt-in feet are cheap and worth the extra step.
Fitting out follows the standard assembly order: bearings pressed in square and flush, rods through, men spaced per the standard 1-2-5-3 layout counting outward from each goal, then bumpers, then handles. Tighten the men’s retaining screws snug only — overtightening strips the plastic, which is a fault you’ll then be living with.
💡 Pro tip: Before final assembly, test-fit each rod through its bearings with nothing else attached. Every rod should slide and spin with almost no resistance. If one binds, fix it now — once the men and handles are on and the table is standing, diagnosing and correcting a bearing alignment problem is far more work.
Simpler builds worth considering
A full-size table is a substantial project. Two scaled-down versions deliver most of the satisfaction with considerably less risk, and both are genuinely good first builds.
A tabletop foosball unit — a shallow cabinet designed to sit on an existing table — removes the legs, the levelling, and much of the structural load from the project. The rods are shorter, which means less deflection and more tolerance for slight bearing misalignment. It plays a faster, more compressed game, and for a flat or a small room it’s a more useful object than a full-size table nobody has space to stand around.
A kids’ or half-size table scales everything down proportionally. Shorter rods are more forgiving, less material is needed, and mistakes cost less. The standard 1-2-5-3 rod layout still works; you’re simply compressing the spacing. If you intend to build a full-size table eventually, building a small one first is an excellent way to discover the bearing-alignment problem on a project where getting it wrong is cheap.
Either way, the technique that matters is identical: buy the hardware first, drill the bearing holes through both clamped walls, and keep the cabinet square. Learn those on a small build and the full-size version becomes routine.
Is it worth building?
More often than with a shuffleboard table, yes — but the economics still deserve a look.
The hardware set alone (rods, bearings, men, handles, bumpers, balls) is a meaningful cost, and adding sheet material, timber, and finish can bring a build close to the price of a decent entry-level table. What you get for the extra effort is a cabinet built to whatever dimensions you want, made of material far heavier than a budget table uses — and since weight is the best proxy for table quality, an overbuilt DIY cabinet can genuinely outplay a cheap bought one.
The strongest cases for building: you want a non-standard size, you want something substantially more solid than the budget tables in your price range, or the woodworking is the point. The weakest case is trying to save money against the second-hand market, where sound tables sell cheaply because they’re heavy and awkward to move.
Frequently asked questions
Can you really build a foosball table at home?
Yes — more realistically than most games tables. The cabinet, legs, playfield, and ball return are ordinary woodworking, and the precision parts (rods, bearings, men, handles) are bought cheaply as components. The one demanding step is drilling aligned bearing holes, and clamping both walls together to drill through at once solves that.
What parts do I need to buy for a DIY foosball table?
Steel rods, bearings, player figures, handles, rod bumpers, retaining hardware, and balls. Foosball parts suppliers sell all of these as components because people rebuild tables constantly. Buy them before you cut any timber, since rod length determines your cabinet dimensions.
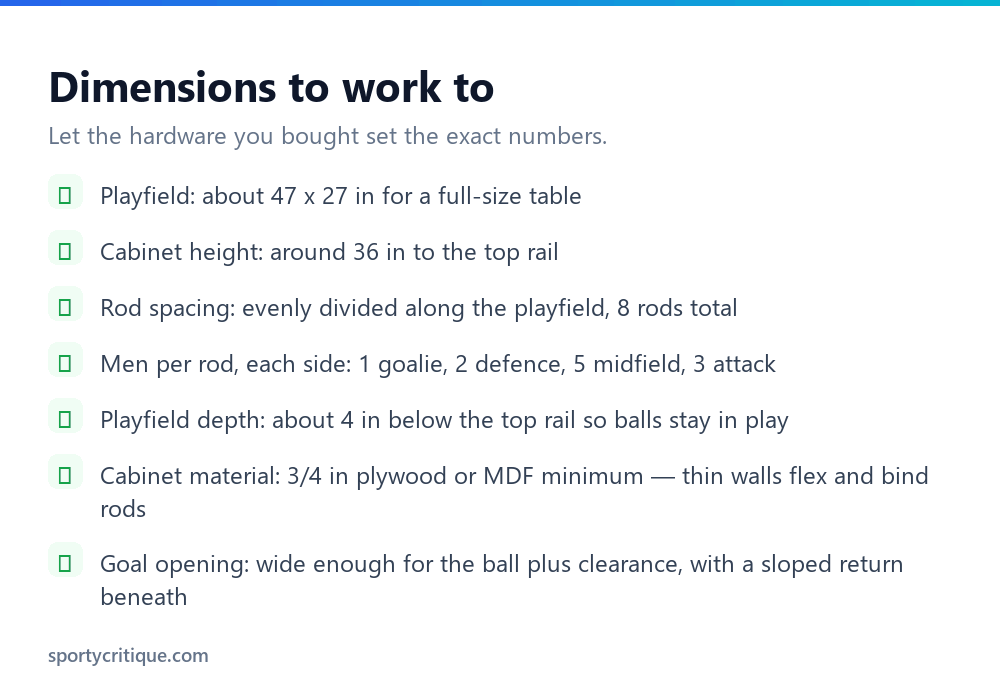
What size should a homemade foosball table be?
A full-size playfield is roughly 47 x 27 inches with the cabinet around 36 inches tall, but let your bought rods set the exact width. Building smaller is perfectly viable for a tight room — just keep the standard 1-2-5-3 rod layout and space the rods evenly along whatever length you choose.
What’s the hardest part of building a foosball table?
Drilling the bearing holes so that each pair aligns exactly across the cabinet. Misalignment of even a couple of millimetres causes rods to bind permanently, and no amount of lubricant fixes it. Clamp the two side walls together and drill through both simultaneously — that guarantees alignment by geometry.
What wood should I use?
Three-quarter inch plywood or MDF at minimum for the cabinet. The priority is rigidity rather than appearance: thin walls flex under play, which moves the bearings and pinches the rods. Solid timber works for legs and rails, and the playfield needs a flat, stable sheet that you seal thoroughly.
Is it cheaper to build a foosball table than buy one?
Marginally, at best, once you’ve bought the hardware set and materials — and not at all compared with the second-hand market. Build it for a custom size, or to get a much heavier cabinet than budget tables offer, rather than to save money.
- →Assembling a foosball table — the same squaring principles
- →Fixing a foosball table — the parts catalogue from the repair side
- →Cleaning and lubrication — setting up your new table properly
- →Choosing a foosball table — if buying starts to look sensible
- →How to play foosball — now use it