How to Draw a Volleyball: Step-by-Step Guide for Beginners
Drawing a volleyball is simple with the right steps. Anyone can do it with practice.
Volleyballs have a unique pattern and shape. This makes them fun to draw, whether you’re an artist or just doodling. In this guide, you’ll learn how to capture the round shape and intricate details of a volleyball. We’ll break down the process into easy steps.
By the end, you’ll have a volleyball that looks realistic and ready for the court. So grab your paper and pencil, and let’s start drawing!
Materials Needed
To draw a volleyball, you need specific materials. These tools will help you create a detailed and accurate drawing. Using the right supplies makes the process easier and more enjoyable.
Essential Tools
First, gather your essential tools. You will need a pencil. A regular HB pencil works well. It is perfect for sketching the basic shape. You also need an eraser. Mistakes happen, and an eraser helps you fix them. Next, grab some paper. Any type of drawing paper is fine. You want a smooth surface for clean lines. A ruler is also important. It helps you draw straight lines and keep proportions accurate. Finally, a black pen or fine liner is useful for outlining your drawing.
Optional Supplies
There are optional supplies that can enhance your drawing. Colored pencils or markers can add depth and color. They make your volleyball look more realistic. A blending stump can help you shade smoothly. It softens pencil lines and creates a more polished look. You might also like to use a compass. It helps draw perfect circles, making your volleyball shape precise. Lastly, a white gel pen can add highlights. It gives your drawing a professional touch.
Basic Shape
Drawing a volleyball starts with understanding its basic shape. A volleyball is a sphere. Capturing this shape correctly is crucial. This section will guide you through drawing the basic shape of a volleyball.
Drawing The Circle
First, draw a perfect circle. Use a compass or trace around a round object. This will be your volleyball’s base. Make sure the circle is neat and even. A clean circle makes the rest of the drawing easier.
Perfecting The Outline
Next, refine the circle’s outline. Make the edges smooth and consistent. Check for any irregularities. Ensure the circle looks balanced. This step is important for an accurate volleyball shape.
Once the outline is smooth, you are ready for the next steps. The basic shape sets the foundation. With a precise circle, you can now add details. This makes your volleyball drawing look realistic.
Panel Lines
Drawing the panel lines on a volleyball is essential. These lines give the ball its distinct look. In this section, we’ll cover how to create accurate panel lines.
Dividing The Circle
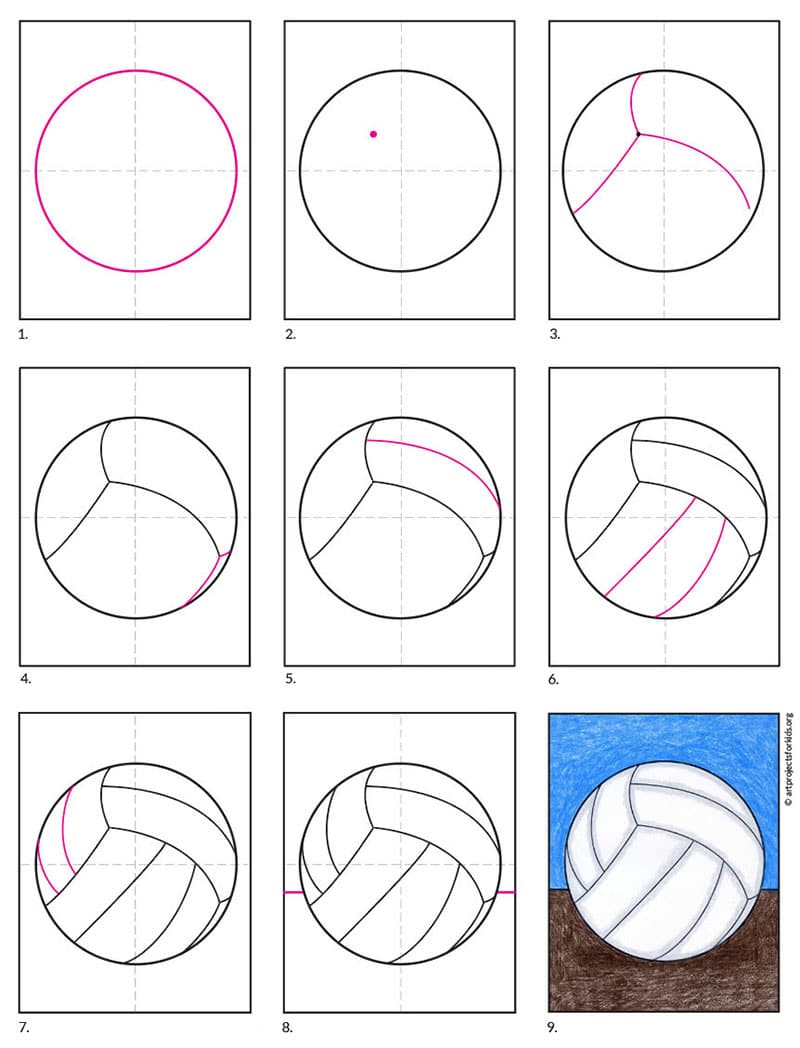
First, you need to divide your circle into equal sections. Start by drawing a vertical line down the center of the circle. Next, draw a horizontal line across the center. Now, you have four equal parts. For more detail, divide each quarter into two more parts. You should now see eight equal sections.
Tip: Use a ruler to make sure your lines are straight. This ensures that your sections are equal. Consistent sections are crucial for the next steps.
Adding Curved Lines
Volleyballs have unique curved lines on each panel. Begin by drawing a curved line starting from the top of one section. Curve it down towards the bottom of the opposite section. Repeat this for all sections. The lines should resemble a wave or an “S” shape. This creates the traditional volleyball panel look.
Pro Tip: Use a light hand when drawing curved lines. This allows for easy adjustments. Once satisfied, go over them with a darker pencil or pen.
Here is a quick summary of the steps:
- Divide the circle into equal sections.
- Draw curved lines across each section.
By following these steps, you can draw realistic volleyball panel lines.

Credit: www.youtube.com
Details And Textures
Drawing a volleyball involves more than just a circle with lines. Details and textures make the drawing realistic and engaging. They bring the ball to life, making it appear three-dimensional. Let’s explore how to enhance the panels and add shadows.
Enhancing The Panels
Each volleyball has panels that create its unique look. Start by drawing the basic lines for the panels. Make sure they curve slightly. This gives the ball a round appearance.
Next, add depth to the panels. Draw another line close to the original panel lines. This creates the illusion of seams. Add small, curved lines where the panels meet. This detail makes the seams look stitched.
Finally, vary the thickness of your panel lines. Thicker lines suggest the edges closest to the viewer. Thinner lines appear farther away. This trick adds a three-dimensional effect.
Adding Shadows
Shadows give the volleyball a realistic look. Start by deciding where your light source is. The opposite side will have the shadows. Use a pencil to shade the areas that are farthest from the light.
Blend the shadows smoothly. This makes the ball look round. Avoid harsh lines between light and dark areas. Gradually darken the shadows as you move away from the light source.
Lastly, add small, subtle shadows inside the panels. This adds depth and texture. Shadows make the ball look like it is ready to be hit across the net.
Final Touches
Final touches make your volleyball drawing stand out. These steps refine your artwork. They bring a polished look to your sketch. Let’s dive into these essential steps.
Cleaning Up Lines
First, erase any unnecessary lines. Use a soft eraser to avoid smudging. Be gentle to keep the paper clean. This step ensures clarity in your drawing.
Next, refine the main lines. Trace over them with a sharper pencil or pen. This enhances the outline of your volleyball. Clear lines make your drawing look professional.
Finalizing The Drawing
Now, add details to your volleyball. Draw the seams accurately. Make sure they curve correctly. This adds realism to your sketch.
Then, shade the volleyball. Use light strokes to create shadows. This gives your drawing depth. Pay attention to light sources for accurate shading.
Lastly, review your work. Check for any missed details. Make final adjustments to perfect your drawing. A thorough review ensures a well-finished piece.
Coloring The Volleyball
Once you’ve drawn your volleyball, the next step is to bring it to life with color. Coloring adds depth and realism to your drawing. It can also make your artwork stand out. Follow these steps to color your volleyball beautifully.
Choosing Colors
Selecting the right colors is crucial. Traditional volleyballs are white with blue, yellow, or red panels. You can stick to these colors for a realistic look. Feel free to get creative and choose colors that you like.
If you want a beach volleyball, consider using brighter colors. These can include neon shades or pastel tones. The right colors will make your volleyball pop. They will also help set the mood of your drawing.
Applying Colors
Start coloring the largest areas first. Use steady, even strokes to fill in the panels. This will give your volleyball a smooth appearance. If you’re using markers, be careful with the edges. You don’t want the colors to bleed.
Next, add shading to give your volleyball a 3D effect. Darken the areas that would be in shadow. Lighten the areas that would catch the most light. This will give your volleyball a realistic look. Don’t forget to blend your colors well.
Finally, add any small details. This might include highlights or texture marks. These details can make your volleyball look more realistic. Take your time and enjoy the process. Your volleyball will look fantastic with the right colors.
Common Mistakes
Drawing a volleyball may seem simple, but many beginners make common mistakes. These errors can affect the final look of your drawing. Below, we’ll address some of the typical mistakes and how to avoid them.
Avoiding Uneven Panels
One of the most common mistakes is drawing uneven panels. Volleyballs usually have six panels. Each panel should be symmetrical and evenly spaced. Here are some tips to help:
- Use a compass to draw a perfect circle.
- Divide the circle into six equal parts.
- Ensure each segment is the same size and shape.
Using a ruler or a stencil can help maintain uniformity. Consistency is key to a realistic volleyball drawing.
Correcting Proportions
Another mistake is incorrect proportions. The ball’s proportions should be accurate to make it look realistic. Follow these steps for correct proportions:
- Start with a light sketch of the ball.
- Draw the panels lightly to adjust as needed.
- Ensure each section is proportional to the others.
Avoid making some sections too big or too small. This will keep your drawing balanced and more lifelike.

Credit: www.youtube.com
Practice Tips
Mastering the art of drawing a volleyball requires patience and practice. These practice tips will help you hone your skills and develop your unique style. Focus on small improvements with each session, and soon, you will see significant progress in your drawings.
Improving Your Skills
To improve your volleyball drawing skills, start with the basics. Practice drawing circles and lines until you can create smooth, even shapes. This helps in forming the main structure of the volleyball.
- Draw Daily: Make a habit of drawing every day. Consistency is key.
- Use References: Look at real volleyballs or photos for accuracy.
- Break It Down: Divide the volleyball into sections. Practice each section individually.
Focus on the details. The lines and patterns on the volleyball are crucial. Ensure they are symmetrical and evenly spaced.
Experimenting With Styles
Experimenting with different styles can make your drawings more interesting. Try various techniques to see what works best for you.
- Shading: Add shading to give your volleyball a 3D effect. Use light and shadow to create depth.
- Textures: Experiment with different textures. This can add realism to your drawings.
- Color: Use colors to make your volleyball stand out. Try different color combinations.
Don’t be afraid to make mistakes. Each error is a learning opportunity. Keep experimenting until you find your unique style.
By following these tips, you can improve your volleyball drawing skills and develop your artistic style.
Credit: www.reddit.com
Frequently Asked Questions
What Materials Do I Need To Draw A Volleyball?
You need paper, a pencil, an eraser, a ruler, and colored pencils. These basic materials will help you start drawing a volleyball.
How Do I Start Drawing A Volleyball?
Start by drawing a perfect circle. Use a compass or a round object to help you draw an accurate circle.
How Do I Draw The Volleyball’s Lines?
Divide the circle into six sections with curved lines. These lines create the volleyball’s characteristic pattern.
Can I Add Shading To My Volleyball Drawing?
Yes, shading adds depth and realism. Use light and dark shades to highlight the volleyball’s curves and texture.
Conclusion
Drawing a volleyball is easier than you think. Follow the steps carefully. Practice makes perfect, so keep trying. Your skills will improve over time. Use simple shapes to start. Add details gradually. Take your time and enjoy the process. Share your drawings with friends.
Get feedback and improve. Drawing can be fun and relaxing. Keep practicing and have fun with it!