Assembling an above ground swimming pool might seem challenging. But with the right steps, it’s manageable.
In this guide, we’ll break down the process for you. Above ground swimming pools are a great addition to any backyard. They provide a fun and relaxing way to enjoy warm weather. But before you can dive in, you need to set it up.
This guide will help you understand the steps involved. We’ll cover everything from preparing the site to filling the pool with water. Whether you’re a DIY enthusiast or a beginner, these instructions are easy to follow. By the end, you’ll have a sparkling pool ready for use. So, let’s get started and turn your backyard into a summer oasis!
Credit: info.royalswimmingpools.com
Choosing The Right Pool
Choosing the right pool is the first step to a perfect swimming experience. Consider different factors to find a pool that fits your needs. Let’s dive into the details.
Size And Shape
The size and shape of your pool depend on your space. Measure your yard to know what will fit. Smaller yards need compact pools. Larger yards can have bigger, unique shapes. Think about how many people will use the pool. This helps in deciding the size.
Material Options
Pools come in various materials. The most common are steel, resin, and aluminum. Steel pools are durable but may rust. Resin pools do not rust and are easy to maintain. Aluminum pools are light and resist rust. Choose a material based on your climate and budget.
Budget Considerations
Set a budget before shopping for a pool. This helps narrow down your options. Pools range from a few hundred to several thousand dollars. Consider the cost of installation and maintenance. Some materials need more upkeep than others. A well-planned budget ensures you get the best pool for your money.

Credit: www.angi.com
Preparing The Site
Before assembling an above ground swimming pool, the site must be prepared. This ensures the pool remains stable and safe. Follow these steps to create a perfect site for your pool.
Selecting The Location
Choose a spot with plenty of sunlight. Avoid areas with overhanging trees. Trees can drop leaves and debris into the pool. Ensure the location is free from underground utilities. This includes cables, pipes, and septic systems.
Clearing The Area
Remove any grass, rocks, and debris from the selected site. Use a shovel or rake to clear the area. Ensure the ground is free of sharp objects. These can damage the pool liner. Mark the perimeter of the pool with stakes and string. This helps define the area that needs clearing.
Leveling The Ground
Use a carpenter’s level to check the ground. The ground must be completely flat. Uneven ground can cause the pool to collapse. Use sand or dirt to fill low spots. Tamp down the ground to make it firm. Recheck the level until the ground is even.
Gathering Necessary Tools
Assembling an above ground swimming pool can be a fun project. Before starting, gather all necessary tools. Proper preparation ensures a smooth and efficient setup.
Essential Tools
Having the right tools is crucial for assembling your pool. Here are some essential tools you need:
- Screwdrivers – Both flathead and Phillips
- Wrenches – Adjustable and socket wrenches
- Measuring Tape – For accurate measurements
- Hammer – For securing parts
- Utility Knife – For cutting materials
- Level – Ensures the pool is even
- Rubber Mallet – Gentle tapping without damage
Optional Equipment
Some tools are not essential but can make the assembly easier. Consider having these optional equipment:
- Power Drill – Speeds up screwing
- Shovel – For leveling the ground
- Garden Hose – Helps with filling and cleaning
- Sand – To create a smooth base
- Utility Cart – For moving heavy items
Safety Gear
Safety is important. Use the right safety gear to protect yourself:
- Gloves – Prevents cuts and blisters
- Safety Glasses – Protects your eyes from debris
- Sun Protection – Hat and sunscreen for outdoor work
- Closed-toe Shoes – Protects your feet from injury
Gathering these tools and equipment ensures a smooth assembly process. Stay safe and enjoy your new swimming pool!
Laying The Foundation
Creating a stable foundation is essential for your above ground swimming pool. The right foundation ensures safety and longevity. Let’s explore the steps involved in laying the foundation.
Base Materials
First, choose the correct base materials. Sand, fine gravel, or a combination of both works well. These materials provide a smooth, level surface. Avoid using soil alone; it can shift and cause problems.
Installing The Ground Cloth
Lay out the ground cloth on the prepared base. This cloth acts as a barrier. It prevents weeds and sharp objects from damaging the pool liner. Ensure the cloth covers the entire pool area.
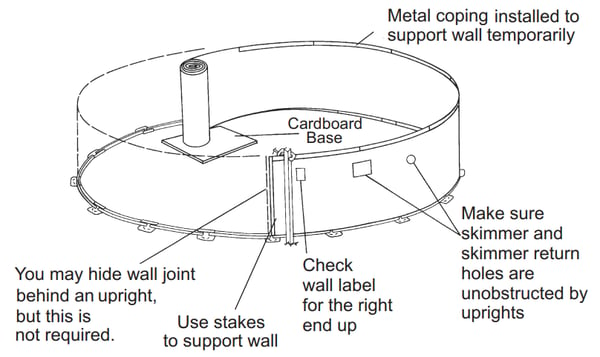
Setting Up The Frame
Assemble the pool frame according to the manufacturer’s instructions. Place the frame parts on the ground cloth. Connect each section securely. Make sure everything is level and aligned.
After setting up the frame, double-check its stability. It should be strong enough to hold the pool’s weight. Proper setup ensures your pool will be safe and enjoyable.
Assembling The Pool Walls
Setting up the walls of your above ground swimming pool is a crucial step. It requires patience and precision. Here’s a step-by-step guide to help you get it right.
Connecting Wall Panels
Begin by laying out the wall panels around the pool area. Make sure each panel is in the correct position. Connect the panels by aligning the edges and securing them with bolts.
- Align the panel edges carefully.
- Use bolts to secure the panels.
- Ensure all panels form a perfect circle or oval.
Double-check the connections to avoid gaps. Tighten the bolts firmly but not excessively. This ensures stability and prevents leaks.
Securing The Walls
Once the panels are connected, it’s time to secure the walls. This step ensures the pool remains intact during use.
- Attach the bottom track around the pool’s perimeter.
- Place the pool walls into the bottom track.
- Secure the walls with top rails.
Place the top rails over the connected panels. This helps to keep the panels in place. Use screws to fasten the top rails securely. The walls should now feel sturdy and stable.
Checking For Stability
Before adding water, check the stability of the pool walls. Walk around the pool and inspect each panel. Ensure there are no loose bolts or gaps.
- Inspect each panel for stability.
- Tighten any loose bolts.
- Ensure all panels are aligned properly.
If you find any issues, fix them immediately. This prevents future problems. A stable pool wall guarantees safety and longevity.
| Step | Description |
|---|---|
| 1 | Lay out and connect wall panels. |
| 2 | Secure the walls with bottom tracks and top rails. |
| 3 | Check for stability and fix any issues. |
Installing The Liner
Installing the liner is a crucial step in setting up your above ground swimming pool. It ensures that your pool holds water without leaks. Proper installation can also enhance the pool’s appearance and durability. Follow these steps to install your liner correctly.
Unpacking The Liner
First, find a clean, dry area to unpack the liner. Carefully remove the liner from its packaging. Inspect it for any damages or defects. Ensure you have all the necessary components before moving forward.
Positioning The Liner
Next, place the liner in the pool’s center. Spread it out evenly. The liner should cover the entire pool floor and walls. Align it properly with the pool’s shape. This step helps in preventing future adjustments.
Smoothing Out Wrinkles
Finally, eliminate any wrinkles on the liner. Start from the center and move towards the edges. Use your hands or a soft broom. Smooth out the liner until it is flat and even. This step ensures a uniform and neat appearance.
Filling The Pool
Filling the pool is one of the most crucial steps in assembling your above-ground swimming pool. Properly filling ensures the pool structure remains intact and safe for use. It also provides a clean and enjoyable swimming experience for everyone.
Choosing The Water Source
First, decide where to get your water. Two main options are available:
- Municipal Water Supply: This is the most common choice. Attach a garden hose to your outdoor faucet. Ensure the water is clean and safe.
- Well Water: If you live in a rural area, this might be your source. Test the water for any contaminants before using it.
Choose the source that best suits your needs and budget. Make sure the water is clear and free from harmful substances.
Monitoring The Fill
As the pool starts filling, keep a close eye on the process. Use a water level indicator to monitor the water height.
- Place the hose at the center of the pool.
- Turn on the water and let it flow steadily.
- Check the water level every hour to ensure even filling.
Consistent monitoring prevents overflows and ensures the pool fills evenly.
Checking For Leaks
While filling, it’s important to check for any leaks. Small leaks can cause big problems later.
| Step | Action |
|---|---|
| 1 | Inspect the pool liner for any small holes or tears. |
| 2 | Check around the pool walls for any visible leaks. |
| 3 | Use a patch kit to fix any found leaks immediately. |
Addressing leaks early will save time and ensure a safe swimming environment.
Final Touches
Carefully connect the pool’s liner to the frame. Ensure all parts are securely fastened. Fill the pool with water, checking for leaks. Enjoy your new above-ground swimming pool.
Assembling an above ground swimming pool can be quite a task. Yet, the final touches bring everything together. This stage ensures your pool is safe, clean, and ready for fun.Adding The Filtration System
The filtration system keeps your pool water clean. Begin by placing the filter near the pool. Connect the intake hose to the pool’s inlet. Attach the outlet hose to the pool’s outlet. Ensure all connections are tight. Fill the filter with water. Turn on the filter to check for any leaks. Make adjustments if necessary.Installing The Ladder
A secure ladder is crucial for pool safety. First, place the ladder at your desired entry point. Make sure it is stable. Attach the ladder to the pool frame. Use bolts and nuts provided in the kit. Tighten all bolts securely. Double-check the ladder’s stability. A wobbly ladder can be dangerous.Setting Up Pool Accessories
Pool accessories add fun and functionality. Install the pool cover when the pool is not in use. This keeps debris out. Set up a pool skimmer to remove floating debris. Add a floating chlorine dispenser for water sanitation. Consider safety accessories like pool alarms. These steps ensure a clean and safe swimming experience. “`Maintenance Tips
Keeping your above ground swimming pool in top condition requires regular maintenance. Proper care ensures your pool stays clean, safe, and ready for use. Let’s dive into some essential maintenance tips to help you maintain your pool effortlessly.
Regular Cleaning
Regular cleaning is crucial for a healthy pool. Skim the surface daily to remove leaves, insects, and debris. Use a pool vacuum weekly to clean the pool floor and walls. Don’t forget to empty the skimmer and pump baskets often to maintain water flow.
- Skim daily: Remove leaves and debris from the surface.
- Vacuum weekly: Clean the pool floor and walls.
- Empty baskets: Maintain water flow by clearing skimmer and pump baskets.
Chemical Balance
Maintaining the right chemical balance is essential for clear, safe water. Test your pool water at least twice a week. Adjust the levels of chlorine, pH, and alkalinity as needed. Use a quality testing kit for accurate results.
| Chemical | Ideal Level |
|---|---|
| Chlorine | 1-3 ppm |
| pH | 7.2-7.6 |
| Alkalinity | 80-120 ppm |
- Test water: Do it at least twice a week.
- Adjust levels: Maintain chlorine, pH, and alkalinity.
- Use quality kits: Ensure accurate testing results.
Winterizing The Pool
Preparing your pool for winter prevents damage and ensures a smooth opening in spring. Start by cleaning the pool thoroughly. Balance the water chemicals, then lower the water level below the skimmer. Drain and store the pump, filter, and other equipment.
- Clean thoroughly: Remove all debris and vacuum the pool.
- Balance chemicals: Ensure water chemistry is correct.
- Lower water level: Below the skimmer to prevent freezing damage.
- Drain equipment: Store pump, filter, and accessories safely.
Cover the pool securely to protect it from debris and harsh weather. A good cover prevents algae growth and keeps the water clean during the off-season.
Credit: blog.royalswimmingpools.com
Frequently Asked Questions
How Do I Start Assembling A Pool?
Begin by selecting a flat, level area. Lay out the ground cloth. Assemble the frame as per the instructions.
What Tools Are Needed To Assemble A Pool?
You will need a screwdriver, a rubber mallet, and a garden hose. Having these tools makes assembly easier.
How Long Does It Take To Assemble A Pool?
Assembly typically takes 1-3 hours. This depends on the pool size and your experience. Follow the instructions carefully.
Do I Need Help To Assemble A Pool?
Yes, it is advisable to have at least one helper. This ensures safety and makes the process smoother.
Conclusion
Assembling an above ground swimming pool is simple with the right steps. Follow the instructions carefully and take your time. Ensure all parts fit correctly and securely. Regularly check for stability and safety. Soon, you will enjoy your new pool.
Happy swimming!