Building a shuffleboard table top might seem complex, but it’s quite doable. You just need the right tools, materials, and guidance.
Shuffleboard is a fun game enjoyed by many. Creating your own table top can add a personal touch to your gaming experience. This guide will walk you through the steps to build a sturdy and smooth shuffleboard table top. With some basic woodworking skills and patience, you can create a high-quality playing surface.
You’ll learn about the necessary materials, the construction process, and tips for finishing. Ready to get started on this rewarding project? Let’s dive into the details and get your shuffleboard table top built!

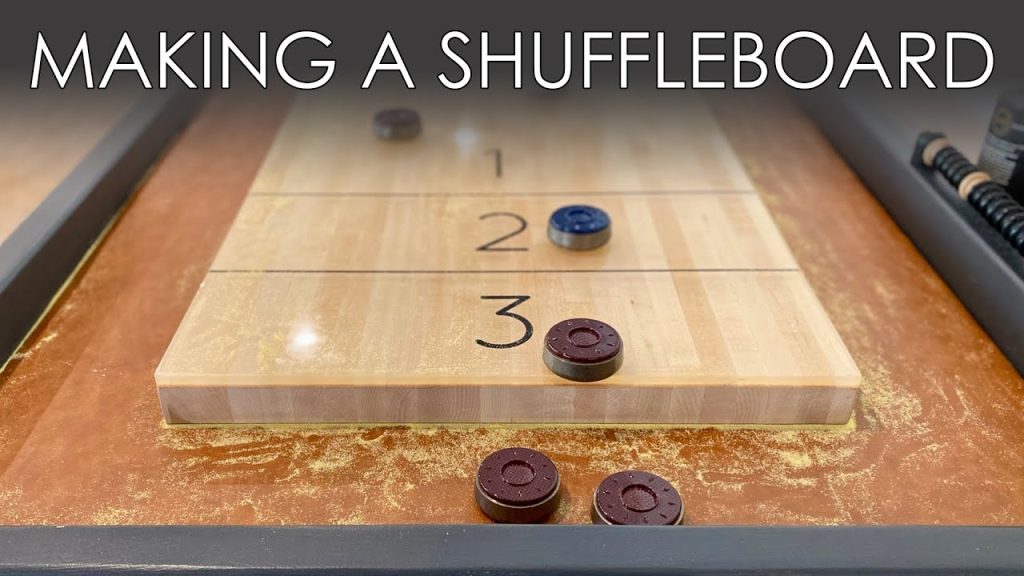
Credit: www.youtube.com
Materials And Tools
Building a shuffleboard table top can be a rewarding project. It requires careful selection of materials and tools. These items ensure your table top is durable and smooth. Let’s dive into the essentials.
Required Materials
You will need hardwood planks for the playing surface. Maple is a great choice. It’s durable and offers a smooth finish. You will also need plywood for the base. This adds support and stability.
Purchase epoxy resin to coat the table top. This creates a slick, durable surface. Sandpaper is necessary for smoothing the wood. Wood glue and screws will help in assembling the pieces together. Lastly, get a finish like polyurethane to protect the wood.
Essential Tools
A circular saw is crucial for cutting the wood to size. A router will help create a smooth edge on the playing surface. An orbital sander is essential for smoothing the wood. You’ll need a drill for making holes and driving screws.
Clamps will hold pieces in place while the glue dries. A tape measure ensures precise measurements. A straight edge will help in drawing accurate lines. Finally, use a paintbrush to apply the finish smoothly.
Choosing The Right Wood
Choosing the right wood for your shuffleboard table top is crucial. The wood type and quality will impact the table’s durability and performance. Here’s a guide to help you make an informed choice.
Best Wood Types
Not all wood types are suitable for shuffleboard tables. Here are some of the best:
- Maple: Maple is a popular choice. It is hard and durable, providing a smooth surface.
- Oak: Oak is another great option. It is strong and has a classic look.
- Birch: Birch is also suitable. It is flexible and resistant to wear.
Wood Quality Considerations
Quality is as important as the type of wood. Here are some factors to consider:
- Grain: Look for tight and straight grains. They provide a smooth playing surface.
- Hardness: Ensure the wood is hard enough to resist dents and scratches.
- Finish: A good finish protects the wood and enhances its appearance.
| Wood Type | Durability | Appearance |
|---|---|---|
| Maple | High | Smooth and Light |
| Oak | Very High | Classic and Rich |
| Birch | Moderate | Flexible and Light |
Choosing the right wood ensures your shuffleboard table is long-lasting. It also enhances your playing experience.
Cutting The Wood
Cutting the wood is a crucial step in building a shuffleboard table top. It’s important to measure accurately and cut precisely. This ensures the table top is even and smooth. Good cutting practices help avoid mistakes and waste.
Measuring And Marking
Start by measuring the dimensions of your shuffleboard table top. Use a tape measure for accuracy. Mark the wood with a pencil. Draw straight lines where the cuts will be. Double-check measurements before cutting. This prevents errors and ensures a perfect fit.
Using A Saw Safely
Safety comes first when using a saw. Wear safety goggles to protect your eyes. Use gloves to protect your hands. Make sure the wood is secure before cutting. Use clamps to hold it steady. Follow the marked lines slowly with the saw. Keep fingers away from the blade. Focus on the cut to ensure accuracy. Take breaks if needed. Don’t rush the process. A steady hand makes a clean cut.
Credit: rogueengineer.com
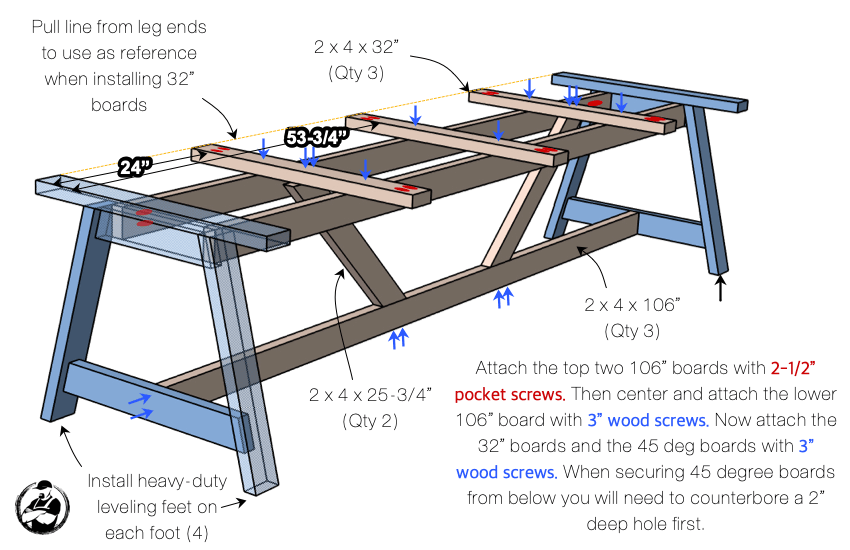
Assembling The Frame
Building the frame for your shuffleboard table top is a crucial step. This part will ensure your table is sturdy and durable. Follow these simple steps to assemble the frame effectively.
Frame Layout
Start by laying out all your frame pieces. This helps you see what goes where. Arrange the pieces on a flat surface. Make sure everything is aligned properly before you start securing the pieces together.
- Measure the lengths of the frame pieces.
- Lay them out in a rectangle or square shape.
- Check the corners for right angles using a carpenter’s square.
- Adjust as needed to ensure a perfect fit.
Having a clear layout is vital. This ensures no gaps and makes the assembly process smoother.
Securing The Pieces
Once your layout is ready, start securing the frame pieces together. Use wood screws and a drill for this step. Follow these steps for a secure frame:
- Pre-drill holes at each joint to prevent wood splitting.
- Insert screws into the pre-drilled holes and tighten them.
- Make sure each corner is securely fastened.
- Double-check the frame for any loose connections.
For extra stability, consider using wood glue at the joints before screwing. This adds strength and durability to your frame. Remember to wipe off any excess glue to keep your work area clean.
Now your frame is ready and secure. Move on to the next step in building your shuffleboard table top with confidence!
Creating The Playing Surface
Creating the playing surface for your shuffleboard table is a critical step. A well-prepared surface ensures smooth and consistent gameplay. This section will guide you through preparing the surface and sanding techniques to achieve a professional finish.
Surface Preparation
The first step in creating the playing surface is to select quality wood. A smooth, dense hardwood like maple works best. Ensure the wood is free from warping and knots. Lay the wood panels flat on a sturdy workbench. Measure and cut the panels to the desired length and width. Use a carpenter’s square to ensure precise cuts.
Next, join the wood panels together. Apply wood glue along the edges and clamp the panels tightly. Wipe away any excess glue with a damp cloth. Allow the glue to dry completely. This may take several hours. Once the glue is dry, reinforce the joints with screws. Space the screws evenly along the edges for added stability.
Sanding Techniques
Begin sanding the surface with coarse-grit sandpaper. Attach the sandpaper to a sanding block or electric sander. Sand the entire surface evenly to remove any rough spots or imperfections. After the initial sanding, switch to medium-grit sandpaper. Sand the surface again to smooth out any remaining rough areas.
For the final sanding, use fine-grit sandpaper. This will give the surface a smooth, polished finish. Sand in the direction of the wood grain to avoid scratches. Wipe down the surface with a tack cloth to remove any dust. Your playing surface should now be smooth and ready for the next steps in building your shuffleboard table.

Credit: www.wikihow.com
Applying The Finish
Building a shuffleboard table top is a rewarding project. After constructing and sanding the table, applying the finish is crucial. The finish protects the wood and enhances its beauty. It ensures smooth gameplay and long-lasting durability. This section will guide you through choosing and applying the perfect finish for your shuffleboard table.
Choosing A Finish
Various finishes can be used on a shuffleboard table. Polyurethane is popular for its durability. Tung oil and varnish are other options. Each finish has unique properties. Consider the table’s usage and your skill level. Polyurethane is tough and water-resistant, making it ideal for heavy use. Tung oil penetrates the wood, giving a natural look. Varnish offers a glossy finish and is easy to apply.
Application Process
Applying the finish requires patience and care. Start by cleaning the table top. Remove any dust with a tack cloth. Stir the finish gently to avoid bubbles. Use a high-quality brush or a foam applicator. Apply the first coat in long, even strokes. Let it dry completely. Sand the surface lightly with fine-grit sandpaper. Wipe off the dust before applying the next coat. Repeat this process for 2-3 coats. Each coat adds more protection and smoothness. Ensure each layer is fully dry before sanding and adding another.
Adding The Lines
Adding lines to your shuffleboard table top is a crucial step. It ensures accurate gameplay and a professional look. This section will guide you through marking and painting the lines.
Line Marking Tools
To start, gather your tools. You need a measuring tape, a straightedge, and a pencil. A chalk line tool is also helpful. These tools help you draw straight and precise lines. Ensure your measuring tape is accurate to avoid mistakes.
Using a straightedge, mark the center line first. This line divides the table into two equal halves. Next, mark the scoring zones. Typically, there are three zones on each side. Measure and mark each zone carefully. Precision here is key to fair gameplay.
Painting The Lines
Once your lines are marked, it’s time to paint. Use painter’s tape to mask off the areas around your lines. This prevents paint from spreading. Choose a high-quality paint suitable for wood surfaces. An acrylic or enamel paint works well.
Use a fine brush for painting the lines. Apply the paint carefully and evenly. Thin coats are better. They dry faster and reduce the chance of paint bleeding. Let each coat dry before adding another. Usually, two coats are enough.
Once the paint is dry, remove the painter’s tape. This reveals clean, sharp lines. Inspect your work for any touch-ups. A steady hand and patience result in professional-looking lines.
Final Touches
After building your shuffleboard table top, the final touches are crucial. They ensure the table looks good and plays well. Let’s dive into the steps to complete your shuffleboard table.
Inspecting The Table
Start by inspecting the table for any imperfections. Look for rough edges and uneven surfaces. Use fine-grit sandpaper to smooth out any rough spots. This will help the pucks glide smoothly.
Next, check the table’s level. An uneven table can affect the game. Use a spirit level to check for any slants. Adjust the legs to make the table perfectly horizontal.
| Inspection Step | Tool Needed |
|---|---|
| Smoothing Rough Edges | Fine-grit Sandpaper |
| Checking Table Level | Spirit Level |
Maintenance Tips
Regular maintenance keeps your shuffleboard table in top condition. Here are some tips:
- Clean the surface with a soft cloth to remove dust and debris.
- Apply a coat of shuffleboard wax for a smooth glide.
- Keep the table in a dry place to avoid warping.
By following these tips, your table will last longer. It will also provide a better playing experience.
Frequently Asked Questions
What Materials Are Needed For A Shuffleboard Table Top?
You’ll need plywood, hardwood, screws, varnish, and shuffleboard wax. Ensure high-quality materials for durability.
How Do I Level A Shuffleboard Table Top?
Use a carpenter’s level and shims to adjust. Check multiple points to ensure the surface is even.
What Is The Best Wood For A Shuffleboard Table?
Maple and birch are popular choices. They are durable and provide a smooth surface.
How Long Does It Take To Build?
Building a shuffleboard table top can take a weekend. It depends on your experience and tools.
Conclusion
Building a shuffleboard table top is a fun, rewarding project. Follow the steps and use quality materials. Measure accurately and cut with care. Sand and finish the surface smoothly. Assemble the pieces tightly. Enjoy your new shuffleboard table with friends and family.
Your hard work will pay off. Practice and improve your shuffleboard skills. Create lasting memories with loved ones. Happy building and happy playing!