Restringing a lacrosse head can seem tricky at first. But it’s a skill every player should know.
In this guide, you’ll learn how to do it step-by-step. Lacrosse players know the importance of a well-strung head. It affects how you catch, throw, and control the ball. A poorly strung head can mess up your game. But don’t worry.
Restringing your lacrosse head isn’t as hard as it looks. With a few tools and some patience, you can do it yourself. This guide will walk you through each step. You’ll understand the basics and feel confident tackling the task. Ready to improve your game by restringing your lacrosse head? Let’s get started!
Introduction To Restringing
Restringing a lacrosse head keeps your equipment in top shape. Learn step-by-step to ensure optimal performance. Simple tools and patience are key.
Restringing a lacrosse head can be a daunting task. But with some practice, it becomes easier. A well-strung head can greatly improve your performance. In this guide, we will cover the basics.Importance Of A Properly Strung Lacrosse Head
A properly strung lacrosse head is crucial. It affects how the ball is held and thrown. The right tension ensures better control and accuracy. A good pocket allows for better ball handling. Without it, your game may suffer.Tools And Materials Needed
You will need a few tools to restring a lacrosse head. Start with a new mesh kit. You will also need sidewall strings, shooting strings, and a stringing tool. Scissors and a lighter will be useful too. Make sure you have everything before you begin. “`Removing The Old String
Restringing a lacrosse head involves several steps. The first step is removing the old string. This process ensures you can start fresh with new, durable string. Below are the steps to guide you through this process.
Cutting The Old String
Begin by finding a pair of sharp scissors. Carefully cut the old string at key points. Focus on areas where the string is tied or knotted. Be sure not to cut the mesh. Cut the string in small sections. This makes it easier to remove.
Removing The Mesh
Once the old string is cut, you can start removing the mesh. Gently pull the string out of the mesh holes. Take your time to avoid tearing the mesh. Use your fingers or a small tool to help if needed. Keep the mesh intact for reuse.
If the string is stubborn, use pliers for a better grip. Be patient, and work methodically. This ensures a clean removal process. Now, your lacrosse head is ready for new stringing!
Preparing The New Mesh
Preparing the new mesh for your lacrosse head is crucial. It ensures optimal performance on the field. This section will guide you through this process step by step.
Choosing The Right Mesh
Selecting the right mesh is the first step. Different meshes have unique features. Some are soft, others are hard. Soft meshes offer better ball control. Hard meshes provide durability. Choose based on your playing style. Consider the weather conditions too. Wet conditions may affect soft meshes more.
Stretching The Mesh
Stretching the mesh is an important step. It helps in shaping the pocket. Start by soaking the mesh in warm water. This makes it more pliable. Next, stretch it gently by hand. Make sure to pull evenly. This prevents any weak spots. Let it dry completely before attaching it to the head.

Credit: stringking.com
Attaching The Top String
Attaching the top string is a crucial step in restringing a lacrosse head. It ensures the mesh is properly aligned and secured. A well-done top string provides the foundation for a consistent pocket and improves playability. Follow these steps to attach the top string effectively.
Aligning The Mesh
To start, align the mesh with the top of the lacrosse head. Ensure the mesh is centered. Count the diamonds to make sure each side is equal. This step is essential to ensure a symmetrical pocket.
Tip: Use the middle diamond as a reference point. It helps in achieving perfect alignment.
Securing The Top String
Once the mesh is aligned, secure the top string. Thread the string through the first hole of the head. Pull it through the first diamond of the mesh. Repeat this process across the top of the head.
- Start from the middle of the head.
- Work towards the sides.
- Ensure each knot is tight.
Make sure the string goes over and under the mesh. This creates a strong hold. Double-check each knot for security.
Pro Tip: Use a lighter to slightly melt the end of the string. It prevents fraying.
| Step | Action |
|---|---|
| 1 | Align the mesh with the head. |
| 2 | Thread the string through the head and mesh. |
| 3 | Tighten each knot. |
Stringing The Sidewalls
Stringing the sidewalls of a lacrosse head is crucial. It ensures proper pocket formation and ball control. Follow these steps to string the sidewalls effectively.
Starting From The Top
Begin by tying a knot at the top of the sidewall string. Thread the string through the first hole at the top of the sidewall. Pull it tightly to secure the knot in place.
Then, feed the string through the top hole of the mesh. Make sure the mesh is tight and straight. Continue threading the string through the next hole in the sidewall.
Repeat this process down the sidewall. Make sure the mesh stays tight and even. This step creates the foundation for your pocket.
Tightening The Sidewalls
After reaching the bottom of the sidewall, tie another knot. Ensure it’s tight and secure. This prevents the string from slipping.
Next, go back up the sidewall. Tighten each section by pulling the string firmly. This step ensures the mesh is snug against the sidewall.
Finally, double-check all knots and strings. Make sure everything is tight and secure. A properly strung sidewall improves performance on the field.
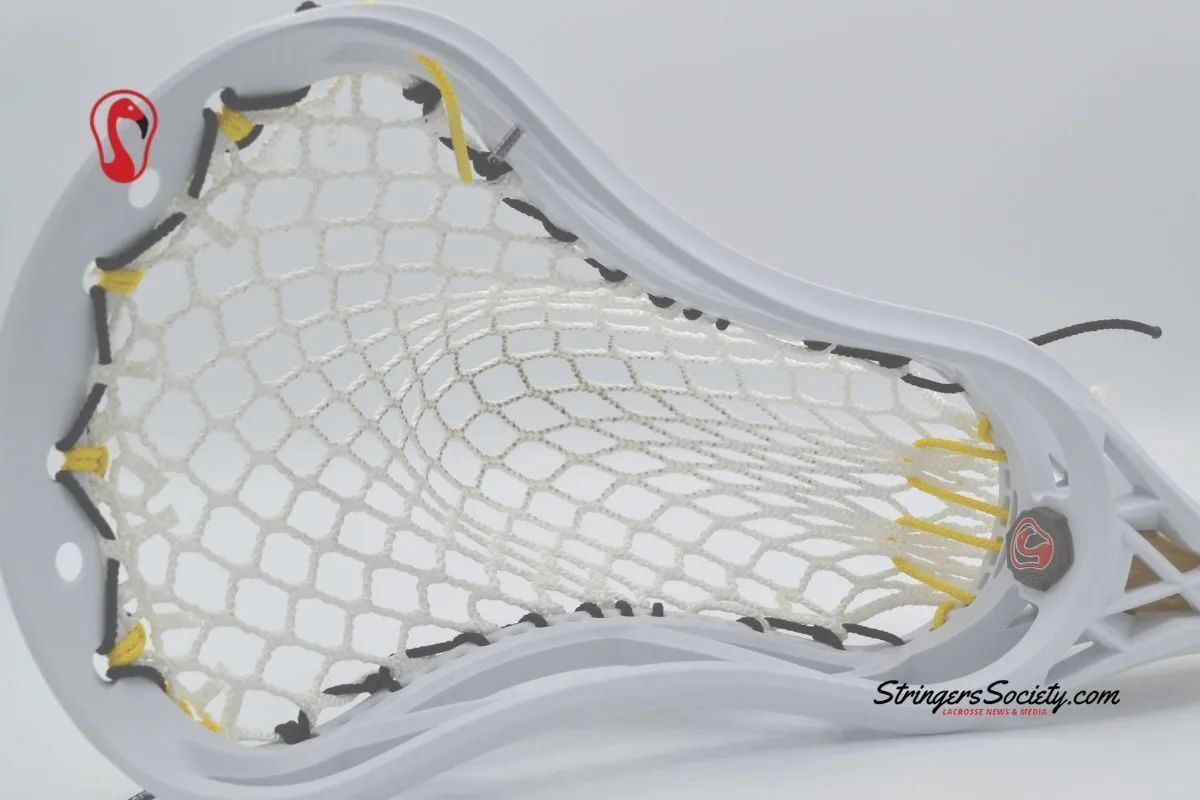
Credit: stringerssociety.com
Stringing The Bottom
Stringing the bottom of a lacrosse head is a crucial step. It secures the ball and impacts your control on the field. Follow these steps to string the bottom of your lacrosse head.
Securing The Bottom String
Start by threading the bottom string through the last row of holes. This row is at the base of the mesh. Pull the string through one side, then guide it across to the other side. Make sure it is snug but not too tight.
Tie a knot on each end of the string. This keeps it from slipping. Ensure the knots are tight. Check that the string is even across the bottom.
Adjusting The Pocket Depth
Now, adjust the pocket depth to suit your playing style. Pull the bottom string to create a deeper pocket. Loosen it if you prefer a shallower pocket. The pocket depth affects how the ball sits in the mesh.
Test the pocket by placing a ball in the head. Make sure it sits comfortably. Adjust the string as needed until you are satisfied with the depth.
Finally, double-check all knots and strings. Ensure everything is secure and in place. Your lacrosse head is now ready for action!
Adding Shooting Strings
Restringing a lacrosse head can seem daunting. But, adding shooting strings is a key step. These strings help control the ball’s release. They also improve accuracy and speed. Learn how to add them correctly.
Choosing The Number Of Shooting Strings
Shooting strings come in different numbers. You can use one, two, or three strings. Each setup offers unique benefits. Beginners often start with two strings. This setup balances control and speed.
Advanced players might prefer three strings. This offers greater control. Remember, each player has different needs. Test different numbers to find the best fit.
Positioning The Shooting Strings
Positioning the shooting strings is crucial. Follow these steps for the best results:
- Top String: Place the first string near the top of the head. This helps guide the ball’s release.
- Middle String: Position the second string in the middle. This offers balance between control and speed.
- Bottom String: If using a third string, place it near the bottom. This enhances control and accuracy.
Proper positioning ensures the strings work effectively. Adjust the tightness as needed. Tighter strings offer more control. Looser strings improve speed.

Credit: www.youtube.com
Final Adjustments
Once you’ve threaded the strings through your lacrosse head, it’s time for the final adjustments. These steps ensure the pocket performs well during play. The final adjustments are crucial for a consistent throw and better ball control. Let’s dive into the key steps: checking the pocket and making necessary tweaks.
Checking The Pocket
First, examine the pocket’s depth. Hold the lacrosse head face-up and press the pocket gently with your hand. The pocket should not be too deep or too shallow. It should hold the ball securely and release it smoothly.
Next, check the tension of the sidewall strings. They should be firm but not overly tight. This helps maintain the pocket’s shape and durability. Ensure the top string is tight, with no slack, for better ball control.
Making Necessary Tweaks
If the pocket is too deep, tighten the bottom string slightly. This raises the pocket and prevents the ball from getting stuck. If it’s too shallow, loosen the bottom string a bit to allow more depth.
Adjust the shooting strings if needed. They control the ball’s release angle and speed. Ensure they are evenly spaced and tight enough to guide the ball but not too tight to hinder its release.
Recheck the overall balance and symmetry of the pocket. A well-balanced pocket ensures a consistent and accurate throw. Make small adjustments as needed until you’re satisfied with the pocket’s performance.
Now, your lacrosse head should be ready for action. Enjoy the game with your newly strung lacrosse head!
Frequently Asked Questions
How Do You Start Restringing A Lacrosse Head?
To start restringing a lacrosse head, remove the old strings. Clean the head thoroughly. Gather your new strings and tools.
What Tools Are Needed To Restring A Lacrosse Head?
You need strings, scissors, a lighter, and a lacrosse head. Optional tools include a stringing kit and a ruler.
How Long Does It Take To Restring A Lacrosse Head?
Restringing a lacrosse head typically takes about 30-60 minutes. It depends on your experience and technique.
Can Beginners Restring A Lacrosse Head?
Yes, beginners can restring a lacrosse head. Follow detailed guides and tutorials to ensure accuracy and proper technique.
Conclusion
Restringing a lacrosse head can seem tough, but it’s doable. Follow the steps carefully. Practice makes perfect. Soon, you’ll get the hang of it. Your lacrosse stick will feel brand new. Proper stringing improves your play. Take your time and be patient.
Enjoy the process and the results. Happy playing!