How to Aim in Billiards: 4 Systems, and the Two Things That Break Them

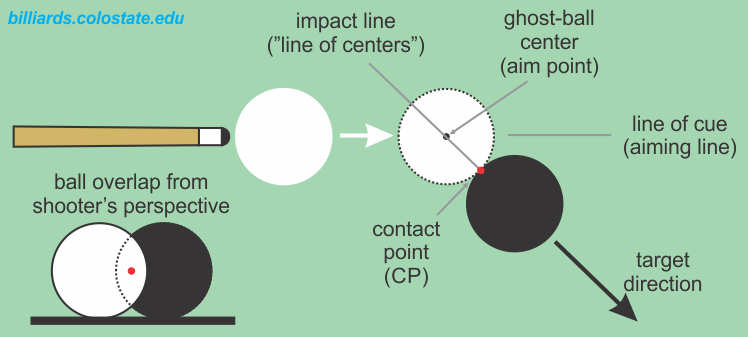
Quick Answer: The most reliable way to aim is the ghost ball method: picture a phantom cue ball touching the object ball directly opposite your target pocket, then send your cue ball’s centre to that phantom position. But before any system can work, two things must be right — your stroke must be straight and your head must be in the right place. Most missed shots aren’t aiming errors at all.
Every aiming article sells you one system as the answer. Here’s what actually happens at a table: professionals use different systems, most of them work, and none of them survive a crooked stroke or a head in the wrong position. So this guide does it in the right order — the systems, then the two things that make systems work, then the drills.
Table of Contents
The four aiming systems, honestly compared
| System | How it works | Best for | The weakness |
|---|---|---|---|
| Ghost ball | Imagine a ball frozen to the object ball on the line to the pocket; aim your cue ball’s centre at its centre | Beginners — most intuitive | Phantom is hard to picture on thin cuts |
| Contact point | Find where the balls must touch, send the cue ball’s edge there | Players with good visual geometry | The contact point isn’t the aim point on cuts — this breaks learners |
| Fractional | Aim full, ¾, ½, ¼ ball overlaps for standard angles | Quick reference at speed | Only approximates in-between angles |
| Back of ball | Focus on the point of the object ball furthest from the pocket | Simplifying near-straight shots | Vague on sharp cuts |
Start with ghost ball. Keep fractional aiming as a sanity check for standard angles. The others arrive on their own with experience. And know that at the top level, aiming systems mostly dissolve into feel — a pro isn’t consciously building phantom balls, they’re recognising a shot they’ve hit ten thousand times. Systems are scaffolding: essential while learning, invisible later.
Ghost ball, step by step
- Pick the pocket. Trace the line from that pocket back through the object ball, and extend it out the other side.
- Place the ghost. On that line, on the far side of the object ball from the pocket, imagine a cue ball frozen to it. That’s where your cue ball must arrive.
- Aim centre to centre. Standing behind the cue ball, line up its centre with the ghost ball’s centre.
- Commit standing up. The aim is decided before you bend over — dropping into the shot is delivery, not aiming. Players who re-aim from down on the table are fighting themselves.
- Stroke straight through. Which brings us to the real problem.
💡 Make the ghost real: put a piece of chalk exactly where the ghost ball would sit and shoot at the chalk a few times. Remove it and shoot the same shot. The visualisation builds in a single session — this is the fastest aiming drill there is.
The reason your aim looks right and isn’t: vision centre
This is the most important thing on this page and it’s missing from almost every beginner guide.
Your vision centre is the head position — relative to the cue — where a genuinely straight shot actually looks straight. Get it wrong and your brain sees the cue pointing somewhere it isn’t. You then ‘correct’ for an error that doesn’t exist, and miss. Consistently. To the same side. Forever.
Instructor Dr. Dave — the closest thing pool has to a physics authority — calls finding your vision centre probably the most important fundamental in pool. Not aiming systems. Not english. Head position.
⚠️ Do NOT just put the cue under your dominant eye. This is the internet’s favourite bad advice on the subject. Some players’ vision centre sits under the dominant eye; others’ is under the nose, or somewhere between the eyes, or — genuinely — outside them. Roughly 5% of people are cross-dominant (right-handed, left-eyed) and some have no dominant eye at all. Your vision centre is yours, and it has to be found, not assumed.
Finding your vision centre (10 minutes, permanent payoff)
- Set up a dead straight shot: cue ball, object ball, and a corner pocket in a perfect line, about three feet apart.
- Get down on the shot in your normal stance and look. Does the cue appear to point dead through both ball centres?
- Now, while staying down, shift your head slightly left and right — a centimetre at a time — and watch how the alignment appears to change. It will change dramatically. That’s the whole revelation.
- Find the head position where the line looks unmistakably straight. Shoot from there.
- Repeat over several sessions. When you find it, that position is now your setup for every shot — build your stance around it, not the other way round.
Keep your head as square to the shot as possible with your eyes level — tilting the head throws the whole calibration off. And once you’ve found it, be religious about it: the most common cause of a sudden inexplicable slump in a decent player is that their head has drifted a centimetre without them noticing.
If you consistently miss to the same side — always thin, always thick — that’s not an aiming problem. That’s a vision centre problem, and no amount of ghost-ball practice will fix it.
The other reason: your stroke isn’t straight
Here’s the honest diagnostic, and it takes three minutes:
The straight-line test. Put the cue ball and an object ball in a dead line to a pocket, three feet apart. Shoot it ten times at medium pace, centre ball. Miss more than once and your stroke is the problem — you have just eliminated aiming as a variable, because there’s no aiming involved in a straight shot.
Most players fail this test and are astonished. The fixes, in order of payoff:
| Fault | What it does | The fix |
|---|---|---|
| Rising up at contact | Swings the cue offline mid-stroke | Stay down until the balls stop moving. This is fault #1 in pool |
| Poking (stopping at impact) | No follow-through, unrepeatable contact | Finish with the tip past where the cue ball was |
| Gripping too tight | Tension nudges the cue sideways | Loose fingers; the cue rests, it isn’t clamped |
| Jerky backswing | Throws the tip off line before you even arrive | Slow back, smooth through |
| Thumb on top of the cue | Presses down, restricts the swing | Thumb points at the floor |
| Not chalking | Micro-miscues that feel like aiming errors | Chalk before every shot |
The full stance, grip and bridge breakdown is in our how to play billiards guide — worth reading alongside this one, because aiming and stroke are the same problem wearing different hats.
Cut angle reference
What you’re actually seeing when you look down a shot, and roughly where the object ball goes:
| Overlap you see | Approx. cut angle | Result | Difficulty |
|---|---|---|---|
| Full ball | 0° | Straight ahead | Easy — and the test shot for everything |
| ¾ ball | ~15° | Slight angle | Easy |
| ½ ball | ~30° | The workhorse angle | Learn this one cold |
| ¼ ball | ~45° | Sharp cut | Moderate |
| Thin edge | 60°+ | Extreme cut | Pros miss these too |
The half-ball hit deserves special attention: it’s the most common angle in pool and the one that feels most natural to picture, because you’re aiming the cue ball’s edge at the object ball’s centre. Groove that one and you have a reliable reference point for judging everything either side of it.
Why english wrecks your aim (and when to use it)
Side spin — ‘english’ — does three things beginners don’t expect:
- It curves the cue ball (squirt and swerve), so the ball doesn’t go where the cue points.
- It ‘throws’ the object ball — friction at contact pushes the object ball slightly off the geometric line.
- It moves the effective ghost ball position, meaning your aim reference is now wrong.
Which is why the honest advice is: don’t use it yet. Beginners apply english because it’s what good players appear to do — but good players use it sparingly, deliberately, and with an internal calibration built over years. Every shot you hit with unintentional side spin is a shot you can’t learn from, because you don’t know whether you missed the aim or the ball simply curved.
⚠️ Unintentional english is the silent aim-killer. Hitting even 2–3 mm off centre curves the cue ball and throws the object ball. Until your straight-line test comes back clean, treat every shot as a centre-ball hit and be suspicious of any miss you can’t explain.
When you do graduate to english, it’s for cue ball position — moving the white ball around the table for the next shot — not for potting. That’s the whole point of it, and it’s the layer above this one.
Aiming bank shots (a different problem entirely)
Everything above is for potting a ball directly. Banks — where the object ball rebounds off a cushion into a pocket — need their own reference, because ‘angle in equals angle out’ is only approximately true on a pool table.
The physics that trips people up: speed changes the angle. Hit a bank softly and the ball rebounds close to the mirror angle. Hit it hard and the cushion compresses, the ball skids, and it comes out shorter (a wider angle than geometry predicts). Add topspin and it runs longer; add backspin and it shortens further. Which is why two players can aim the identical bank and get completely different results.
| What you do | What happens to the rebound |
|---|---|
| Soft, centre ball | Closest to the mirror angle — the reference |
| Hard | Rebounds shorter (wider) — cushion compresses |
| Topspin (follow) | Runs longer off the cushion |
| Backspin (draw) | Comes back shorter |
| Running english | Widens the rebound and speeds it up |
| Reverse english | Shortens and kills the rebound |
The practical method for beginners: use the mirror system. Imagine the pocket reflected on the far side of the cushion — as if the rail were a mirror and there were a second table behind it — and aim at that phantom pocket. Then adjust for speed by feel, which is the part that takes practice. Start with soft banks until the mirror line is instinctive; the adjustments come once you have a baseline to adjust from.
Drills that build aim
| Drill | Setup | Target |
|---|---|---|
| Straight-line test | Cue ball, object ball, pocket in a line, 3ft apart | 10/10 before anything else |
| Chalk ghost | Chalk cube at the ghost ball position, various cuts | Builds visualisation fast |
| Progressive cuts | Same object ball, move cue ball to create ½, ¼, thin cuts | 5 in a row at each angle |
| Spot shot | Object ball on the foot spot, cue ball behind the head string | The classic — 10 attempts, track your score |
| The L drill | Balls along a rail; pot each in sequence | Tests aim under changing angles |
| Stop-shot ladder | Straight shot, cue ball must stop dead | Proves your stroke is centre and straight |
Fifteen minutes on the straight-line test and the spot shot, at the start of every session, is worth more than an evening of games. Do it for a month and your aim won’t just improve — you’ll finally know whether it was ever the problem. For a structured practice plan, see our improvement guide and solo practice routines.
Frequently asked questions
Do professionals use aiming systems?
Mixed. Many aim by accumulated feel — which is a system trained into instinct rather than the absence of one. Others use ghost ball or fractional references consciously. What they all share is a repeatable stroke and a settled vision centre.
Why do I always miss to the same side?
That’s the signature of a vision centre problem, not an aiming one. Your head is in a position where straight doesn’t look straight, so you’re compensating for a phantom error. Run the vision centre drill above.
Should I put the cue under my dominant eye?
Maybe — but don’t assume it. Some players’ vision centre is under the dominant eye, others’ is under the nose or elsewhere entirely. Test it rather than following a rule.
Why do I miss more when I use spin?
Because english curves the cue ball and throws the object ball, changing the aim you’d need. It’s not you — it’s physics. Master centre-ball first.
How long should I stay down on a shot?
Decide the aim standing, confirm it once when you get down, then shoot within a few seconds. Long freezing over the ball breeds doubt and tension — rhythm beats analysis.
Which aiming system is best for beginners?
Ghost ball, without much competition. It’s the most intuitive, it transfers to every shot, and the chalk drill makes it concrete in one session.