Badminton Doubles Rotation: Front-Back vs. Side-by-Side Explained


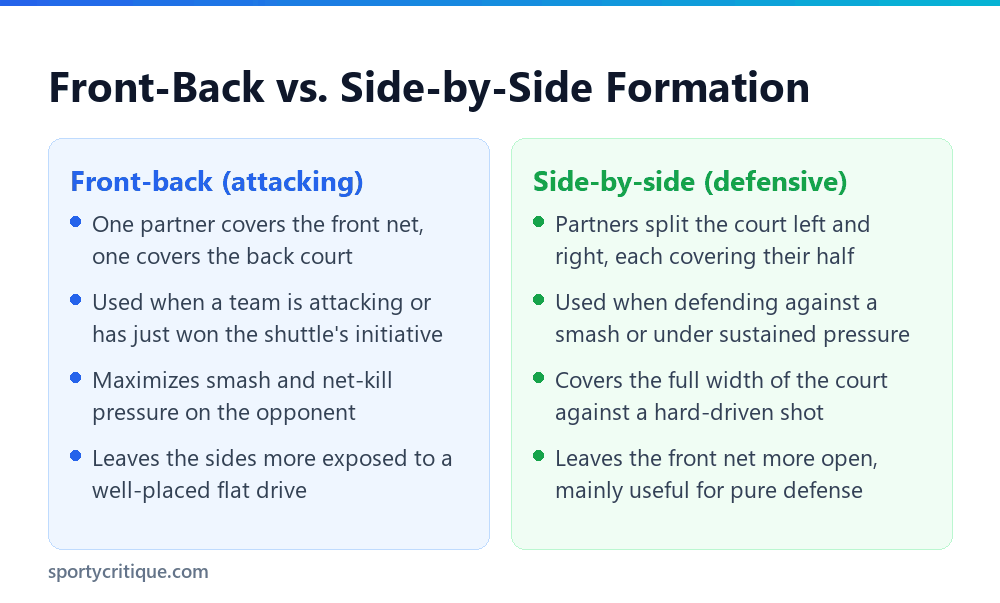
Badminton doubles rotation switches between two core formations depending on who controls the rally. Front-back, one partner at the net and one at the back court, is the attacking formation used when a team has won the shuttle’s initiative and wants to press an advantage with smashes and net kills. Side-by-side, partners splitting the court left and right, is the defensive formation used when facing a smash or sustained pressure, covering the court’s full width rather than its depth. Strong doubles teams shift between these formations fluidly within a single rally based on who currently has the attacking advantage.
New doubles players often default to one formation regardless of the rally’s actual state, either staying side-by-side out of habit or trying to force a front-back attack even while under defensive pressure. Understanding when and why to switch between these two formations is one of the clearest markers separating intermediate doubles players from more advanced, tactically aware ones.
- →Front-back formation maximizes attacking pressure when a team controls the rally
- →Side-by-side formation maximizes court coverage when defending against a smash
- →The correct formation depends on who currently has the attacking advantage, not fixed habit
- →Transitioning between formations happens continuously within a single rally, not just once
- →Communication between partners is what makes fluid formation switching actually work
Table of Contents
Front-Back Formation: Attacking Structure
In front-back formation, one partner positions near the net, ready to finish off a weak return with a net kill or intercept a loose shot, while the other partner covers the back court, generating power through smashes and clears from that deeper position. This division of labor lets each partner specialize in the specific skill their court position rewards.
This formation works specifically because it maximizes attacking pressure: the back player can smash with full power without worrying about covering the net simultaneously, while the front player stays primed to end the rally quickly on any shuttle that doesn’t clear the net cleanly. The tradeoff is real vulnerability to the sides, since neither player is specifically positioned to cover a wide, flat drive shot aimed at the gap between them.
Side-by-Side Formation: Defensive Structure
In side-by-side formation, partners split the court into left and right halves, each responsible for defending their own side against smashes and drives, a setup that maximizes coverage across the court’s width, exactly what’s needed when facing an opponent’s smash attack rather than trying to press an attack of the team’s own.
⚠️ Watch out: Staying in side-by-side formation after regaining the attacking advantage, rather than transitioning to front-back, wastes an attacking opportunity, since side-by-side doesn’t concentrate net pressure the way front-back does. Formation should follow the rally’s actual state, not become a fixed habit regardless of who currently controls the point.
Reading the Rally to Choose the Right Formation
The team that just won control of the shuttle, typically by forcing a weak, high return from the opponent, should transition toward front-back formation to press that advantage with smashes and net pressure. The team facing that smash or under defensive pressure should be in side-by-side formation specifically to cover the width a hard smash or drive threatens.
This means both teams on the court are typically shifting formation simultaneously and continuously throughout a single rally, not choosing one formation at the rally’s start and holding it throughout. A rally with multiple momentum swings, the attack changing hands several times, requires both teams to transition formation multiple times within that same single point.
💡 Pro tip: Practicing formation transitions specifically, drilling the shift from side-by-side to front-back the instant a partner wins the attack, and back again the instant that attack is lost, builds the reflexive speed this constant switching actually requires in a live match.
Why Communication Makes Formation Switching Work
Fluid formation switching depends heavily on both partners recognizing the rally’s state simultaneously and moving together, since one partner shifting to front-back while the other remains side-by-side creates gaps and coverage confusion that an opponent can exploit immediately.
Experienced doubles pairs develop an almost automatic, shared read of when to transition, built through extensive practice together rather than verbal communication during every single point, though verbal calls, especially in ambiguous or fast-developing situations, remain a valuable tool newer pairs should use more deliberately while this shared read is still developing.
Common Formation Mistakes
- ✓Transition to front-back the moment your team wins the attacking advantage
- ✓Shift to side-by-side the moment you’re facing a smash or defensive pressure
- ✓Move to the correct formation together with your partner, not independently
- ✓Communicate verbally during ambiguous or fast-developing rally situations
- ✕Staying in one formation out of habit regardless of the rally’s actual state
- ✕Holding front-back formation while facing a smash, leaving the sides exposed
- ✕Shifting formation independently while a partner remains in the previous one
- ✕Assuming shared formation awareness will develop without dedicated practice together
Rotational Movement Within Front-Back
Within front-back formation itself, partners often rotate the front and back roles during extended rallies rather than one player being permanently fixed at the net and the other permanently at the back. A player who moves forward to retrieve a net shot may rotate into the front role temporarily while their partner rotates back to cover the deeper court.
This internal rotation adds another layer of coordination beyond the broader front-back versus side-by-side decision, and pairs who move together fluidly through these smaller internal rotations, not just the larger formation switches, tend to leave fewer exploitable gaps for opponents to target during longer, more complex rallies.
Formation Considerations in Mixed Doubles
Mixed doubles commonly uses a variation where the female player takes the front net position more consistently, given typical strengths in quick net play and reflexes, while the male player covers the back court for power shots, though this isn’t a rigid rule and skilled mixed pairs adjust based on each individual player’s actual strengths rather than gender alone.
The same front-back versus side-by-side switching logic still applies in mixed doubles regardless of this common front-net tendency; the team still needs to shift toward side-by-side defensively when facing pressure, just with the specific front and back roles sometimes assigned somewhat more consistently than in same-gender doubles pairs.
Formation During the Serve
At the moment of serving, doubles teams typically use a modified front-back-like setup regardless of the broader attacking or defensive state of the match, with the server positioned appropriately for their serve type and their partner positioned to cover the most likely return areas based on where the serve is being placed.
This serving formation transitions immediately into either front-back or side-by-side within the first shot or two of the actual rally, depending on how the return comes back and which team ends up controlling the exchange from that point forward. The serve itself is a brief, distinct phase rather than a third ongoing formation type that persists throughout a rally.
The Diagonal or Transitional Formation
Between pure front-back and pure side-by-side, many pairs briefly pass through an intermediate, diagonal-ish positioning as they physically move from one formation to the other, since instant, teleport-like transitions aren’t physically possible and there’s always a brief window where players are still repositioning mid-transition.
Minimizing the time spent in this transitional, less-organized state matters tactically, since an opponent who recognizes a team mid-transition and targets that exact moment with a well-placed shot can exploit the temporary gap before the new formation is fully established. Faster, more practiced transitions shrink this vulnerable window.
Reading and Exploiting an Opponent’s Formation
Just as a team manages its own formation, watching an opponent’s current formation reveals tactical opportunities: a team caught in front-back formation when they shouldn’t be, perhaps slow to transition after losing the attack, is vulnerable to a flat, wide drive aimed at the gap between their front and back players.
Deliberately targeting an opponent’s slow or incomplete formation transition, rather than always hitting the most powerful shot available regardless of opponent positioning, is a specific tactical skill that separates players who understand doubles strategy deeply from those focused purely on their own shot execution without reading the opposing team’s court coverage.
Drilling Formation Transitions in Practice
Structured drills where a coach or feeding partner deliberately alternates between feeding a smash, requiring a side-by-side response, and a weak, liftable shot, requiring a shift to front-back, build the reflexive recognition and movement speed that live match play alone doesn’t always develop efficiently, since live rallies don’t offer the same controlled, repeatable practice of this specific skill.
Pairs who have practiced together extensively often develop formation-switching timing that looks almost telepathic to an outside observer, but this appearance of natural chemistry is nearly always the product of dedicated, repetitive practice specifically targeting this skill rather than an innate ability some pairs simply have and others don’t.
Specific Errors That Break Down Formation Coordination
A common breakdown happens when one partner reads the rally’s state correctly and transitions appropriately while the other partner, focused purely on their own shot or positioning, fails to notice the shift and stays in the previous formation, creating exactly the kind of coverage gap opponents look to exploit.
Another frequent error is over-committing to a formation transition before the rally’s state has actually changed, moving toward front-back prematurely based on an anticipated rather than actual weak return, which can leave a team caught mid-transition if the opponent’s shot turns out to be stronger than expected. Reacting to what actually happens, rather than what’s merely anticipated, keeps transitions properly timed to real rally developments.
Frequently Asked Questions
Which formation should my doubles team use most of the time?
Neither exclusively. Strong doubles teams switch fluidly between front-back and side-by-side within a single rally based on which team currently controls the attack.
Why does side-by-side formation leave the net open?
Because both partners are positioned to cover width rather than depth, which is the correct tradeoff when defending against a smash but leaves the net less protected during that specific formation.
How do I know when to switch from side-by-side to front-back?
The moment your team regains the attacking advantage, typically by forcing a weak or high return from your opponents, is the signal to transition toward front-back to press that advantage.
Is front-back always the better, more aggressive choice?
Not always. It’s the correct choice specifically when your team controls the attack. Using it while facing a smash leaves the sides exposed and is a tactical mistake, not simply a more aggressive one.
Do doubles partners rotate front and back roles within front-back formation?
Often, yes, especially during longer rallies. A player who moves forward to retrieve a shot may temporarily take the front role while their partner rotates back.
Does mixed doubles use different formation rules?
The same front-back and side-by-side switching logic applies, though mixed pairs commonly assign the female player to the front net position more consistently, based on typical strengths rather than a strict rule.
Mastering formation switching takes dedicated practice with a consistent partner far more than it takes any individual shot skill, since the timing and shared awareness this tactic depends on builds specifically through repetition together, not through solo practice or general athleticism alone.
None of this replaces raw shot quality or physical conditioning, but for two pairs of otherwise similar skill, the team with sharper, faster, better-communicated formation transitions consistently wins more of the close, extended rallies that decide tight matches, the exact moments where a fraction of a second of hesitation on either side ends up deciding the point.
As an Amazon Associate, we earn from qualifying purchases through links on this page.