
How to Build an Outdoor Shuffleboard Court

A regulation outdoor shuffleboard court is 39 ft by 6 ft, but a backyard court works fine at 25–30 ft as long as you keep the scoring triangle proportional. Build it as a reinforced concrete slab about 4 in thick over a compacted stone base, steel-trowel the surface smooth, cure it properly for a week, then mark the triangles and seal it. If you already have a flat patio or driveway, mark it out and play there first — it costs almost nothing and tells you whether you’ll use it.
Of all the shuffleboard projects you could take on, this is the one that actually rewards DIY. Unlike a shuffleboard table, where near-perfect flatness is a machining problem, a court is concrete and paint — a job with forgiving tolerances that a competent DIYer can genuinely do well.
It’s also permanent, so it pays to plan properly. Below is the full build, plus the much cheaper route worth trying first.
- →Regulation is 39 x 6 ft, but 25–30 ft plays perfectly well in a garden.
- →The base matters more than the slab — compacted hardcore prevents cracking.
- →Steel-trowel the surface smooth. Rough concrete destroys the glide.
- →Cure it slowly under cover for a week; rushed curing causes cracks and dust.
- →Mark the triangle proportionally if your court is shorter than regulation.
- →Try marking out an existing patio first — it’s free and it tests the idea.
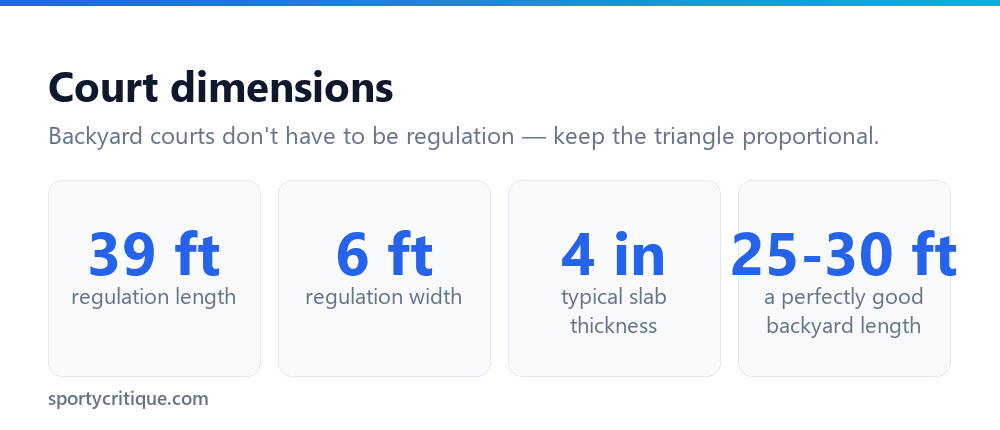
Table of Contents
Start cheap: test the idea first

Before pouring concrete, consider whether you already have a surface. A flat patio, a driveway, or a garage floor can be marked out with chalk or temporary tape in an hour, and you can play a full game on it that afternoon.
This is worth doing even if you fully intend to build properly, for two reasons. It tells you whether your household actually plays shuffleboard often enough to justify a permanent slab — plenty of enthusiastically-built garden games go unused within a year. And it lets you experiment with length and orientation before committing, which is far easier than discovering after the pour that the court runs into afternoon sun or a washing line.
If the existing surface is sound concrete, dedicated outdoor court paint over it is a genuine middle option: a real playing surface with proper markings, at a fraction of the cost and effort of a new slab.
Mark out your patio with chalk first. An afternoon of that tells you more about whether to build a court than any amount of planning.
Siting the court
Three considerations decide where the court goes, and getting them wrong is expensive once concrete is involved.
Trees are the main enemy. Leaves, seeds, sap, and bird droppings all land on a horizontal surface, and a single leaf will stop a disc dead or deflect it. A court under or beside a tree needs sweeping before every game, which reliably means it stops getting used. Site it in the open if you possibly can.
Drainage and ground conditions. The slab needs to sit on stable, well-drained ground. Avoid low spots where water collects, and check what the ground does in winter — a court built over soft or waterlogged soil will settle unevenly and crack, however good the concrete is.
Space around it. Allow three to four feet of clear walking space on all sides. Players walk the full length of the court repeatedly to retrieve discs and score frames, and a court squeezed against a fence is awkward to use. Add the surrounding space to your footprint calculation before deciding the court will fit.
📊 Note: Sun matters more than people expect. A court running east–west means one player squinting into a low sun for the whole game, every evening. If you have the choice, orient it north–south.
The build
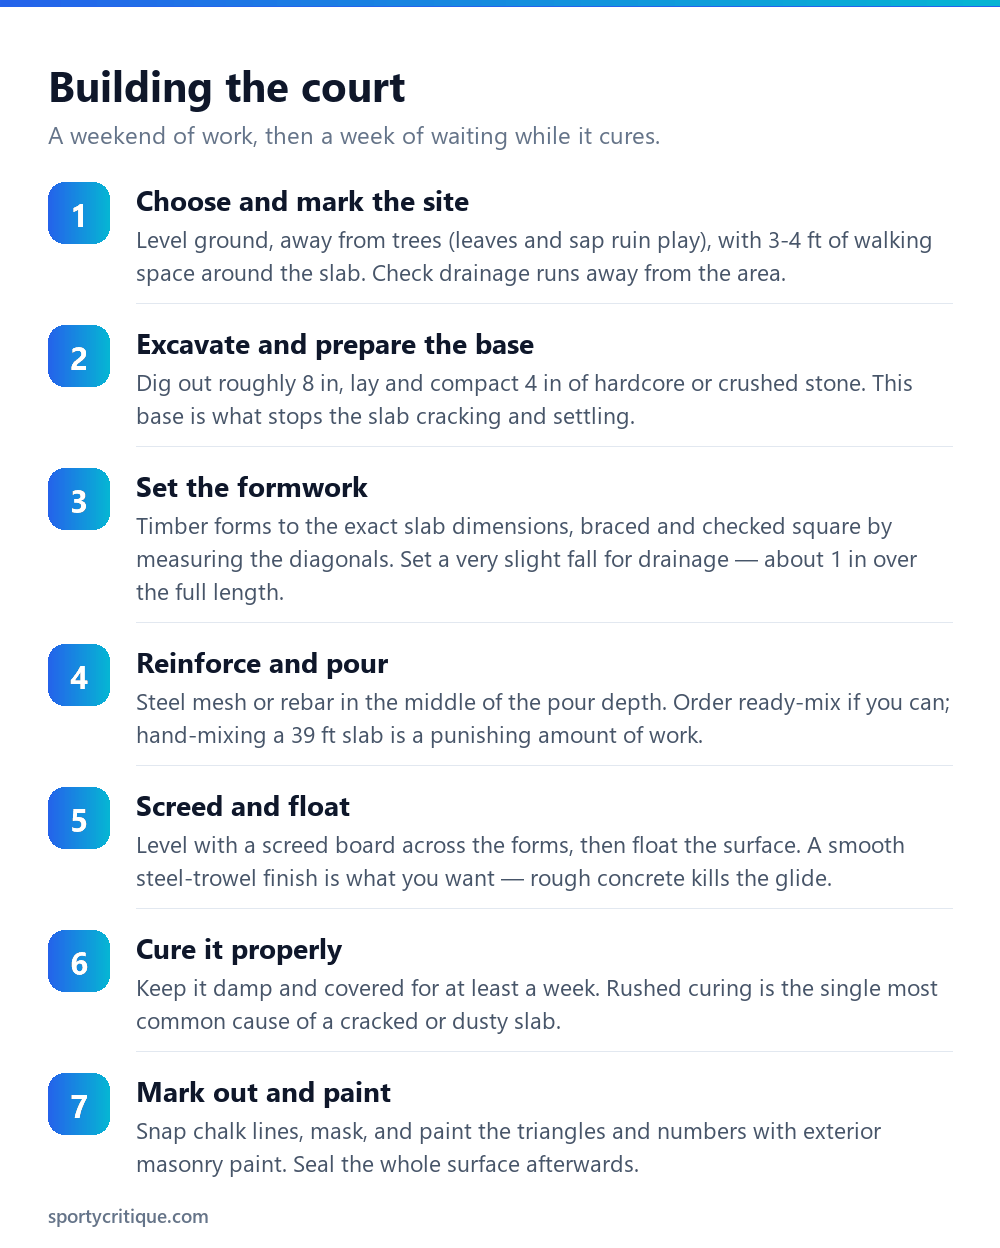
The base is more important than the concrete. Excavate around eight inches, then lay and compact four inches of hardcore or crushed stone. This is what spreads the load and stops the slab settling unevenly, and it’s the step most likely to be skimped. Compact it properly — a hired plate compactor is worth the money over an afternoon with a hand tamper.
Formwork square and slightly falling. Timber forms set to your exact dimensions, braced so they don’t bow under the weight of wet concrete. Check square by measuring both diagonals rather than trusting the corners. Set a very slight fall — around an inch over the full length — so rainwater runs off rather than pooling; that much slope is imperceptible in play.
Reinforce, then pour. Steel mesh or rebar sitting in the middle of the pour depth, held up on chairs rather than laid on the base. For a court of any size, order ready-mix concrete: hand-mixing enough for a 39-foot slab is a genuinely punishing amount of work, and a slab poured in stages over hours will have cold joints that crack along the seam.
Screed and trowel. Level it with a straight board dragged across the forms, then float and finally steel-trowel the surface. The steel trowel is what produces the dense, smooth finish that makes discs glide — a broom or float finish, which is what you’d want on a patio for grip, is exactly wrong here.
⚠️ Watch out: Cure it slowly. Keep the slab damp and covered with plastic sheeting for at least a week — longer in hot weather. Concrete that dries too fast is weaker, dustier, and far more likely to crack. This is the least visible step and the one that most determines how long the court lasts.
Marking out the scoring triangle

Each end of the court carries a triangle pointing back toward the shooter. The tip — deepest and hardest to reach — is worth 10. Behind it sit two zones worth 8 each, then two worth 7. Directly behind the whole triangle is a rectangle marked −10: the kitchen, which subtracts ten points from anyone who overshoots into it.
If you’ve built shorter than regulation, scale the triangle proportionally rather than copying regulation measurements onto a short court — otherwise the scoring area occupies too much of the playing length and the game loses its subtlety. Keep the ratio of triangle length to overall court length roughly the same as the regulation layout.
Snap chalk lines, mask carefully, and use exterior masonry paint. Two thin coats beat one thick one, and pulling the tape while the second coat is still slightly tacky gives the cleanest edges. Once the paint has fully cured, seal the entire surface with a concrete sealer — it protects the markings, resists staining, and makes the surface easier to sweep clean.
For the full rules of what you’ve just built, our outdoor shuffleboard guide covers gameplay, and the scoring guide explains why a disc touching a line scores nothing at all on a court — the opposite of the table game.
Cost, tools, and time
Worth planning properly before you start, because a half-finished concrete pour is not a project you can pause.
On timing: the excavation and base preparation is a full day, the pour and finishing is another (and it’s time-critical once the concrete arrives, so have your tools and a helper ready before the truck does). Then a week of curing, a few days of drying, and half a day marking out and painting. Two to three weeks from start to first game, most of it waiting.
The single most useful piece of planning advice: have a second person confirmed for pour day. Screeding and trowelling a 39-foot slab alone, against a curing clock, is how courts end up with a wavy surface that no amount of powder will fix.
Playing surface and upkeep
A finished concrete court isn’t quite ready to play on. Like a shuffleboard table, an outdoor court is dusted with a fine powder — usually sold as shuffleboard sand or silicone beads — that reduces friction and lets the discs glide properly. Bare concrete, however smooth, is too grabby.
Spread it sparingly and sweep it evenly down the court. You’ll reapply regularly, since wind and rain remove it, and outdoor courts generally need more frequent attention than indoor tables for exactly that reason.
Ongoing maintenance is mostly sweeping. Keep leaves, grit, and debris off — they stop discs dead and scratch the sealed surface. Reseal the concrete every few years, and expect to touch up the painted markings periodically, since they take the most wear from disc impacts and sweeping.
💡 Pro tip: Keep a stiff broom and a tub of powder in a weatherproof box beside the court. Maintenance that requires fetching supplies from a shed at the other end of the garden is maintenance that doesn’t happen, and an unswept court quickly becomes an unused one.
Frequently asked questions
What size should a backyard shuffleboard court be?
Regulation is 39 x 6 ft, but 25–30 ft plays perfectly well and fits far more gardens. Keep the scoring triangle proportional to the court length rather than using regulation triangle dimensions on a short court. Allow 3–4 ft of walking space around the slab on top of the playing area.
Can I build a shuffleboard court on an existing patio?
Yes, and it’s the cheapest way to start. If the concrete is sound and reasonably smooth, mark it out with chalk to test it, then use outdoor court paint for something permanent. It won’t glide quite like a purpose-built steel-trowelled slab, but it’s a genuine playing surface for a fraction of the cost.
How thick should the concrete slab be?
About 4 inches, reinforced with steel mesh or rebar sitting in the middle of the depth, over 4 inches of compacted hardcore. The compacted base matters as much as the slab itself — it’s what stops uneven settling, which is the usual cause of cracks.
What surface finish do I need?
Steel-trowelled smooth. This is the opposite of a normal patio finish: a broom or float finish gives grip, which is exactly what you don’t want. The smoother and denser the surface, the better the discs glide once powder is applied.
Do outdoor shuffleboard courts need wax or powder?
Yes — a fine powder, usually sold as shuffleboard sand or silicone beads, spread sparingly across the surface. Bare concrete is too grabby even when smooth. Outdoor courts need reapplying more often than indoor tables because wind and rain remove it.
How long before I can play on a new court?
Keep it damp and covered for at least a week while it cures, then let it dry fully before painting. Realistically you’re looking at two to three weeks from pour to first game, most of which is waiting. Rushing the cure is the most common cause of a slab that cracks or dusts within a year.
- →How to play outdoor shuffleboard — rules for your new court
- →Shuffleboard scoring — the triangle, the kitchen, and line rules
- →Strategy and how to win — shot selection on a court
- →Building a shuffleboard table — the indoor project
- →How to play shuffleboard — both versions compared