How to Build a Shuffleboard Table (And Whether You Should)


Building a shuffleboard table is a serious woodworking project, and the difficulty is concentrated in one place: the playfield must be dead flat. Edge-glue kiln-dried hardwood into a slab, flatten it with a thickness planer or router sled (hand-sanding won’t do it), build an overbuilt cradle to carry it, then finish with multiple thin coats of polyurethane. Build short — 9 to 12 feet — because flatness gets exponentially harder with length. And be honest with yourself: for most people, a used table is the better answer.
Let’s start with the advice you won’t get from most build guides: this is the one games-room project where buying used genuinely beats building, for the majority of people who ask about it.
That’s not gatekeeping. It’s that a shuffleboard playfield has one demanding requirement — near-perfect flatness over a long span — and meeting it needs either specialist machinery or a lot of skill. Meanwhile, second-hand tables are abundant and cheap because they’re heavy and nobody wants to move them. Our table guide covers what to look for.
If you’re still building — because you want a custom size, because you have the tools, or because the project is the point — the rest of this is how to do it properly.
- →Flatness is the entire project. Everything else is ordinary woodworking.
- →Build short. A 9–12 ft table is achievable; 22 ft realistically isn’t without a wide-belt sander.
- →Acclimatise your timber in the room for weeks before cutting.
- →Overbuild the cradle — any sag in the frame transfers into the playing surface.
- →Multiple thin polyurethane coats, not one thick one. That’s where the slide comes from.
- →Price your materials first. They often approach the cost of a used table.
Table of Contents
DIY Shuffleboard Construction: Lumber Selection & Hardware Matrix
| Component Assembly | Recommended Material & Grade | Finished Dimensions | Joinery Standard | Structural Function |
|---|---|---|---|---|
| Butcher Block Playfield | Edge-Glued Hard Rock Maple / White Oak | 3.0″ T × 20.0″ W × 12’–16′ L | Staggered end joints, Titebond III waterproof glue | Dense, stable hardwood core resisting moisture warp |
| Polymeric Polymer Pour Top | Two-Part Self-Leveling Epoxy Resin | 0.25″ Continuous Clear Coat | Torched to eliminate micro-bubbles during cure | Glass-flat impervious friction surface (lifetime wear) |
| Climatic Adjuster System | 1/2″ Zinc-Plated All-Thread Steel Rods | 4 to 6 adjusters spaced every 24″ to 30″ | Angle iron brackets lag-bolted to underside | Calibrates concave/convex crown adjustments |
| Cabinet Cradle & Gutters | 1″ Furniture Oak Plywood + Solid Trim | 28.0″ W × 8.0″ D Cradle Gutters | Dadoed side frames lined with marine carpet | Catches sliding weights and spent powder beads |
| Heavy Foundation Pedestals | 4×4 Solid Hardwood Legs w/ Levelers | 3.5″ × 3.5″ with 3/8″ Threaded Footers | Mortise and tenon or heavy steel leg gussets | Ensures rigid foundation with independent leveling |
Build or buy, honestly
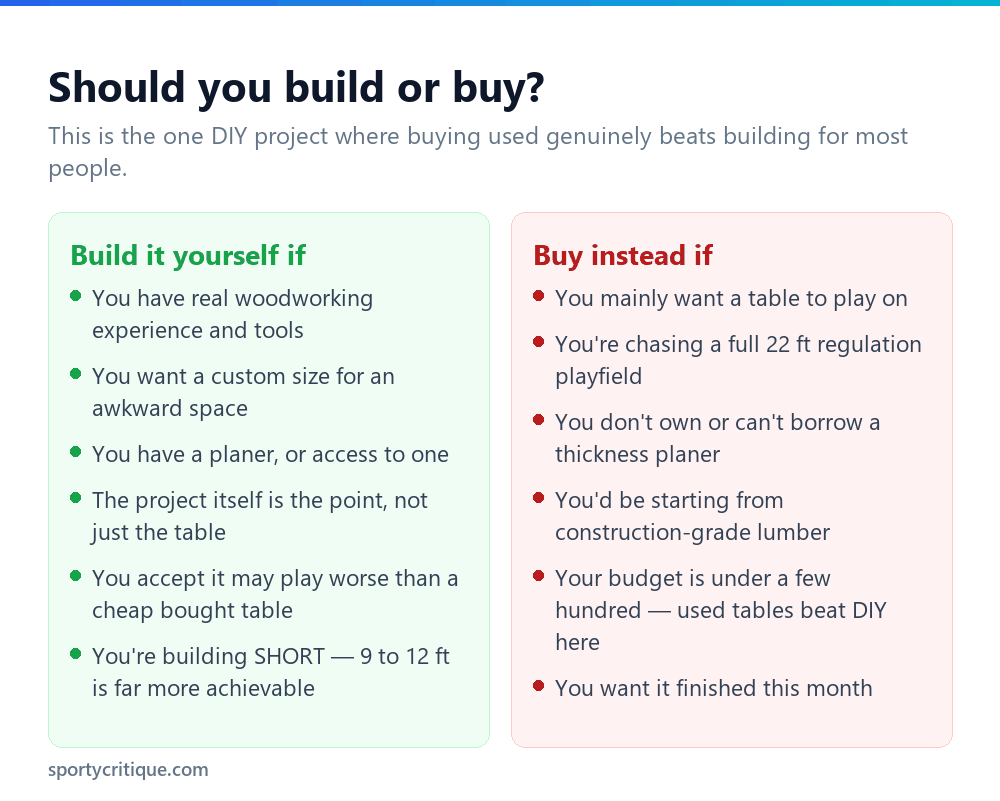
The economics are worth checking before you commit. Kiln-dried hard maple in the quantities needed for even a 12-foot playfield is not cheap, and once you add the cradle timber, polyurethane, weights, and powder, the materials bill on a decent build often lands close to what a solid used table costs.
The difference is that the used table is already flat, already finished, and already playable, while yours needs weeks of work and might not be flat at the end. If your goal is to play shuffleboard, that comparison is uncomfortable but real.
The good reasons to build anyway: you want a size nobody sells (a 10-foot table for a specific alcove, say), you enjoy woodworking as an end in itself, or you have workshop access that makes the hard step easy. Those are all legitimate — just go in clear-eyed rather than expecting to save money.
Second-hand shuffleboard tables are cheap because they’re heavy and nobody wants to move them. That’s the DIY builder’s real competition.
Why flatness is so hard
It’s worth understanding the specific problem, because it determines every decision that follows.
A shuffleboard weight glides on a film of silicone beads with very little friction. That means it’s extraordinarily sensitive to the surface underneath — a dip or rise of even a millimetre over a few feet will visibly deflect a weight’s path. On a 22-foot table, keeping the whole span within that tolerance is a machining problem, not a sanding problem.
Wood also moves. A glued-up hardwood slab responds to humidity by cupping and bowing, which is why commercial tables include climate adjusters — tensioning bolts underneath that let the owner pull the playfield back into flat as it moves through the seasons. If you’re building a table of any real length, plan to include something equivalent; without it, a slab that’s flat in July may not be in January.
This is also why length is the single biggest difficulty multiplier. A 9-foot playfield can be flattened with a router sled and patience. A 22-foot one realistically needs a commercial wide-belt sander. If this is your first build, halving the length more than halves the difficulty.
Timber and preparation
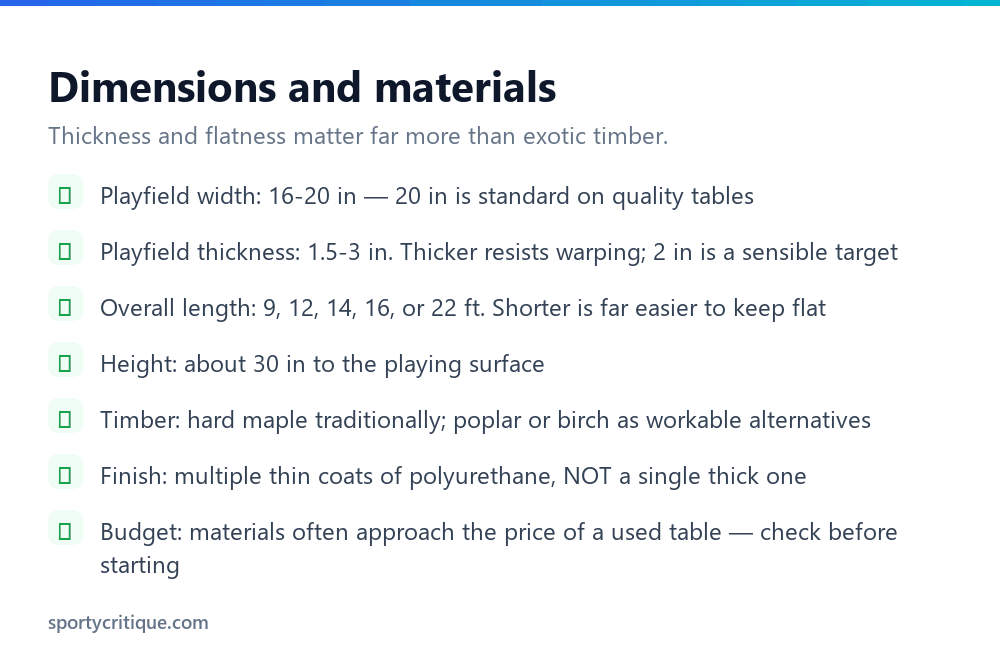
Hard maple is the traditional choice for good reasons: it’s dense, close-grained, wears well, and takes a fine finish. Poplar and birch are cheaper and workable, though softer surfaces dent more easily under dropped weights. Avoid construction-grade softwoods entirely — they’re too soft and too prone to movement.
Kiln-dried, and acclimatised. This is the step people skip and regret. Bring your timber into the room where the table will live and leave it there for at least two weeks, ideally longer, stacked with spacers so air circulates. Wood that hasn’t equalised with its final environment will move after you’ve built with it, and a playfield that cups two months after completion is a rebuild rather than a repair.
Thickness matters more than species. Aim for a playfield around two inches thick. Thicker slabs resist cupping better and feel more solid under a weight; the cheap tables our buying guide warns about are thin, which is exactly why they warp.
When you glue up, alternate the grain direction of adjacent boards — end grain arching up, then down, then up. This makes any cupping tendency fight itself across the width rather than compounding into one big curve. Clamp evenly across the whole width, use enough clamps that the joints close without gaps, and leave it overnight before removing pressure.
Flattening: the make-or-break step
You have three realistic options and one that doesn’t work.
A thickness planer is the cleanest route if your playfield fits its width, which for a 20-inch playfield means an unusually wide machine. Some builders glue up in two narrower halves, plane each, then join them — which works but puts a joint down the middle of the playing surface, and that joint had better be perfect.
A router sled is the most accessible method: rails either side of the slab, a router riding a carriage across them, taking light passes until the whole surface is level. It’s slow and produces a lot of dust, and it’s genuinely capable of flattening a slab that no hand tool could touch. For a home build this is usually the answer.
Commercial wide-belt sanding. Many timber yards and cabinet shops will run a slab through their machine for a fee. For anything over about 12 feet, this is realistically the only route, and it’s worth phoning around before you commit to a length — find out what your local shop can handle, then design to that.
⚠️ Watch out: Hand-sanding will not flatten a playfield. It will smooth it, which is different — a hand-sanded surface follows whatever waviness is already there, and on a shuffleboard table that waviness is exactly the problem. Every build that ends in disappointment failed at this step.
The cradle, gutters, and finish
The cradle is the frame and legs. Overbuild it: any sag or twist in the structure transfers straight into the playing surface, undoing the flattening work. Use substantial timber, brace it properly, and include adjustable feet so you can level the finished table in place — an unlevel table sends every weight drifting, as our playing guide explains.
If you’re building anything over 12 feet, include some form of climate adjuster: a steel channel or threaded rods running beneath the playfield that can be tensioned to pull out seasonal bowing. Retrofitting these is far harder than building them in.
The gutters down each side catch weights that slide off. Consistent depth matters more than matching any particular specification — a gutter that varies in depth will bounce weights back onto the playfield unpredictably. Rout them before finishing, and ease the edges so weights don’t chip the playfield lip on the way in.
The finish is where the slide comes from. Sand progressively to a fine grit, then apply multiple thin coats of polyurethane, sanding lightly between coats and removing all dust each time. Thin coats build a harder, more even surface than one thick pour, which tends to sag and leave ripples that are invisible until a weight travels across them. Expect five or more coats, and don’t rush the drying.
💡 Pro tip: Test the surface as you build it up. After a few coats, slide a weight down the table with some powder on it. You’ll feel dead spots and ripples long before you can see them, and it’s far easier to correct at coat four than after the table is finished and marked out.
Marking out and first wax
Mark the foul lines and scoring zones once the finish is fully cured. The standard layout has scoring bands numbered 1, 2 and 3 at each end, with foul lines set back from them — scale the proportions to your table’s length rather than copying regulation measurements onto a short table, or the zones will be crammed at the ends.
Apply the lines under the final coat if you can, so they’re protected by finish rather than sitting on top of it where weights will wear them away. Thin painted lines or fine tape sealed beneath a topcoat both work.
Then powder it, test, and adjust. A new table often plays fast because the finish is pristine, so start with a slower powder grade than you might expect — and remember that short tables generally want slower powder than long ones. Our cleaning and waxing guide covers the speed grades in detail.
A more achievable alternative
If the full build looks daunting, two smaller projects deliver most of the enjoyment for a fraction of the difficulty.
A tabletop shuffleboard — a short playfield, perhaps 6 to 9 feet, built to sit on an existing table or a pair of trestles — removes the cradle from the project entirely and shortens the span you need to keep flat. It plays a faster, cruder game, but it’s a genuine build that a competent DIYer can finish in a couple of weekends.
Or build the other shuffleboard. An outdoor shuffleboard court is a concrete-and-paint project rather than a fine woodworking one, and the tolerances are far more forgiving. If you want a shuffleboard you built yourself and you have outdoor space, it’s the easier and more reliably successful route by some distance.
Frequently asked questions
Is it cheaper to build a shuffleboard table than buy one?
Usually not, once you price kiln-dried hardwood in the quantities needed. Materials for a decent build often approach the cost of a solid used table — and used tables are already flat, finished, and playable. Build for the custom size or the enjoyment, not to save money.
What wood should I use for a shuffleboard table?
Hard maple traditionally — dense, close-grained, and it takes a fine finish. Poplar and birch work and cost less, though they dent more easily. Avoid construction softwoods entirely. Thickness (aim for around 2 inches) and proper kiln-drying matter more than the species you choose.
How flat does a shuffleboard playfield need to be?
Flat enough that a weight gliding on silicone beads doesn’t deflect — in practice, within about a millimetre across the span. That’s a machining tolerance rather than a sanding one, which is why a router sled, thickness planer, or commercial wide-belt sander is essential and hand-sanding isn’t sufficient.
Can I build a full 22-foot regulation table?
Realistically only with access to commercial flattening equipment, because keeping that span within tolerance by hand is extremely difficult. Most successful home builds are 9 to 14 feet. If you want regulation length, phone local cabinet shops about wide-belt sanding before you buy any timber.
What finish should I use on the playing surface?
Multiple thin coats of polyurethane, sanded lightly between coats. Thin coats build a harder and more even surface than one thick application, which tends to sag and leave ripples you won’t see until a weight crosses them. Expect five or more coats and let each cure properly.
Do I need climate adjusters?
On anything over about 12 feet, yes — hardwood moves with humidity, and tensioning bolts beneath the playfield are how commercial tables correct seasonal bowing. Build them in from the start; retrofitting is considerably harder than including them during construction.
- →Build an outdoor shuffleboard court — the more achievable DIY project
- →Cleaning and waxing — powder speeds for your new table
- →How to play table shuffleboard — rules and scoring
- →Best shuffleboard tables — if you decide to buy instead
- →How to play shuffleboard — both versions of the game